How to Make Sticky Ads with jQuery Effortlessly

Sticky Ads are those that follows you when you are scrolling down a page. They bring great view-ability to the advertisement placed on the site, as visitors are tend to click on the sticky ads quite often.
These types of ads can be placed anywhere, like on sidebars or inside columns, on the website where they hold on their position regardless of scrolling.
In this tutorial I will explain you to effortlessly develop this Sticky Ads feature in your website.
Sticky Ads work on every website – HTML, WordPress, PHP or any other.
How Sticky Ads Work
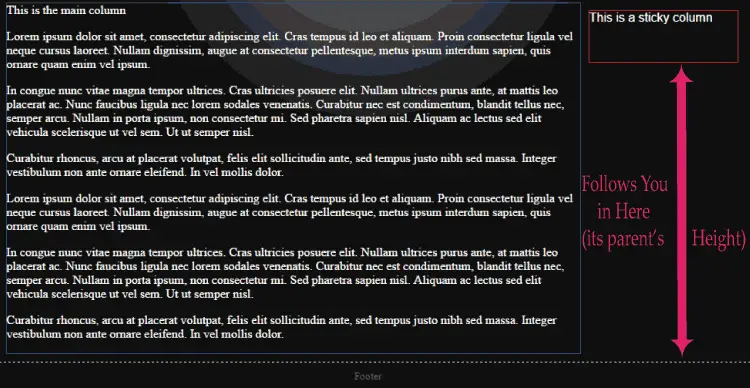
The concept here is to make a HTML div as sticky and inside it place the advertisements. This way the advertisements will become sticky.
This sticky div is always stuck inside it’s parent and never leaves it, even if you scroll down the page. It follows you until you scroll down to the bottom of its parent.

For implementing this feature I will use Sticky Kit.
Sticky Kit
Sticky Kit is a jQuery plugin for creating sticky elements in the website. It allows you to apply stickiness to any HTML element (div, span, etc).
The Sticky Kit has an in-built function called stick_in_parent().
This function checks it’s (sticky element’s), parent’s height and then applies the stickiness for this entire height.
You can download the Sticky Kit from here.
Follow the below 4 steps to make any div sticky by using this plugin.
Step 1 Make the HTML structure of your web page like below:<div class="content">
<div class="sidebar">
This is a sticky column
</div>
<div class="main">
This is the main column
</div>
</div>
Step 2: Put the JS file called jquery.sticky-kit.js in the website folder.
Step 3: Add reference to jQuery and sticky kit JS on the page head.<script src="https://ajax.googleapis.com/ajax/libs/jquery/3.1.0/jquery.min.js"></script>
<script src="sticky-kit.js.download"></script>
<script type="text/javascript">
    jQuery(document).ready(function ($) {
        $(".sidebar").stick_in_parent();
    });
</script>
Note – Here I applied stickiness to the ‘div’ that has the CSS class called sidebar.
If multiple elements have the sidebar class then stickiness is applied to all of them.
Sticky Div Implementation Issues and Solutions
Sometimes you may face problems in implementing Sticky Kit on your website due to the HTML structure of your web page. Therefore you have to apply a bit of hack to make it work.
Let’s discuss some of these situations.
1. You Don’t Want to Change HTML Structure of your Web Page
Stickiness is applied to the height of the element’s parent, so if your web page HTML structure is creating problems while applying the Sticky Kit, then you can just use a bit of jQuery to create a hack.
Take for example, you want to apply stickiness not based on height of the parent but on the height of some other column. Then you can do this with jQuery code given below:
$(".sidebarParent").height($(".otherColumn").height());
$(".sidebar").stick_in_parent();
Here .sidebarParent is the parent of .sidebar.
This will save your time as you don’t have change the web page HTML structure.
2. Apply Stickiness only on Tablets and Larger Screens
Apply jQuery’s if statement on the window width to do this trick.
if($(window).width() >= 768){
     $(".sidebar").stick_in_parent();
}
Apply Stickiness after a Few Seconds Delay
If the parent column is showing some stuffs that are coming from other website, either through jQuery AJAX method or some other way.
An example of this thing would be the DISQUS comment that loads after a few second.
These comments will increase the height of the parent element after a few seconds. So the Sticky div would not stick for the whole height of it’s parent.
To solve this you can call the stick_in_parent() function after a few seconds delay.
jQuery(document).ready(function($){
   setInterval(function(){
    stickyAds();
   }, 3000);

   function stickyAds(){
    $(".sidebar").stick_in_parent();
   }
});
Note – I used the setInterval function to call the function after 3 seconds delay. By this time I can hope that the AJAX data is received and shown on the div.
Sticky Ads Video
That’s all, this completes the Sticky Ads implementation. The download link is below:
Not just ads, use the Sticky Ads feature to make any column or multiple columns sticky. Sticky Ads will give you good revenues while showing advertisements in your website.
I hope this tutorial will helps you so please share this tutorial by using the share buttons given below.
1. jQuery Validation of Email, Number, Checkbox and More
2. Check Uncheck All checkbox with jQuery
3. Creating jQuery Expand Collapse Panels In HTML


 Welcome to YogiHosting - A Programming Tutorial Website. It is used by millions of people around the world to learn and explore about ASP.NET Core, Blazor, jQuery, JavaScript, Docker, Kubernetes and other topics.