How to Install Bootstrap Package in ASP.NET Core Application in Visual Studio
Visual Studio has many tools available that you can use to install client-side packages such as Bootstrap & JQuery. Here in this tutorial I will discuss 2 popular ones which are:
- LibMan (LibraryManager)
- Bower
I will also give you an example of this installation process. So make sure to read this tutorial on one go.
How to Install Bootstrap in ASP.NET Core Using LibMan
When you are using Visual Studio 2022 then LibMan is a perfect choice to install Bootstrap Package in your application. Just follow these quick steps:
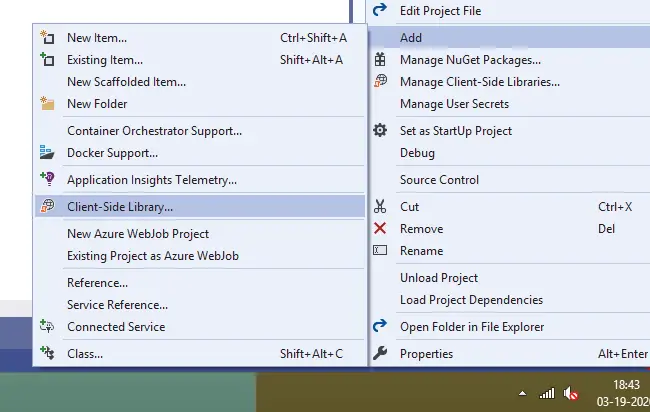
- Step #1: In your ‘Solution Explorer’ window, right click on the Project Name and then select Add > Client-Side Library. It will open ‘Add Client-Side Library’ window.
- Step #2: Next, in the Add Client-Side Library window leave the default provider which is “cdnjs” in this case.
- Step #3: Type the library name to add in the Library text box. IntelliSense provides a list of libraries based on the name you have added. So here just type in twitter-bootstrap, and when the entry shows up, simply select it. It will automatically select the latest version of Bootstrap. However, if you want then you can also type the version manually. Here, I am installing the latest version of Bootstrap i.e. (“twitter-bootstrap@4.4.1”).
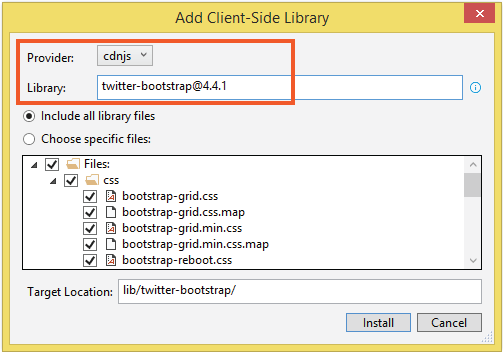
- Step #4: There are two radio buttons “Include All library files” and “Choose Specific files“. The Include All library files option will download all files while Choose Specific files option allows you to select files which you needs to be included. Select “All library files” option unless you have specific requirements.
- Step #5: In the Target Location text box you can specify the folder location where you want the library files to be installed. By default Bootstrap will be installed in the default location which is Install button which will download and install the Bootstrap package on your application.
Once bootstrap is installed you will find libman.json file added to your application’s root folder. Open it, it’s code is given below:
1 2 3 4 5 6 7 8 9 10 | { "version": "1.0", "defaultProvider": "cdnjs", "libraries": [ { "library": "twitter-bootstrap@4.4.1", "destination": "lib/bootstrap/" } ]} |
What is libman.json file in ASP.NET Core
The libman.json file is the Library Manager manifest file which contains the all the libraries (ie. packages) along with their destinations that are installed in the application.
Note that you will find the Bootstrap reference in it.
You can do a number of tasks with the libman.json file, these are:
- 1. Cleaning Client-Side Libraries
- 2. Restoring Client-Side Libraries
- 3. Update Client-Side Libraries
- 4. Uninstall Client-Side Libraries
Cleaning & Restoring Client-Side Libraries
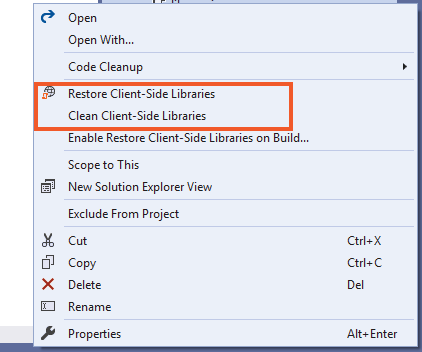
Cleaning & Restoring Client-Side Libraries can be done quite easily by right clicking on the libman.json file, and it will show up these 2 options. Simply select the needed option to perform the task.
I have shown this in the image below:
Update & Uninstall Client-Side Libraries
The steps to update or uninstall a Client-Side Library are similar. You need to follow the below steps.
- 1. Open the libman.json file and then click on the client-side library which you want to uninstall or update.
- 2. You will see a light yellow bulb icon appearing on the left side. Click on this icon to get the options for – whether to update or uninstall that specific client-side library. I have shown this in the below image.
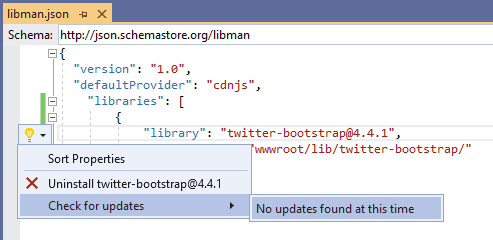
Note: You can also uninstall and update the a client-side library by ‘removing or changing it’s version nunber’ given on it’s entry in the libman.json file, and then saving the file.
How to Install Bootstrap in ASP.NET Core Using Bower
When you are using Visual Studio 2017 or earlier versions then Bower is a perfect choice to install Bootstrap Package in your application.
To add Bootstrap to the project I will first need to add Bower Configuration File (bower.json). So right click the project in the solution explorer and select Add ➤ New Item.
The ‘Add New Item’ dialog box will show up. On the left section of this dialog, select Installed ➤ ASP.NET Core ➤ Web. Then on the middle section select Bower Configuration File and click the Add button (see the below image).
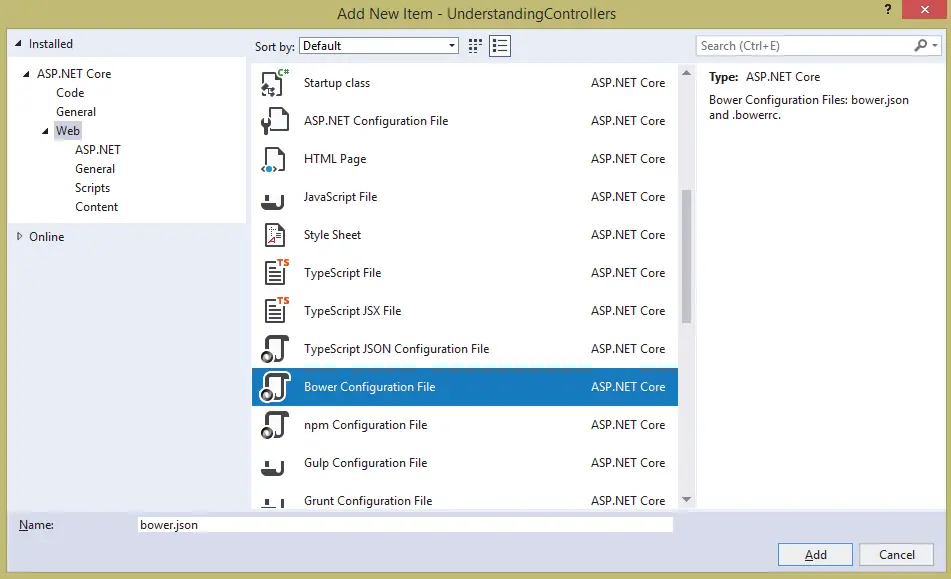
The bower.json file will be added and will open for editing in Visual Studio.
Right click the ‘bower.json’ file in solution explorer and select Manage Bower Packages. See the below image for this:
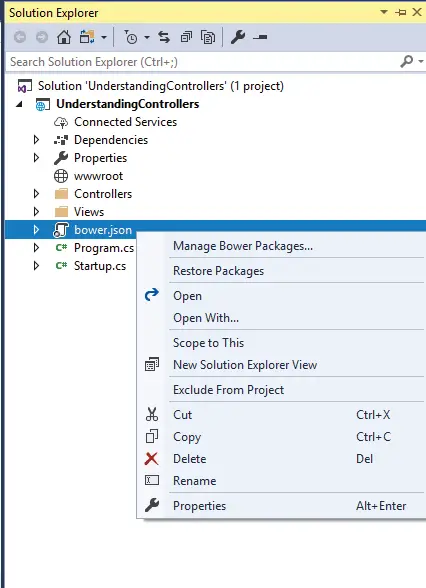
The ‘Manage Bower Packages’ window will open up. Here you click the Browse tab and on the search box type – ‘bootstrap’.
The bootstrap option will show up on the section that is below the search box. Select it, then on the right side choose it’s latest version and click the Install button to add Bootstrap to your project.
The below image shows this:
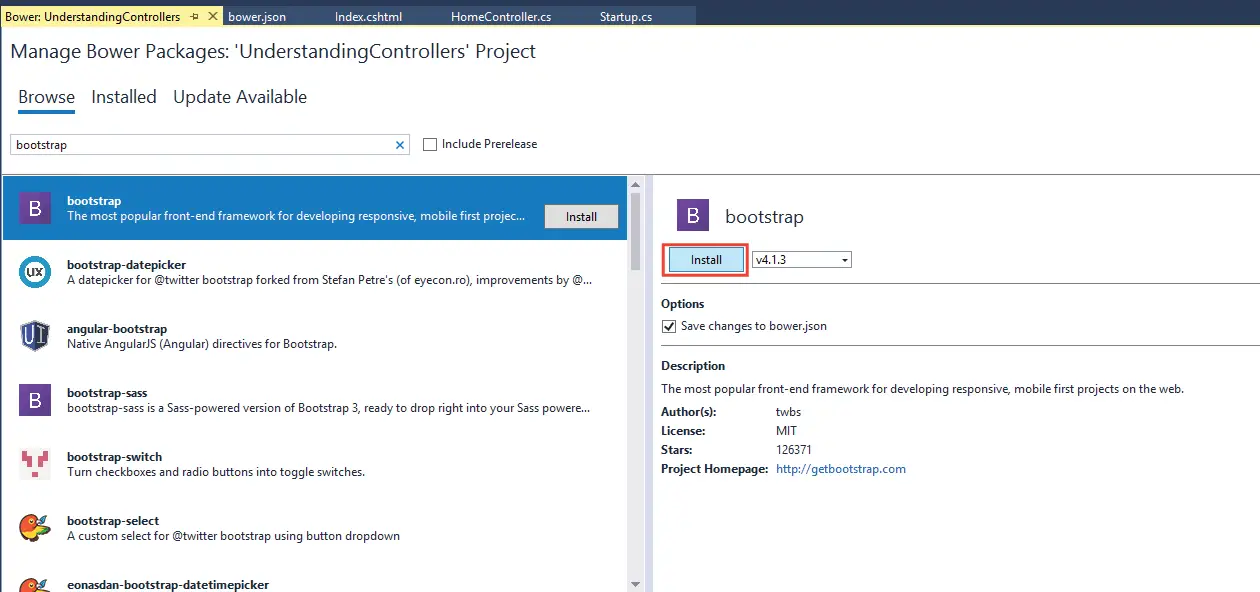
In a few seconds time Bootstrap package will be downloaded and ready to be used in your project.
If you open the bower.json file, you will find the bootstrap entry is added inside the dependencies section:
1 2 3 4 5 6 7 | { "name": "asp.net", "private": true, "dependencies": { "bootstrap": "v4.4.1" }} |
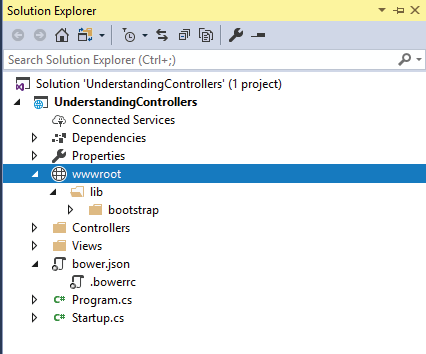
Note that installing client side libraries can also be done manually by first downloading them from their respective websites and placing their downloaded files in your website’s wwwrooot folder.
Before using Boostrap for designing layouts you need to add the link to the bootstrap css in the _Layout.cshtml file of your app.
1 | <link rel="stylesheet" href="~/lib/bootstrap/dist/css/bootstrap.min.css" /> |
I hope you liked this tutorial on boostrap installation in asp.net core. Kindly share it with your friends. Thank you.


 Welcome to YogiHosting - A Programming Tutorial Website. It is used by millions of people around the world to learn and explore about ASP.NET Core, Blazor, jQuery, JavaScript, Docker, Kubernetes and other topics.
Dear sir/Madam:
please am using visual studio 2008 how can I add bootstrap to my Asp.net application?
thank you for your kind co-operation
Yours sincerely;
Emmanuel.
Hello Emmanuel,
You can add bootstrap by downloading the package from the bootstrap official website. Then copy and paste the package’s folder in your website wwwroot folder. Then in your view you just provide the link to bootstrap CSS and JS files. Check this article – How to Use Bootstrap to Create Responsive Design.
Enjoyed every bit of your blog article.Thanks Again. Great.