How to Implement Discord API in ASP.NET MVC & C#

Discord is All-in-one voice and text chat for gamers that’s free, secure, and works on both your desktop and phone. As of December 2017, there were about 87 million unique users of the software.
In this tutorial you will learn How to Implement Discord API in ASP.NET & C#. For this you will first need to create an APP on the Discord website. By making an app on Discord opens up many possibilities for deeper integrations with your other services and platforms.
Here are some examples to whet your appetite:
- Using your Discord account to safely login to your guild’s website.
- Display who’s online or in-game, on your website or forum.
- Automatically join private Discord servers or gain new roles based on external website permissions.
- Show more detailed status information on your player profile.
- Allow your players to create invites in Discord so that other people can play with them.
- Launch into game sessions, parties, and groups directly from Discord.
- Launch into your game’s spectate mode directly from Discord.
- Allow your players to ask to join their friends’ games.
Once the Discord APP is created then you can communicate with this APP using API and get the response in JSON format.
Steps to Implement Discord API
There are 4 major steps while you are Implementing Discord API. These steps are:
- STEP 1: Create your Discord APP on the Discord website.
- STEP 2: Implement OAUTH 2.0 to get the Authorization Code.
- STEP 3: Get the Access Token from the Authorization Code.
- STEP 4: Make Discord API call with the Access Token.
STEP 1: Create your Discord APP
The Discord APP is created on the discord website. Go to Discord Developers URL, there create your account.
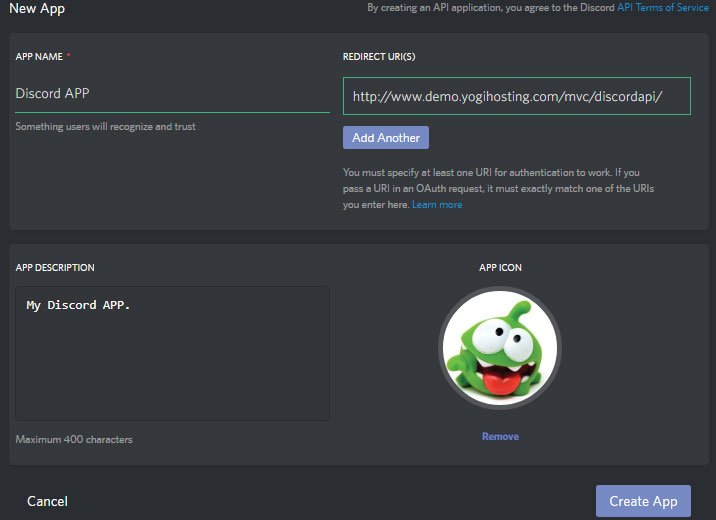
Next, go to My Apps area and create a New App. Then give your app some name and set the Redirect Uri. Finally click the Create App button.

Once the APP is created you will get the Client Id and Client Secret. Store them in your computer as you will need them when making the API calls.
STEP 2: OAUTH 2.0 to get the Authorization Code
Discord implements OAUTH 2.0 authentication. This allows only authenticated users to make API Calls. Once you have authenticated yourself with the OAUTH 2.0 then you get the authorization code.
To get the authorization code you have to redirect your user to this URL – https://discordapp.com/api/oauth2/authorize.
You have to also pass the following parameters with the query sting added to this URL:
- response_type – code
- client_id – your client id
- scope – identify%20guilds.join
- state – 15773059ghq9183habn
- redirect_uri – redirect url set on the app
In my button click code I am redirecting the user with Response.Redirect method:
string client_id = "418953801228382749";
string redirect_url = "http://www.demo.yogihosting.com/mvc/discordapi/";
Response.Redirect("https://discordapp.com/api/oauth2/authorize?response_type=code&client_id=" + client_id + "&scope=identify%20guilds.join&state=15773059ghq9183habn&redirect_uri=" + redirect_url + "");
The Discord APP will read this information and then authenticate yourself. After that, it sends the Authorization Code to the redirect URL, as query string parameter called code.
This is how the URL will contain this code:
http://www.demo.yogihosting.com/mvc/discordapi/?state=15773059ghq9183habn&code=y7GMlM6fieeuRfvcVHK2mp1ypA8DYW
STEP 3: Get Access Token from Authorization Code
You already got the Authorization code in query string on step 2. Now make HTTP Post request to the URL – https://discordapp.com/api/oauth2/token.
Also pass the following parameters to the request.
- client_id – your client id
- client_secret_id – your client secret
- grant_type – authorization_code
- code – code
- redirect_uri – redirect url set on the app
The below C# code does this work:
string client_id = "418953801228382749";
string client_sceret = "bPBj62ofALTdUDGcQoh76zxL4HZ3";
string redirect_url = "http://www.demo.yogihosting.com/mvc/discordapi/";
string code = Request.QueryString["code"];

/*Get Access Token from authorization code by making http post request*/

HttpWebRequest webRequest = (HttpWebRequest)WebRequest.Create("https://discordapp.com/api/oauth2/token");
webRequest.Method = "POST";
string parameters = "client_id=" + client_id + "&client_secret=" + client_sceret + "&grant_type=authorization_code&code=" + code + "&redirect_uri=" + redirect_url + "";
byte[] byteArray = Encoding.UTF8.GetBytes(parameters);
webRequest.ContentType = "application/x-www-form-urlencoded";
webRequest.ContentLength = byteArray.Length;
Stream postStream = webRequest.GetRequestStream();

postStream.Write(byteArray, 0, byteArray.Length);
postStream.Close();
WebResponse response = webRequest.GetResponse();
postStream = response.GetResponseStream();
StreamReader reader = new StreamReader(postStream);
string responseFromServer = reader.ReadToEnd();

string tokenInfo = responseFromServer.Split(',')[0].Split(':')[1];
string access_token = tokenInfo.Trim().Substring(1, tokenInfo.Length - 3);

/*End*/
The string variable called responseFromServer, which is given on the 3rd last line, will receive the JSON from the Discord API.
I am them extracting the Access Token from this JSON using the split() method (see last 2 lines of the code).
The JSON format is:
{
    "access_token": "6qrZcUqja7812RVdnEKjpzOL4CvHBFG",
    "token_type": "Bearer",
    "expires_in": 604800,
    "refresh_token": "D43f5y0ahjqew82jZ4NViEr2YafMKhue",
    "scope": "identify"
}
STEP 4: Make Discord API call with the Access Token
Now coming to the Final Step where you have to make HTTP GET request to the Discord API with the Access Token.
URL to make the HTTP Get request is – https://discordapp.com/api/users/@me.
Also note to pass a parameter called Authorization to the header. This should contain a string called Bearer with your Access Token.
The given below code does this work:
/*Do http get request to the URL to get the client info in json*/
 HttpWebRequest webRequest1 = (HttpWebRequest)WebRequest.Create("https://discordapp.com/api/users/@me");
 webRequest1.Method = "Get";
 webRequest1.ContentLength = 0;
 webRequest1.Headers.Add("Authorization", "Bearer " + access_token);
 webRequest1.ContentType = "application/x-www-form-urlencoded";

 string apiResponse1 = "";
 using (HttpWebResponse response1 = webRequest1.GetResponse() as HttpWebResponse)
 {
     StreamReader reader1 = new StreamReader(response1.GetResponseStream());
     apiResponse1 = reader1.ReadToEnd();
 }
 /*End*/
On the last line of this code you will get the User’s information on the string variable called apiResponse1 in JSON Format.
This JSON will look something like:
{"username": "yogyogi", "discriminator": "2930", "mfa_enabled": false, "id": "406157847835967489", "avatar": null}
You can download the full code using the below link:


 Welcome to YogiHosting - A Programming Tutorial Website. It is used by millions of people around the world to learn and explore about ASP.NET Core, Blazor, jQuery, JavaScript, Docker, Kubernetes and other topics.