Code-First Approach in Entity Framework Core
The Entity Framework Core Code-First approach creates the database and tables based on entity classes and configurations given on DbContext. The Code-First Approach is helpful in situations where we are beginning a new project and don’t have a clear picture of the database. This is the preferred approach when working with EF Core and the creation of database & tables are done when migration commands are run.
Page Contents
Example Project
To understand how the Code-First approach works, first create a new ASP.NET Core project and Install Entity Framework Core package on it. In this project we will be dealing with Companies having areas like it’s employees, departments, etc.
Create Entity & DbContext
Create a class called Information.cs inside the Models folder. It will contain information about the different companies like company id, company name, license, year of establishment and yearly revenue generated by them.
namespace EFCoreExample.Models
{
    public class Information
    {
        public int Id { get; set; }

        public string Name { get; set; }

        public string License { get; set; }

        public DateTime Establshied { get; set; }

        public decimal Revenue { get; set; }
    }
}
Next create a Database Context (DbContext) for EF Core and name it CompanyContext.cs. Place it inside the Models folder.
using Microsoft.EntityFrameworkCore;

namespace EFCoreExample.Models
{
    public class CompanyContext : DbContext
    {
        public CompanyContext(DbContextOptions<CompanyContext> options) : base(options)
        {
        }

        public DbSet<Information> Information { get; set; }
    }
}
We now register the DbContext as a service in the Program.cs class of the app. So we add the below given code line to it.
builder.Services.AddDbContext<CompanyContext>(options =>
  options.UseSqlServer(builder.Configuration.GetConnectionString("DefaultConnection")));
The connection string to the database is stored in the appsettings.json file and is shown below.
{
  "ConnectionStrings": {
    "DefaultConnection": "Data Source=(localdb)\\MSSQLLocalDB;Initial Catalog=Company;Integrated Security=True;Connect Timeout=30;Encrypt=False;TrustServerCertificate=False;ApplicationIntent=ReadWrite;MultiSubnetFailover=False"
  }
}
EF Core Migrations
With Migrations we can create the database and it’s tables based on the Entity & Database Context classes. Check that in the database connection string we have provided the database. Here the database name is Company and is located in the SQL Server Express LocalDB.
In Visual Studio, open NuGet Package Manager Console window from Tools ➤ NuGet Package Manager ➤ Package Manager Console and enter the following PMC command to create a migration.
PM> add-migration CompanyDBOr, we can do the same thing by executing the CLI command given below.
PM> dotnet ef migrations add CompanyDBThe command will create a Migrations folder on the project.
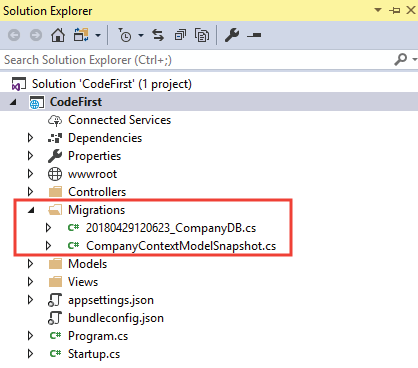
Now we create the database by executing the update-database PMC command on the Package Manager Console:
PM> update-databaseOr, we can run the CLI command to do the same thing:
PM> dotnet ef database updateThe command will execute and will create the Company database which we can open and see on the SQL Server Object Explorer window in Visual Studio.
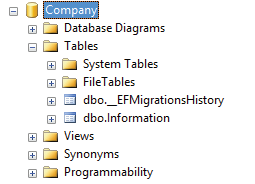
Congrats, we have successfully created the database by using Entity Framework Core Code-First approach. Next we are going to create a new record on this database.
Create a Record
Let us Create a new Record on the Information table with Entity Framework Core. We add a new action method on a controller that will create a record. The code is given below.
public class HomeController : Controller
{
    private CompanyContext context;
    public HomeController(CompanyContext cc)
    {
        context = cc;
    }

    public IActionResult CreateInformation()
    {
        var info = new Information()
        {
            Name = "YogiHosting",
            License = "XXYY",
            Revenue = 1000,
            Establshied = Convert.ToDateTime("2014/06/24")
        };
        context.Entry(info).State = EntityState.Added;
        context.SaveChanges();

        return View();
    }
}
Once the Action is called, the code will execute, and a new record is added to the Information table. We can see the new record on the SQL Server database.

Entity Framework Core Seed Data
We can create the database and populate it with test data through our code. This is known as seeding the database. For doing this create a new static class called DbInitializer.cs inside the “Data” folder of the app. The Initialize method does the seeding part and contains test records which will be inserted to the database.
using EFCoreExample.Models;

namespace EFCoreExample.Data
{
    public static class DbInitializer
    {
        public static void Initialize(CompanyContext context)
        {
            // Look for any students.
            if (context.Information.Any())
            {
                return;   // DB has been seeded
            }

            var infos = new Information[]
            {
                new Information { Name = "YogiHosting", License = "XXYY", Revenue = 1000, Establshied = Convert.ToDateTime("2014/06/24") },
                new Information{ Name ="Microsoft", License ="XXXX", Revenue = 1000, Establshied = Convert.ToDateTime("2014/07/14") },
                new Information{ Name ="Google", License ="RRRRR", Revenue = 1000, Establshied = Convert.ToDateTime("2019/06/18") },
                new Information{ Name ="Apple", License ="XADFD", Revenue = 1000, Establshied = Convert.ToDateTime("2022/02/02") },
                new Information{ Name ="SpaceX", License ="##@$", Revenue = 1000, Establshied = Convert.ToDateTime("2030/10/01") }
            };

            context.Information.AddRange(infos);
            context.SaveChanges();
        }
    }
}
Now call this class from the Program class of the app by adding the below code.
using (var scope = app.Services.CreateScope())
{
    var services = scope.ServiceProvider;

    var context = services.GetRequiredService<CompanyContext>();
    context.Database.EnsureCreated();
    DbInitializer.Initialize(context);
}
The EnsureCreated method creates the database if no database exists. After that the DbInitializer.Initialize(context) is called and it does the seeding part.
Test it by first dropping the database and then running the app. The app checks for the database and finds that it does not exists. It then creates the database and adds test data. Using this approach we can bypass the Migration commands which we used earlier to create the database.
Download the source codes from here.
We learned the concept of CODE-FIRST approach in Entity Framework Core. We created the database from entity classes and then seeded the database. Now we are ready to create the CRUD Operations in EF Core and this is the topic of the next tutorial.





 Welcome to YogiHosting - A Programming Tutorial Website. It is used by millions of people around the world to learn and explore about ASP.NET Core, Blazor, jQuery, JavaScript, Docker, Kubernetes and other topics.