Blazor WebAssemble Authentication from Google

In this tutorial we are going to implement Authentication from Google feature in a Blazor WebAssembly app. We will also implement Oauth 2.0 and JWT Tokens for authentication purpose.
Create Blazor WebAssembly app
Open Visual Studio and create a new Blazor WebAssembly Standalone App.

Give the app name as BWGoogle or any other name of your choice. On the next screen choose the Authentication type to Individual Accounts. This will add authentication support on the app with ASP.NET Core Identity. I have shown this in the below image.

The app will be created and it uses the Microsoft.AspNetCore.Components.WebAssembly package. This package authenticates users and obtains JWT tokens to call protected APIs.
In the Program.cs class we will find the OpenID Connect (OIDC) service is added. It standardize the process for authenticating and authorizing users when they sign in to Google. Note that the app is configured with default scopes for “openid” and “profile”.
builder.Services.AddOidcAuthentication(options =>
{
    // Configure your authentication provider options here.
    // For more information, see https://aka.ms/blazor-standalone-auth
    builder.Configuration.Bind("Local", options.ProviderOptions);
});
Inside the wwwroot folder we will find appsettings.json file. Open this file to find values for the AUTHORITY andClientId. We will soon update them to the values which Google will provide us.
{
  "Local": {
    "Authority": "https://login.microsoftonline.com/",
    "ClientId": "33333333-3333-3333-33333333333333333"
  }
}Also see that the Index.html page located inside the wwwroot folder contains a referece to a JavaScript called AuthenticationService.js that handles OIDC protocol and performs the authentication operations.
<script src="_content/Microsoft.AspNetCore.Components.WebAssembly.Authentication/AuthenticationService.js"></script>

<div class="note">App.razor</div>
<p>The <span class="term">App.razor</span> component contains a number of components like CascadingAuthenticationState, AuthorizeRouteView and RedirectToLogin. It authorizes authenticated users while redirects un-authenticated users to login area of the app. It's code is given below.</p>


<CascadingAuthenticationState>
    <Router AppAssembly="@typeof(App).Assembly">
        <Found Context="routeData">
            <AuthorizeRouteView RouteData="@routeData" DefaultLayout="@typeof(MainLayout)">
                <NotAuthorized>
                    @if (context.User.Identity?.IsAuthenticated != true)
                    {
                        <RedirectToLogin />
                    }
                    else
                    {
                        <p role="alert">You are not authorized to access this resource.</p>
                    }
                </NotAuthorized>
            </AuthorizeRouteView>
            <FocusOnNavigate RouteData="@routeData" Selector="h1" />
        </Found>
        <NotFound>
            <PageTitle>Not found</PageTitle>
            <LayoutView Layout="@typeof(MainLayout)">
                <p role="alert">Sorry, there's nothing at this address.</p>
            </LayoutView>
        </NotFound>
    </Router>
</CascadingAuthenticationState>
The LoginDisplay.razor displays username for the authenticated user while option to register or login for anonymous user. It is displayed inside MainLayout.razor component.
@using Microsoft.AspNetCore.Components.WebAssembly.Authentication
@inject NavigationManager Navigation

<AuthorizeView>
    <Authorized>
        Hello, @context.User.Identity?.Name!
        <button class="nav-link btn btn-link" @onclick="BeginLogOut">Log out</button>
    </Authorized>
    <NotAuthorized>
        <a href="authentication/login">Log in</a>
    </NotAuthorized>
</AuthorizeView>

@code{
    public void BeginLogOut()
    {
        Navigation.NavigateToLogout("authentication/logout");
    }
}
Inside the “Pages” folder their is Authentication.razor component which defines routes required for handling different authentication stages.
@page "/authentication/{action}"
@using Microsoft.AspNetCore.Components.WebAssembly.Authentication
<RemoteAuthenticatorView Action="@Action" />

@code{
    [Parameter] public string? Action { get; set; }
}
Create project in Google Cloud Console
We now have to create a new project in Google Cloud Console. Google Cloud Console is a bit messy and it is difficult to find project, api and other links so I will be providing you important links as we progress in this tutorial.
So, create a new project and give it a name of your choice. I have named it “BlazorApp” as you can see in the below image. The link to create a new project is this.

Next, go to Google Cloud Console main page – link. Here select your project and then click on APIs and services link. I have shown this in the below image:

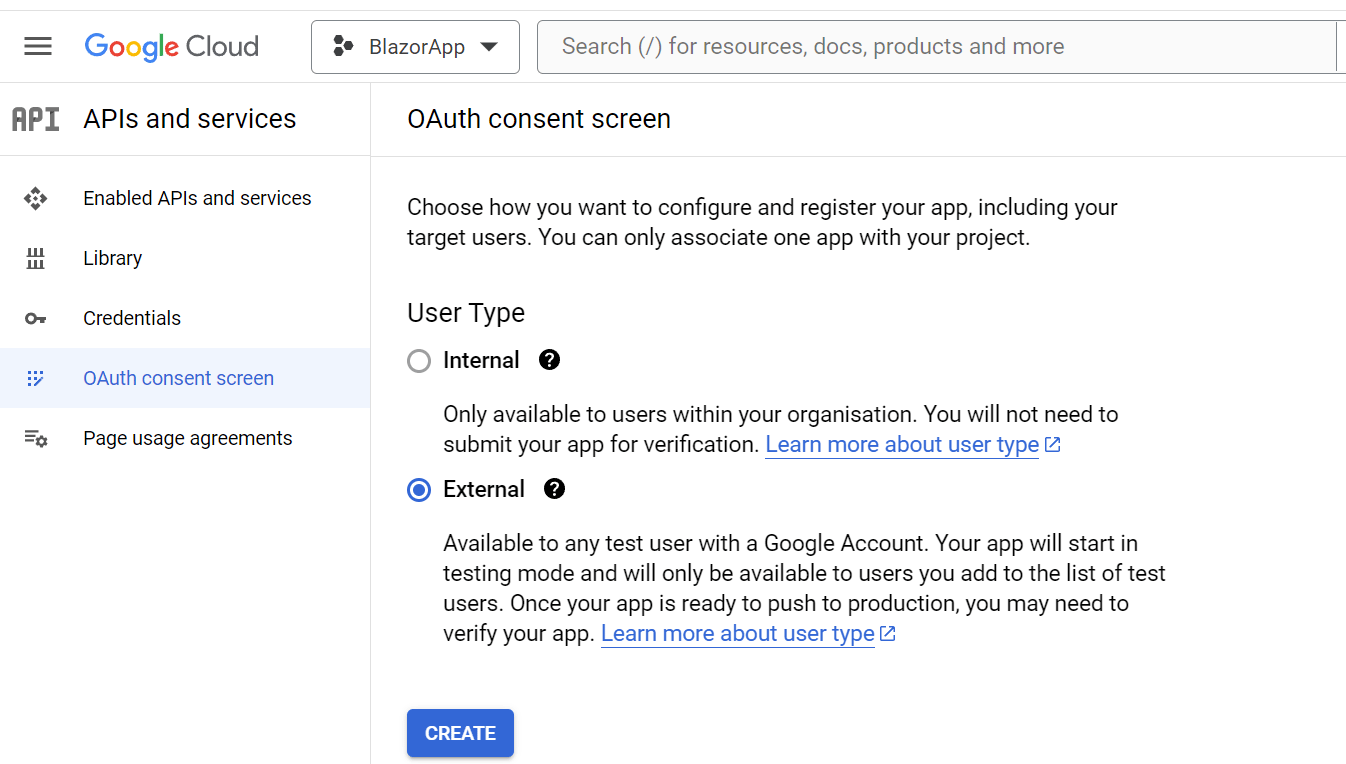
In the “APIs and services” page we have to configure and register our Blazor app. So click on the OAuth consent screen link on the left panel and select “User Type” as “External” and click on CREATE button.
Next, you will have to add your Blazor app information. So fill it as given below:
- App name – BlazorApp
- User support email – fill your email address
- Application home page – https://localhost:5001
- Developer email address – fill your email address
Now click SAVE AND CONTINUE button to proceed.
In the next screen you can add or remove scopes. We don’t need to do anything here so simply click SAVE AND CONTINUE button to proceed.
Next screen will allow you to add test users. Here also we don’t need to do anything here so click SAVE AND CONTINUE button to proceed. This complete this proecss of configuring our Blazor app.
We now have to create OAuth client ID so in the “APIs and services” page, click on “Credentials” on the left panel then click on “CREATE CREDENTIALS” link on the top and then select “OAuth client ID”. I have shown this in the below image.

We will reach Create OAuth client ID page where we have to add the following things:
- Application type – select “Web Application”
- Name – BlazorAppClient
- Authorised redirect URIs – https://localhost:5001/authentication/login-callback
Click the “CREATE” button. We will see a popup window telling “OAuth client created”. We will also get client id and secret. Make sure to save it as we will need them in future.

So, now our Google Project is created and properly configured.
Configuring Blazor WebAssembly app
Let’s now configure our app with the google project details. So open launchsettings.json given inside “Properties” folder and here change the applicationUrl inside “profiles > https” to https://localhost:5001. Recall – this is the url which we added on the google project. Check the highlighted code where I have shown this.
"profiles": {
  "https": {
    "commandName": "Project",
    "dotnetRunMessages": true,
    "launchBrowser": true,
    "inspectUri": "{wsProtocol}://{url.hostname}:{url.port}/_framework/debug/ws-proxy?browser={browserInspectUri}",
    "applicationUrl": "https://localhost:5001;http://localhost:5275",
    "environmentVariables": {
      "ASPNETCORE_ENVIRONMENT": "Development"
    }
  },
Next, on the appsettings.json and appsettings.development.json file add the google project client id, redirect url and other things as shown below.
{
  "Local": {
    "Authority": "https://accounts.google.com/",
    "ClientId": "355869681115-fbm2537cr73himmhhp276d4ahs06a848.apps.googleusercontent.com",
    "PostLogoutRedirectUri": "https://localhost:5001/authentication/logout-callback",
    "RedirectUri": "https://localhost:5001/authentication/login-callback",
    "ResponseType": "id_token"
  }
}
Remember to replace your ClientId value as given by Google.
Now we are ready to test google login feature. So lets run the Blazor App. Then click the Log in link on the header which will redirect us to google.

Here enter your google email and password as shown below.

On successful login google will redirect us back to our Blazor WASM app and we will see hello with our google username.

Congrats, we just have completed login with Google feature in Blazor WASM project.Thanks for reading and make sure to see my other Blazor tutorials.
SHARE THIS ARTICLE
Related Tutorials:

ABOUT THE AUTHOR
I hope you enjoyed reading this tutorial. If it helped you then consider buying a cup of coffee for me. This will help me in writing more such good tutorials for the readers. Thank you.

HELLO EVERYONE
 Welcome to YogiHosting - A Programming Tutorial Website. It is used by millions of people around the world to learn and explore about ASP.NET Core, Blazor, jQuery, JavaScript, Docker, Kubernetes and other topics.
SUBSCRIBE TO NEWSLETTER
Enter your email address to subscribe to this blog and receive notifications of new posts by email.
Join 90K other subscribers