Blazor – Creating a reusable HTML Select Component with a Custom Validator

In this tutorial we will create Blazor Reusable Components that can be used in multiple places. They save a lot of time when you are creating big projects. In this tutorial I will create a reusable HTML Select element from scratch. Later on, I will also integrate a Custom Validator on this select element.
Page Contents
Create a new Blazor Project from scratch or use an existing one. I have named my project to be BlazorSV, you can find this project download link at the bottom of this article.
To the project, add a new class called Employee.cs which has a required name and city field. The class code is shown below.
using System.ComponentModel.DataAnnotations;

namespace BlazorSV.Models
{
    public class Employee
    {
        [Required]
	public string Name { get; set; }

	[Required]
	public string City { get; set; }
    }
}
Next, create a new razor component called ReusableSelect.razor inside the Pages folder of the project, add the following code:
@page "/ReusableSelect"

@using BlazorSV.Models;
<link href="/validation.css" rel="stylesheet" />

<h1 class="bg-info text-white">Job Application Form</h1>
<h2 class="bg-secondary text-white">@FormSubmitMessage</h2>

<EditForm Model="EmployeeData" OnValidSubmit="HandleValidSubmit" OnInvalidSubmit="HandleInvalidSubmit">
    <DataAnnotationsValidator />
    <ValidationSummary />

    <div class="form-group">
        <label>Name</label>
        <ValidationMessage For="@(() => EmployeeData.Name)" />
        <InputText class="form-control" @bind-Value="EmployeeData.Name" />
    </div>

    <div class="form-group">
        <label>Your City</label>
        <ValidationMessage For="@(() => EmployeeData.City)" />
        <SelectCommon @bind-Value="EmployeeData.City" Data="Cities">
            <option selected value="">Select</option>
        </SelectCommon>
    </div>

    <div class="form-group">
        <button class="btn btn-primary">Submit</button>
    </div>
</EditForm>

@code {
    public Employee EmployeeData = new Employee();

    public string FormSubmitMessage { get; set; } = "Job Application Not Submitted";

    List<string> Cities = new List<string> { "New York", "Los Angeles", "Boston" };

    public void HandleValidSubmit()
    {
        // insert it to the database
        FormSubmitMessage = "Job Application Submitted";
    }

    public void HandleInvalidSubmit() => FormSubmitMessage = "Invalid Data Submitted";
}
I have used the EditForm component and inside it I have added 2 fields of the Employee class. The Name field is shown by the InputText component.
<InputText class="form-control" @bind-Value="EmployeeData.Name" />The Cityfield is shown by a reusable component called SelectCommon.razor. It is bind to the City field by the bind-Value attribute. The Data attribute provides the list of 3 cities to this component.
<SelectCommon @bind-Value="EmployeeData.City" Data="Cities">
    <option selected value="">Select</option>
</SelectCommon>
Let us now create this reusable component.
Reusable HTML Select Component
Create a new Razor Component called SelectCommon inside the “Pages” folder of the project. Inside this component define a InputSelect component that Blazor will render as a HTML Select element. It’s full code is given below.
@inherits InputBase<string>

<InputSelect class="form-control" @bind-Value="HandleChange">
    @ChildContent
    @foreach (string c in Data)
    {
        <option value="@c">@c</option>
    }
</InputSelect>

@code {
    [Parameter]
    public RenderFragment ChildContent { get; set; }

    [Parameter]
    public List<string> Data { get; set; }

    public string HandleChange
    {
        get { return CurrentValueAsString; }
        set { CurrentValueAsString = value; }
    }

    protected override bool TryParseValueFromString(string value, out string result, out string validationErrorMessage)
    {
        result = value;
        if (value == "Los Angeles")
        {
            validationErrorMessage = "The city is temporarily unaccepted";
            return false;
        }
        else
        {
            validationErrorMessage = null;
            return true;
        }
    }
}
I have inherited this component with the InputBase<T> class. Let us understand what work it does.
InputBase<T> and TryParseValueFromString
The InputBase<T> class is the generic abstract class for Blazor controls. It is a valuable class and provides us access to functionalities like validations which I will show you in this tutorial itself. You will also need to override the TryParseValueFromString method.
The character T is type of the InputBase class which specifies the type of the property the component will be assigned to. I have used string for this type “T”.
@inherits InputBase<string>I have done this because the City property (which is assigned to the inputselect component) is a string value.
protected abstract bool TryParseValueFromString(string value, out T result, out string validationErrorMessage);The TryParseValueFromString is called whenever the value of the control changes. If the control is an input type then this method gets called when you type any character on it.
If the control is a select element then this method is called when you change the selected value.
So, in the TryParseValueFromString method you can validate the data and return “true” if validation passes else you return “false”. You can also provide validation messages if the data is not correct.
This method has 3 parameters:
- The first parameter contains the value of the input control.
- The second parameter is an output parameter and returns back the value of the input control.
- The third parameter contains the validation message.
Let’s keep the theory aside and see how the InputSelect component works.
The ChildContent component parameter receives the first select element’s option:
<option selected value="">Select</option>The Data component parameter receives the List of cities data that contains 3 cities – ‘New York, Los Angeles, Boston’.
[Parameter]
public List<string> Data { get; set; }
These cities form the options of the select element. I have used foreach loop to create these options.
@foreach (string c in Data)
{
    <option value="@c">@c</option>
}
The InputBase class provides a property called CurrentValueAsString which can be used to get the current value of the control and it also sets the current value of the control.
The InputSelect component’s bind-Value="HandleChange" calls a HandleChange property which uses this CurrentValueAsString property to get the current value of the control and also to set the current value.
public string HandleChange
{
    get { return CurrentValueAsString; }
    set { CurrentValueAsString = value; }
}
So, whenever the user chooses a value in the select control, first the “HandleChange” property gets called then the “TryParseValueFromString” method gets called.
In the TryParseValueFromString I have temporarily disabled “Los Angeles” city.
protected override bool TryParseValueFromString(string value, out string result, out string validationErrorMessage)
{
    result = value;
    if (value == "Los Angeles")
    {
        validationErrorMessage = "The city is temporarily unaccepted";
        return false;
    }
    else
    {
        validationErrorMessage = null;
        return true;
    }
}
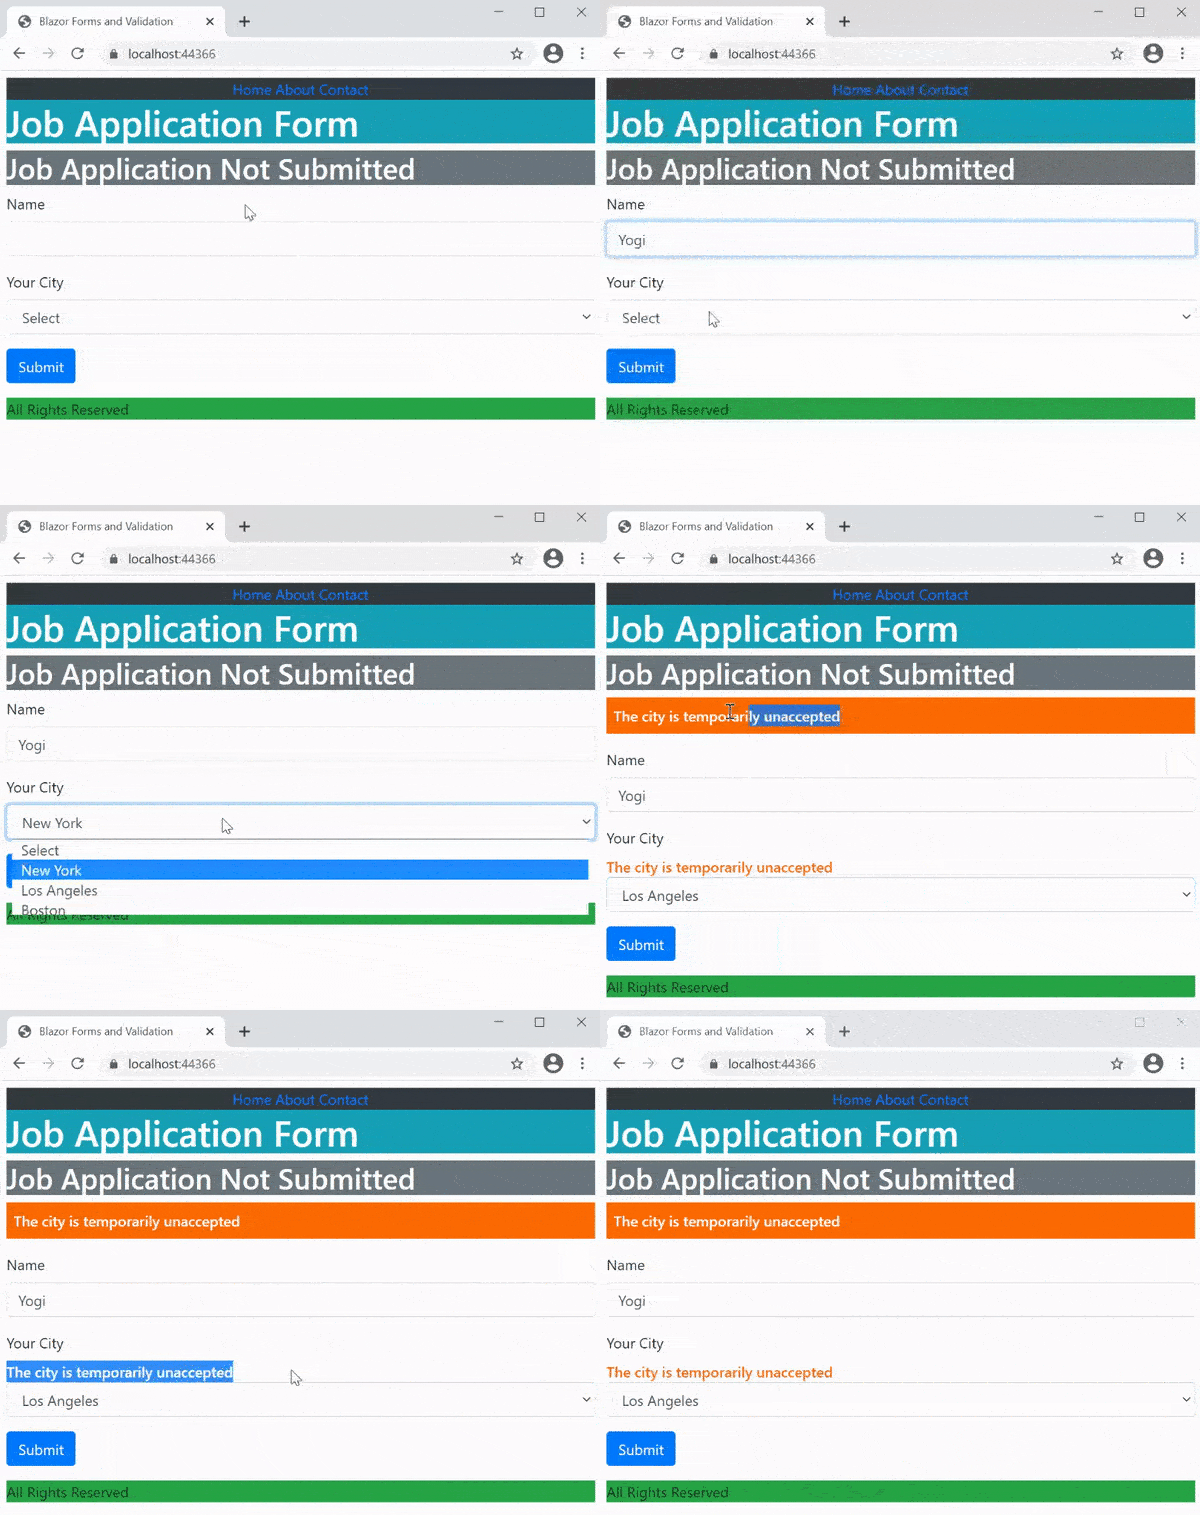
Run your project and select the Los Angeles city, and you will receive the validation messages. I have shown this in the below video.

The question now arise is to how to turn the SelectCommon component to a reusable one. The answer is by using @typeparam directive.
@typeparam directive to create Generic reusable component
The InputSelect I made previously only binds to a string type property. So, if there is another property of type int, then this InputSelect cannot be bind to it.
I will now make my SelectCommon component to a Generic one by using @typeparam directive. The @typeparam specifies the type parameters for the component. With this, the SelectCommon component will be able to bind to string as well as int type properties.
Let us add a new property called Age of type int to the Employee class. See the highlighted code below.
using System.ComponentModel.DataAnnotations;

namespace BlazorSV.Models
{
	public class Employee
	{
		[Required]
		public string Name { get; set; }

		[Required]
		public string City { get; set; }

        [Range(30, 32)]
        public int Age { get; set; }
    }
}
Next, change the ReusableSelect.razor component as shown in highlighted manner.
@page "/ReusableSelect"
<link href="validation.css" rel="stylesheet" />

<h1 class="bg-info text-white">Job Application Form</h1>
<h2 class="bg-secondary text-white">@FormSubmitMessage</h2>

<EditForm Model="EmployeeData" OnValidSubmit="HandleValidSubmit" OnInvalidSubmit="HandleInvalidSubmit">
    <DataAnnotationsValidator />
    <ValidationSummary />

    <div class="form-group">
        <label>Name</label>
        <ValidationMessage For="@(() => EmployeeData.Name)" />
        <InputText class="form-control" @bind-Value="EmployeeData.Name" />
    </div>

    <div class="form-group">
        <label>Your City</label>
        <ValidationMessage For="@(() => EmployeeData.City)" />
        <SelectCommon T="string" Parser="@(s => Convert.ToString(s))" @bind-Value="EmployeeData.City" Data="Cities">
            <option selected value="">Select</option>
        </SelectCommon>
    </div>

    <div class="form-group">
        <label>Your Age</label>
        <ValidationMessage For="@(() => EmployeeData.Age)" />
        <SelectCommon T="int" Parser="@(s => int.Parse(s))" @bind-Value="EmployeeData.Age" Data="Ages">
            <option selected value="0">Select</option>
        </SelectCommon>
    </div>

    <div class="form-group">
        <button class="btn btn-primary">Submit</button>
    </div>
</EditForm>

@code {
    public Employee EmployeeData = new Employee();

    public string FormSubmitMessage { get; set; } = "Job Application Not Submitted";

    List<string> Cities = new List<string> { "New York", "Los Angeles", "Boston" };
    List<int> Ages = new List<int> { 30, 31, 32, 33, 34, 35 };

    public void HandleValidSubmit()
    {
        // insert it to the database
        FormSubmitMessage = "Job Application Submitted";
    }

    public void HandleInvalidSubmit() => FormSubmitMessage = "Invalid Data Submitted";
}
The code of the SelectCommon which is binding to the City field of Employee class is changed to:
<SelectCommon T="string" Parser="@(s => Convert.ToString(s))" @bind-Value="EmployeeData.City" Data="Cities">
    <option selected value="">Select</option>
</SelectCommon>
I have added 2 attributes to it:
- 1. “T” which binds to the typeparam of this component. I have passed string to it.
- 2. Parser which binds to a Func delegate type component parameter. I have passed Convert.ToString() method to it.
Parser="@(s => Convert.ToString(s))"I also added a second “SelectCommon” that binds to the newly added Age property of the Employee class.
<SelectCommon T="int" Parser="@(s => int.Parse(s))" @bind-Value="EmployeeData.Age" Data="Ages">
    <option selected value="">Select</option>
</SelectCommon>
Here I passed int for T attribute that specifies the bind property is of int type and for the Parser I passed int.Parse() method. I will explain it’s working shortly.
Next, change the SelectCommon.razor component’s code as shown below (changes are highlighted).
@typeparam T
@inherits InputBase<T>

<InputSelect class="form-control" @bind-Value="HandleChange">
    @ChildContent
    @foreach (T c in Data)
    {
        <option value="@c">@c</option>
    }
</InputSelect>

@code {
    [Parameter]
    public RenderFragment ChildContent { get; set; }

    [Parameter]
    public List<T> Data { get; set; }

    [Parameter]
    public Func<string, T> Parser { get; set; }

    public string HandleChange
    {
        get { return CurrentValueAsString; }
        set { CurrentValueAsString = value; }
    }

    protected override bool TryParseValueFromString(string value, out T result, out string validationErrorMessage)
    {
        result = Parser(value);
        if (value == "Los Angeles" || value == "30")
        {
           validationErrorMessage = "Data unaccepted";
           return false;
        }
        validationErrorMessage = null;
        return true;
    }
}
I have added @typeparam T to make this component a generic type. Then changed the InputBase to @inherits InputBase<T>.
The Data component parameter is changed to List<T>. So now it can accept both List<string> & List<int> types.
[Parameter]
public List<T> Data { get; set; }
The for each loop to create the select options is changed to use the type T.
@foreach (T c in Data)
{
    <option value="@c">@c</option>
}
The biggest change is done in the TryParseValueFromString method which now accept output parameter as “T” type.
I also performed 2 validations which are to stop:
- 1. Los Angeles city selection in first select.
- 2. 30 for Age selection in second select.
if (value == "Los Angeles" || value == "30")
{
    validationErrorMessage = "Data unaccepted";
    return false;
}
The Parser component parameter of Func<string, T> is used to convert the result output parameter of the TryParseValueFromString method to the T type.
You will understand it by seeing these 2 examples.
1. Example 1 – When the Parser is:
Parser="@(s => Convert.ToString(s))"Then result = Parser(value) becomes result = Convert.ToString(result) and the result is converted to string type.
2. Example 2 – When the Parser is:
Parser="@(s => int.Parse(s))"Then result = Parser(value) becomes result = int.Parse(result) and the result is converted to int type.
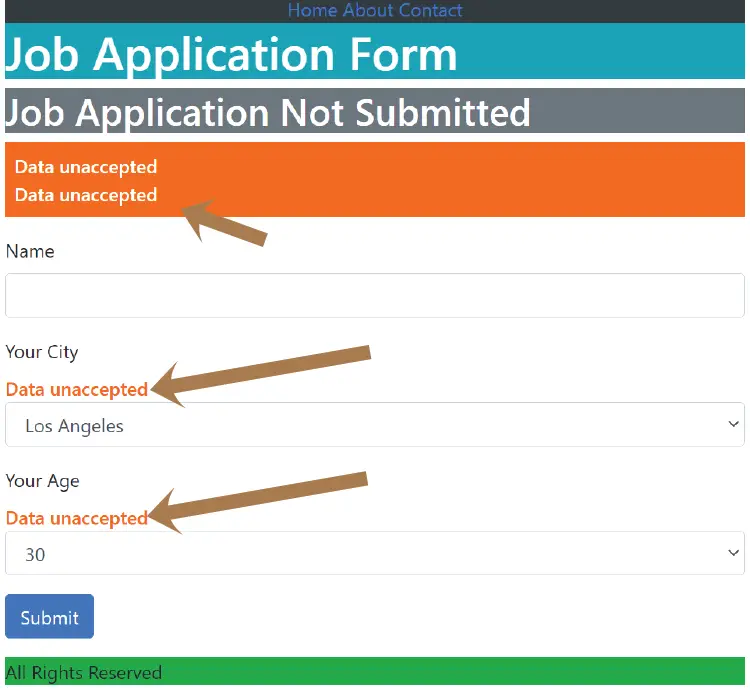
Now test it’s working by running your app. Select “Los Angeles” in the first select and “30” in the second one. You will receive 2 validation errors which are shown by the below given image:

Blazor Custom Validator
The EditForm component defines a cascading EditContext object. This object provides access to form validations as it holds metadata related to a data editing process, such as flags to indicate which fields have been modified and the current set of validation messages.
It can be used to create a very powerful custom validator. So, let us create a Custom Validatorthat will prevent user of age 30 if they come from Boston city.
First of all, remove or comment out the TryParseValueFromString code where you added the validation code since you don’t need it anymore.
protected override bool TryParseValueFromString(string value, out T result, out string validationErrorMessage)
{
    result = Parser(value);
    /*if (value == "Los Angeles" || value == "30")
    {
        validationErrorMessage = "Data unaccepted";
        return false;
    }*/
    validationErrorMessage = null;
    return true;
}
Now create a new class called CityAgeValidator.cs which will be the Custom Validator and it will perform validations to prevent 30 years old person from Boston city from submitting the form.
The full code of CityAgeValidator.cs is given below.
using Microsoft.AspNetCore.Components.Forms;
using Microsoft.AspNetCore.Components;

namespace BlazorSV.Models
{
    public class CityAgeValidator : ComponentBase
    {
        [Parameter]
        public string City { get; set; }

        [Parameter]
        public int Age { get; set; }

        [CascadingParameter]
        public EditContext EC { get; set; }

        protected override void OnInitialized()
        {
            ValidationMessageStore store = new ValidationMessageStore(EC);
            EC.OnFieldChanged += (sender, args) =>
            {
                string name = args.FieldIdentifier.FieldName;
                if (name == "City" || name == "Age")
                {
                    Validate(EC.Model as Employee, store);
                }
            };
        }

        private void Validate(Employee model, ValidationMessageStore store)
        {
            if (model.City == City && (model.Age == Age))
            {
                string message = City + " does not allow " + Age + " years person for job";
                store.Add(EC.Field("Age"), message);
            }
            else
                store.Clear();
            EC.NotifyValidationStateChanged();
        }
    }
}
This class is derived from the ComponentBase which is the base class of the razor component. The cascading parameter of type EditContext provides access to data editing process.
[CascadingParameter]
public EditContext EC { get; set; }
I used this parameter to apply OnFieldChanged event for the SelectCommon components binding the City and Age fields.
EC.OnFieldChanged += (sender, args) =>
{
…
}
So, whenever the selection of the item changes in any of these 2 select elements then the OnFieldChanged event gets called.
The OnFieldChanged event calls Validate method which does the validation and provides the validation message when data is inappropriate. See it’s code below.
private void Validate(Employee model, ValidationMessageStore store)
{
    if (model.City == City && (model.Age == Age))
    {
        string message = City + " does not allow " + Age + " years person for job";
        store.Add(EC.Field("Age"), message);
    }
    else
        store.Clear();
    EC.NotifyValidationStateChanged();
}
The class ValidationMessageStore holds validation message for a field. I have made sure the validation message is for the Age field.
store.Add(EC.Field("Age"), message);The notification is sent to the EditForm component through the NotifyValidationStateChanged method.
EC.NotifyValidationStateChanged();You may ask what City and Age are targeted? There values are provided to component parameters of this class.
[Parameter]
public string City { get; set; }

[Parameter]
public int Age { get; set; }
Next, go to the ReusableSelect.razor component and call this custom validator, also provide the values for the City and Age component parameters which I have shown in highlighted manner below.
<EditForm Model="EmployeeData" OnValidSubmit="HandleValidSubmit" OnInvalidSubmit="HandleInvalidSubmit">
    <DataAnnotationsValidator />
    <ValidationSummary />
    <CityAgeValidator Age="30" City="Boston" />

    <div class="form-group">
        <label>Name</label>
        <ValidationMessage For="@(() => EmployeeData.Name)" />
        <InputText class="form-control" @bind-Value="EmployeeData.Name" />
    </div>

    <div class="form-group">
        <label>Your City</label>
        <ValidationMessage For="@(() => EmployeeData.City)" />
        <SelectCommon T="string" Parser="@(s => Convert.ToString(s))" @bind-Value="EmployeeData.City" Data="Cities">
            <option selected value="">Select</option>
        </SelectCommon>
    </div>

    <div class="form-group">
        <label>Your Age</label>
        <ValidationMessage For="@(() => EmployeeData.Age)" />
        <SelectCommon T="int" Parser="@(s => int.Parse(s))" @bind-Value="EmployeeData.Age" Data="Ages">
            <option selected value="0">Select</option>
        </SelectCommon>
    </div>

    <div class="form-group">
        <button class="btn btn-primary">Submit</button>
    </div>
</EditForm>
I have provided Age to be 30 and City to be Boston to be stopped from submitting the form.
<CityAgeValidator Age="30" City="Boston" />Now run the app and select city as Boston and age as 30. You will get validation error messages. Check the working in the below video.
Download the source codes
In this tutorial on Blazor Reusable Components, we covered all the necessary things that will help you to create a generic reusable component in Blazor. In the last part I created a Custom Validator in Blazor. I hope you like this tutorial so kindly share it on your facebook, twitter, linkedin and other social account. This will help me in a great way.


 Welcome to YogiHosting - A Programming Tutorial Website. It is used by millions of people around the world to learn and explore about ASP.NET Core, Blazor, jQuery, JavaScript, Docker, Kubernetes and other topics.
Hi, this is an awesome article about validation.
Thank you dude.
I know many information about validation, but i will know, how to use DataAnnotaionValidation on this component.