Razor Components Lifecycle Methods of Blazor
All Razor Component have a well-defined Lifecycle, which is represented by synchronous and asynchronous lifecycle methods. We an override these methods to perform additional operations to build our custom features. Let use understand all about Lifecyle of Razor Components in this tutorial.
Page Contents
- How to use Razor Components in Blazor
- Advanced Razor Components features in Blazor
- Razor Components Lifecycle Methods of Blazor
Lifecycle Methods
The below table list out the Lifecycle methods of Razor Components. The “Async” ones are the asynchronous versions of these methods.
| Name | Description |
|---|---|
| OnInitialized() , OnInitializedAsync() | This method is invoked when a Razor Component is first initialized. |
| OnParametersSet(), OnParametersSetAsync() | This method is invoked when the values of the Component Parameters are applied. |
| ShouldRender() | This method is invoked before the Razor Component’s contents are rendered. If this method returns true then UI is refreshed else if it returns false then UI is not refreshed. |
| OnAfterRender(firstRender), OnAfterRenderAsync(firstRender) | This method is invoked after the component’s content is rendered. The bool parameter is true if this is the first time this method is invoked else false. |
Most of the time we will be only using OnParametersSet() and OnParametersSetAsync() methods on our projects.
Example : Razor Components Lifecycle usage
In database driven operations it may take a few seconds time to fetch records from the database. In most of the time, condition values are sent to the Component Parameters. We should only perform the database operations once the Component Parameter values are set.
We should do the database quering inside the OnParametersSet or OnParametersSetAsync methods. Let us create an example for this to understand it further. In our blazor app, create a razor component called People.razor inside the Pages folder with the codes as shown below:
1 2 3 4 5 6 7 8 9 10 11 12 13 14 15 16 17 18 19 20 21 22 23 24 25 26 27 28 29 30 31 32 33 34 35 36 37 38 39 40 41 42 43 44 45 46 47 48 49 50 51 52 53 | <h1 class="bg-info text-white">People</h1>@if (person == null){ <h2 class="bg-warning text-white p-3">Loading..</h2>}else{ <table class="table table-sm table-bordered table-striped "> <thead> <tr> <th>Name</th> <th>City</th> </tr> </thead> <tbody> <tr> <td>@person.Name</td> <td>@person.City</td> </tr> </tbody> </table>}@code { public class Person { public string Name { get; set; } public string City { get; set; } } [Parameter] public string Name { get; set; } public Person person { get; set; } protected async override Task OnParametersSetAsync() { await Task.Delay(5000); List<Person> pl = new List<Person> { new Person { Name = "Jack Sparrow", City = "New York" }, new Person { Name = "Bruce Wayne", City = "Gotham" }, new Person { Name = "Clark Kent", City = "Metropolis" }, new Person { Name = "Donald Trump", City = "New York" }, new Person { Name = "Vladimir Putin", City = "Moscow" }, new Person { Name = "Chipper Jones", City = "Beijing" }, new Person { Name = "Cristiano Ronaldo", City = "Funchal" } }; person = pl.Where(a => a.Name == Name).FirstOrDefault(); }} |
This component defines a Person class and a “person” property. Another property called Name is a component parameter whose value will be provided by parent component. So, this is a condition value that says – fetch a person whose name is provided to the component parameter by the parent component.
Inside the OnParametersSetAsync() method a person, with a name provided by the parent component, is fetched from the repository. The repository is a List
I have applied a delay of 5 seconds – await Task.Delay(5000). It resembles a delay that can happen during a database operation.
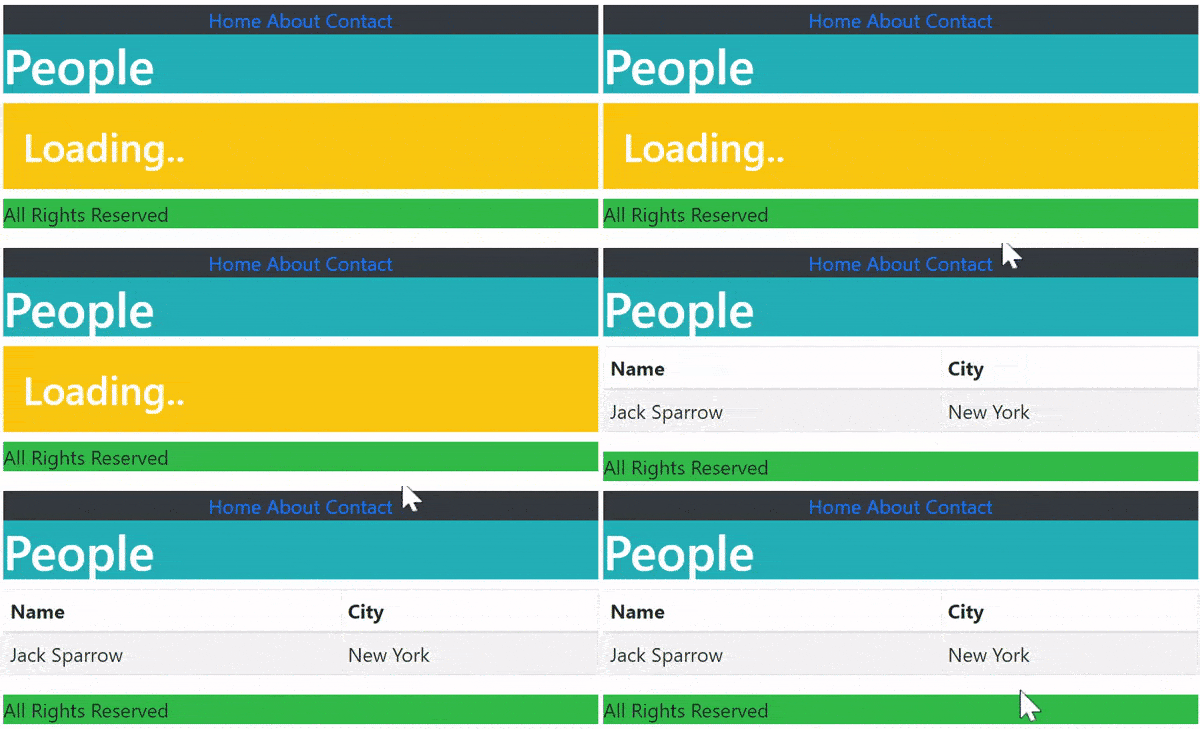
The value of the person property is null for the first 5 seconds, till that time a loading message is displayed. Finally, after 5 seconds the person info is displayed on the html table.
Next, create another razor component called ParameterSet.razor inside the Pages folder. This razor component calls the People.razor component. It also provides the value for the name of the person to be searched, and this name is “Jack Sparrow”. The code is given below.
@page "/ParameterSet"

<People Name="Jack Sparrow" />
Now run your app and you will see the delay as shown by the below video:
Example : Supress UI with ShouldRender method
The ShouldRender() method is invoked before the Razor Component’s contents are rendered. Note that even if ShouldRender is overridden, the component is always initially rendered.
When this method returns false then UI is not rendered. I will show this by creating a Razor Component called Examplex.razor where their will be a button which will show a Hello Blazor message on the click. It’s code is given below:
@page "/Examplex"

<h3 class="bg-info text-white">Hello @Name</h3>
<button class="btn btn-primary" @onclick="HandleClick">Show Hello</button>

@code {
    protected override bool ShouldRender()
    {
        return false;
    }

    public string Name;

    public void HandleClick()
    {
        Name = "Blazor";
    }
}
Notice I have overridden the ShouldRender Lifecycle method which is returning false so I am supressing UI with it.
Run your app and go to the URL – https://localhost:44366/Examplex . Here you will see Hello message. This is because the component is always initially rendered.
Now click on the button, you expect to see Hello Blazor but nothing happens as “ShouldRender” is returning false.
The below video shows this thing.

Now simple remove or comment out the ShouldRender Lifecycle method. Rerun the app and click the button which will show “Hello Blazor” message.
Example : OnAfterRenderAsync Lifecycle method
Working with JavaScript in Blazor should be done on OnAfterRenderAsync() Lifecycle method because element are only available after the component is rendered.
In the below code I have updating a div element’s inner text with JavaScript code. So this JavaScript code should be called from inside the OnAfterRenderAsync() method.
Add a new Razor Component called Exampley.razor with the below code:
@using Microsoft.JSInterop
@inject IJSRuntime JSRuntime

@page "/Exampley"

<div class="bg-info text-white" @ref="divElement" ></div>

@code {
    private ElementReference divElement;

    protected override async Task OnAfterRenderAsync(bool firstRender)
    {
        if (firstRender)
        {
            await JSRuntime.InvokeVoidAsync("setElementText", divElement, "Text after render");
        }
    }
}
See the code of OnAfterRenderAsync method. When the component is rendered the first time then firstRender variable is true. So, with the if block I am making sure the JavaScript code is called on this time only.
if (firstRender)
{
    await JSRuntime.InvokeVoidAsync("setElementText", divElement, "Text after render");
}
The JSRuntime.InvokeVoidAsync method will call a JavaScript function named setElementText and passes to it a reference to the div and new text to be applied to the div.
I will now need to add the setElementText() JavaScript function inside the head section of _Host.cshtml file.
<script>
    window.setElementText = (element, text) => element.innerText = text;
</script>
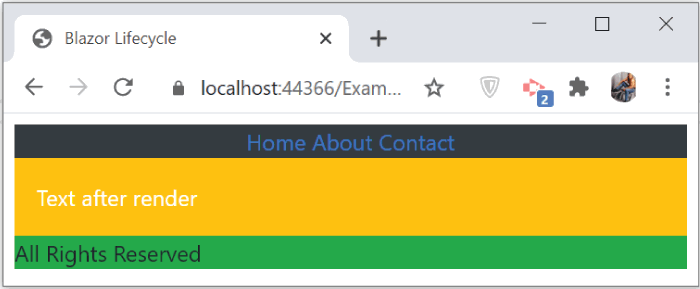
Run your app and go to the URL – https://localhost:44366/Exampley where you will see the div inner text is changed. See the below image:
StateHasChanged and @ref in Blazor
The StateHasChanged method is used to notify the component that it’s state has changed. When applicable, this will cause the component to be re-rendered. Use this method whenever you see the component is not updated.
You will use this method quite often when the JavaScript code is used to update the component but the component is not updated. Then in such case you will have to call StateHasChanged() method.
In Blazor you can get an instance of a component by @ref attribute. This can be done by:
- Add an @ref attribute to the child component.
- Define a field with the same type as the child component.
From the instance of the component, you can call the component’s public fields.
Let us create not 1 but 2 examples to understand @ref and StateHasChanged.
The @ref can also be used to reference html elements in the same way. The below given first example shows this concept.
Create a new razor component called Examplez.razor with the following code:
@page "/Examplez"

@using Microsoft.AspNetCore.Components
@using Microsoft.JSInterop
@inject IJSRuntime JSRuntime

<div class="p-2">
    <p class="alert-info p-3">
        Get value via JS call: <strong>@(fromJs ?? "Empty")</strong>
    </p>

    <p class="alert-success p-3">
        Set value via JS call: <strong @ref="element"></strong>
    </p>

    <button class="btn btn-success" @onclick="HandleClick">Click to Call JS</button>
</div>

@code {
    private string fromJs;
    private ElementReference element;

    public async void HandleClick()
    {
        fromJs = await JSRuntime.InvokeAsync<string>("setText", element, "Hello from JS call!");
        StateHasChanged();
    }
}
Here the button’s click event calls a JavaScript function by the name of setText which will update the text of the strong tag – <strong @ref="element"></strong>.
Notice that @ref attribute is used to create reference of this “strong” tag. For this I have defined a property called element of type ElementReference as shown below:
private ElementReference element;The string variable – fromJs is assigned the value that is returned by the JavaScript function.
fromJs = await JSRuntime.InvokeAsync<string>("setText", element, "Hello from JS call!");After that I called the StateHasChanged to notify the component that it’s state has changed and it needs to re-render for the changes to show on the UI.
StateHasChanged();The other strong tag checks if the value is not null (through ?? operator) and shows empty if null else shows the value returned by the JS function.
<strong>@(fromJs ?? "Empty")</strong>Next, add the JavaScript function setText() inside the html head section of the _Host.cshtml file of the app.
1 2 3 4 5 6 | <script> window.setText = (element, text) => { element.innerText = text; return text; };</script> |
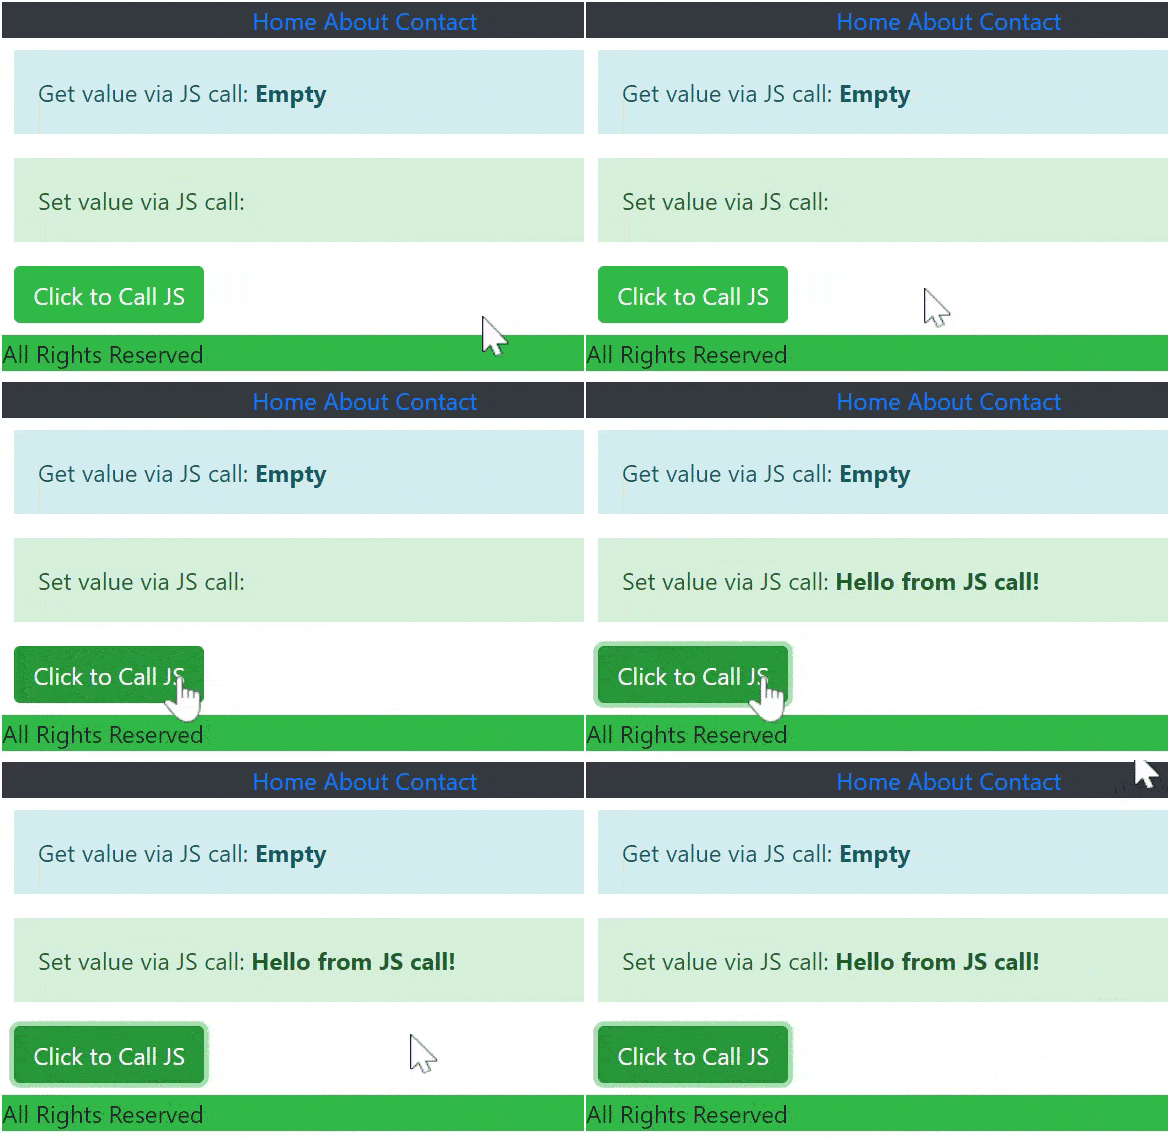
Now run the app and go to the URL – https://localhost:44366/Examplez. Click the button and you will see the text “Hello from JS call!” on both the strong tags.
Now comment the StateHasChanged() method:
//StateHasChanged();Rerun the app and check once again. This time the button click event only updates the lower strong tag but not the top one. The reason is, the component does not know that it’s state is changed by JS code and so I need to re-render it. This is the use of StateHasChanged method.
Check the below video which shows this thing.
Now create the second example. Create a new Razor Component called MultiNavLink.razor with the following code:
1 2 3 4 5 6 7 8 9 10 11 12 13 14 15 16 | <a href="https://www.yogihosting.com" target="_blank"> @if (Enabled) @("Go to Google") else @("Go to YogiHosting")</a>@code { private bool Enabled { get; set; } = true; public void SetEnabled(bool enabled) { Enabled = enabled; StateHasChanged(); }} |
The SetEnabled method checks the value of the bool variable Enabled and changes the link’s text based on it’s value. If the value is true then anchor text becomes “Go to Google” while for false it becomes “Go to YogiHosting”.
Next create another component called Exampleb.razor and add the following code to it:
1 2 3 4 5 6 7 8 9 10 11 12 13 14 15 16 17 18 19 20 | @page "/Exampleb"<div class="p-3"> <MultiNavLink @ref="element"></MultiNavLink> <button class="btn btn-secondary" @onclick="ToggleLinks"> Toggle Links </button></div>@code { private MultiNavLink? element; private bool LinkEnabled = true; public void ToggleLinks() { LinkEnabled = !LinkEnabled; element.SetEnabled(LinkEnabled); }} |
Here I call the MultiNavLink component and also reference it with @ref attribute:
<MultiNavLink @ref="element"></MultiNavLink>Notice the property:
private MultiNavLink element;This property has to be of type “MultiNavLink” otherwise @ref will not work.
The button’s click event calls the SetEnabled public method of the “MultiNavLink” component by using it’s reference. It just toggles the value of LinkEnabled property, so this will change the anchor’s text.
Now run your app and go the URL – https://localhost:44366/Exampleb click the button and see this toggling.
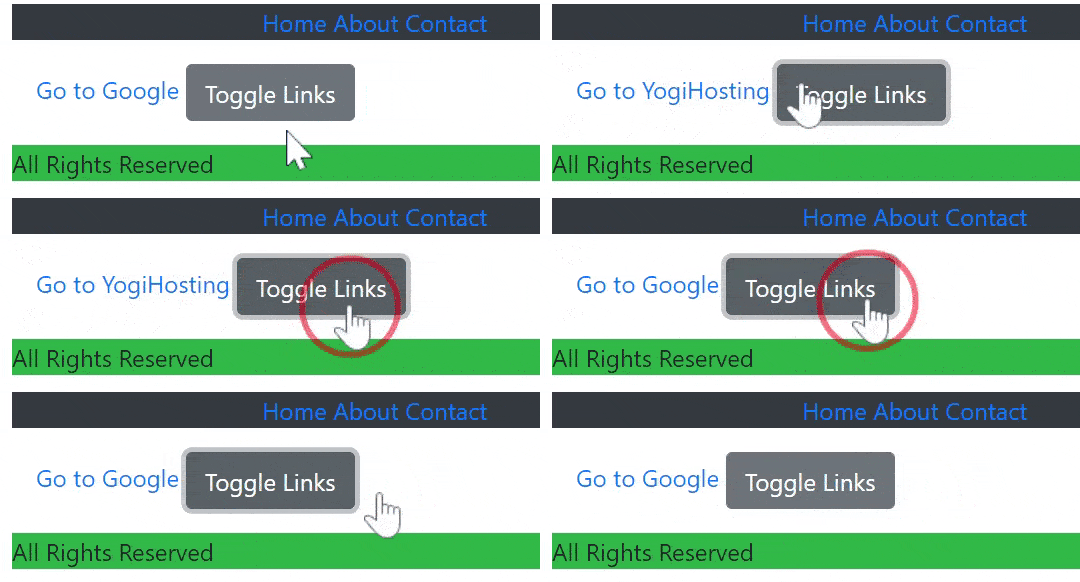
Now comment out the StateHasChanged() method and the toggling stop. The reason is because the component does not know that you have changed the value of the bool property Enabled in the Examplep.razor component.
This is how @ref and StateHasChanged works in Blazor.
IDisposable to dispose a Razor Component
Razor component must be disposed for garbage collection. Use Dispose() method to release unmanaged resources. The skeleton of Dispose method is shown below.
1 2 3 4 5 6 7 8 9 10 11 | @using System@implements IDisposable...@code { public void Dispose() { // dispose unmanaged resources }} |
The important thing to note that you will need the component to implement IDisposable interface.
@implements IDisposableNote that Managed resources are disposed by Blazor automatically.
Download the source codes
In this tutorial I covered all about the Lifecycle of a Razor Component. I hope you enjoyed learning this topic.




 Welcome to YogiHosting - A Programming Tutorial Website. It is used by millions of people around the world to learn and explore about ASP.NET Core, Blazor, jQuery, JavaScript, Docker, Kubernetes and other topics.