Managing ASP.NET Core app hosted on Kubernetes

In this tutorial we will go through some necessary and detailed information that will be needed for managing your ASP.NET Core apps on Kubernetes. I will be proceeding from the last tutorial where I had Deployed ASP.NET Core App on Kubernetes. So make sure you have gone through the previous tutorial so that you can understand the kubernetes topics which we will be covering here.
ASP.NET Core Kubernetes series consists of the following articles:
- Deploy ASP.NET Core App on Kubernetes
- Managing ASP.NET Core app hosted on Kubernetes
- How to use Kubernetes Ingress on an ASP.NET Core app
- Kubernetes: Host Multi-Container ASP.NET Core app to Single Pod
- Kubernetes: Host Multi-Container ASP.NET Core app to Multiple Pods
- Kubernetes Volume emptyDir and SSL Mount to volume
- Kubernetes Persistent volumes (PV) and Persistent Volume Claim (PVC)
- Kubernetes Liveness Readiness Startup Probes
- How to use Helm for ASP.NET Core with Kubernetes
Page Contents
ASP.NET Core Kubernetes Deployment
We can manages ASP.NET Core Kubernetes app with the help of a deployment configuration file. In this file we can specify number of Pods to run for the ASP.NET Core app.
apiVersion: apps/v1
kind: Deployment
metadata:
  name: first-dep
  labels:
    app: aspnet-core-app
spec:
  replicas: 1
  selector:
    matchLabels:
      component: web
  template:
    metadata:
      labels:
        component: web
    spec:
      containers:
        - name: csimpleweb
          image: simpleweb
          imagePullPolicy: Never
          ports:
            - containerPort: 80
In the command prompt go to the directory of this deployment file and run the apply command given below:
kubectl apply -f mydep.yamlNext, run the following command to get all the running pods:
kubectl get podsYou can see only 1 Pod is running. This is the same Pod created by the deployment.

You can also run the kubectl describe command to describe this deployment. This command will provide detailed information for this deployment. Run the below given command:
kubectl describe deployment first-depNotice the replicas line where it is showing 1 desired | 1 updated | 1 total | 1 available | 0 unavailable . It means there is 1 total Pod running the ASP.NET Core app.
Now I will change the deployment in order to configure replicas to 3. So, update the replicase to 3 in the deployment yaml configuration file.
apiVersion: apps/v1
kind: Deployment
metadata:
  name: first-dep
  labels:
    app: aspnet-core-app
spec:
  replicas: 3
  selector:
    matchLabels:
      component: web
  template:
    metadata:
      labels:
        component: web
    spec:
      containers:
        - name: csimpleweb
          image: simpleweb
          imagePullPolicy: Never
          ports:
            - containerPort: 80
Next, go to the directory of this yaml file and run the kubectl apply command once again, and this command will update the deployment. The command is given below.
kubectl apply -f mydep.yamlNote that “mydep.yaml” is the name of the deployment file. You will get the message deployment.apps/first-dep configured which tells deployment is updated. See the below screenshot where I marked this message:

Now run the kubectl describe deployment first-dep command again and you will see it now showing 3 Pods are running. In the below screenshot I have shown the result given by the command.
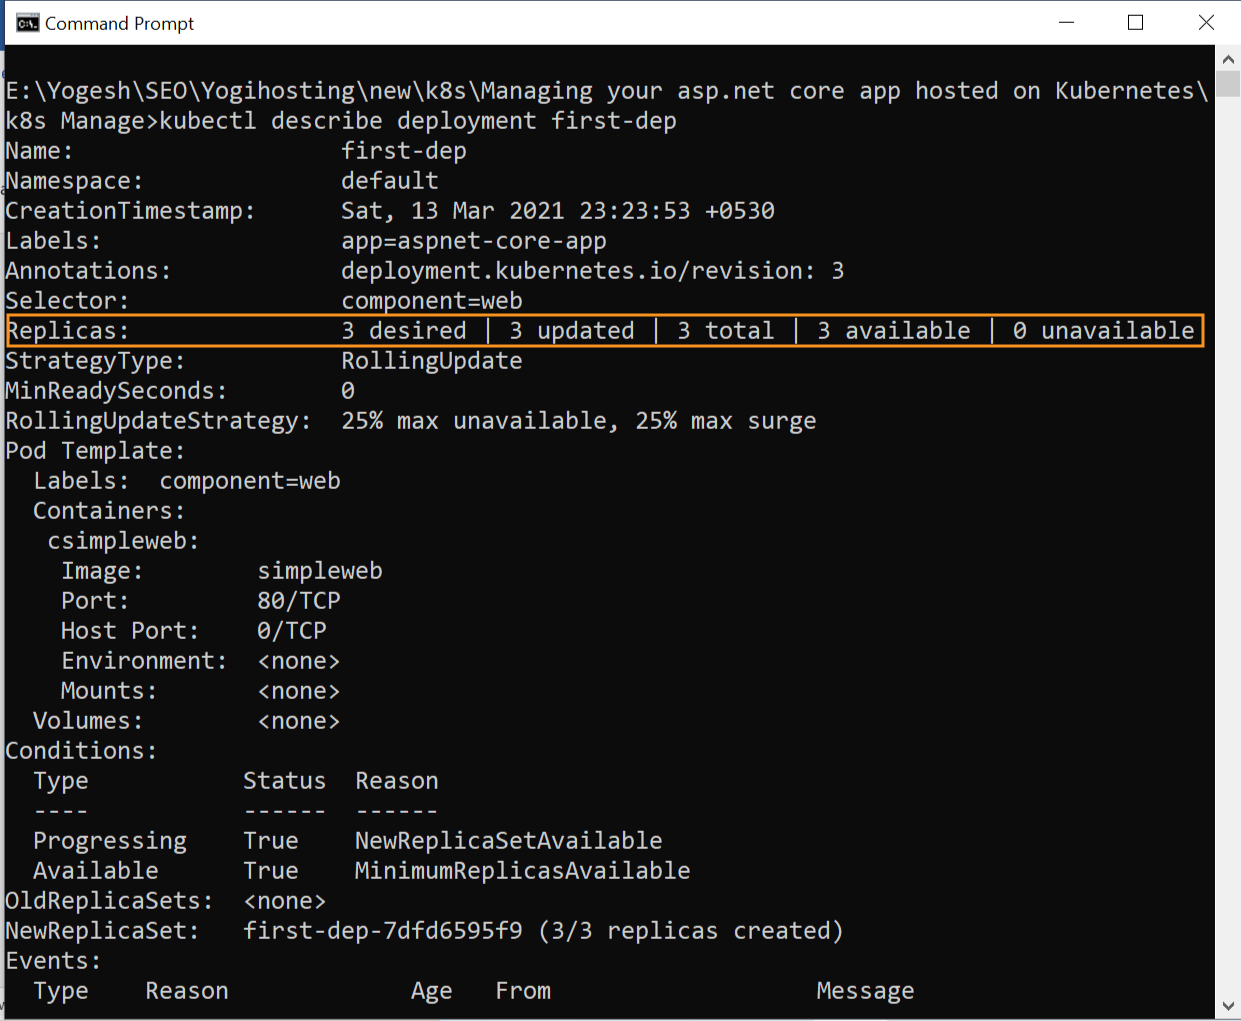
You can also run the kubectl get pods command to see 3 Pods are running. In the below image I have shown this thing.

So now our ASP.NET Core app is running in 3 Kubernetes Pods.
Deleting Pods
You can delete a running pod by the delete pod command which is given below:
kubectl delete pods podnameNext, delete any one of the 3 pods and then press CTRL+C to break from it, then quickly run the kubectl get pods command. You will see the Pod will now show Terminating status, and a new Pod is started by the deployment.
This is because the deployment has specified replicas: 3 which means it will keep on running the ASP.NET Core app in 3 Pods all the time. This is very helpful for the app because even if some Pods go down due to any problem like outrage or code exception then you get the surety that new Pods will automatically be created for the app.
I have shown this thing in the below image.
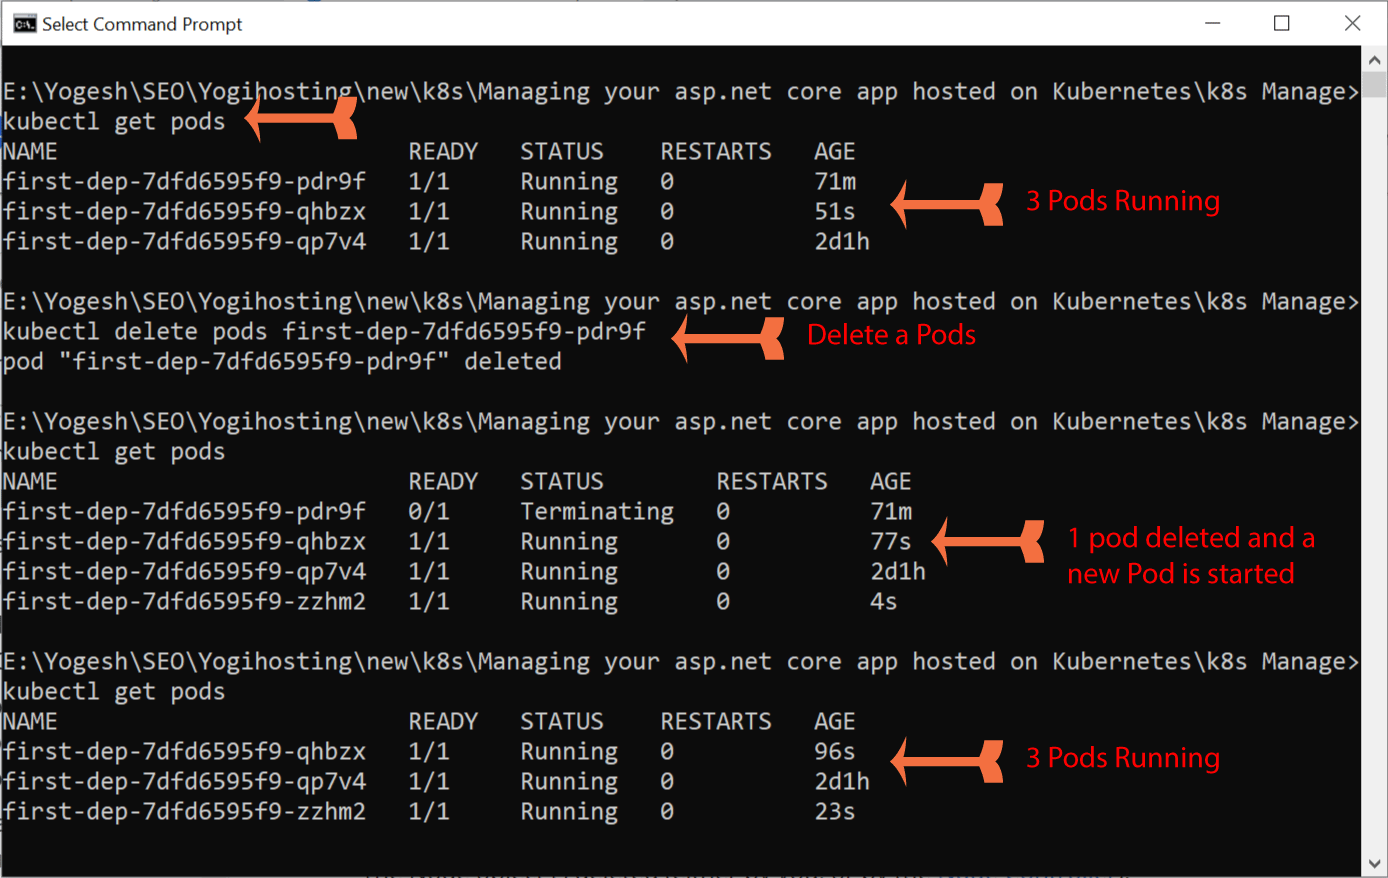
The question now comes here is how to delete pods. The answer is by deleting deployment. First we run kubectl get deployments to get the name of the deployment and then run kubectl delete deployment deploymentname to delete the deployment.
Deleting Objects in Kubernetes
You can delete any object whether it is deployment, service, ingress etc by kubectl delete command which is given below.
kubectl delete -f filename.yamlHere replace the “filename.yaml” with the name of your yaml file.
We can also delete objects by their name, see below:
kubectl delete pods name
kubectl delete deployment name
kubectl delete service name
kubectl delete ingress name
Kubernetes Debug Running Pods
Kubectl also let you to debug running Pods and see their logs. To see the logs of a Pod, use the command:
Kubectl logs podnameCheck the below screenshot where I am showing the logs of a Pod by running the kubectl logs first-dep-7dfd6595f9-qhbzx where “first-dep-7dfd6595f9-qhbzx” is the name of the pod.
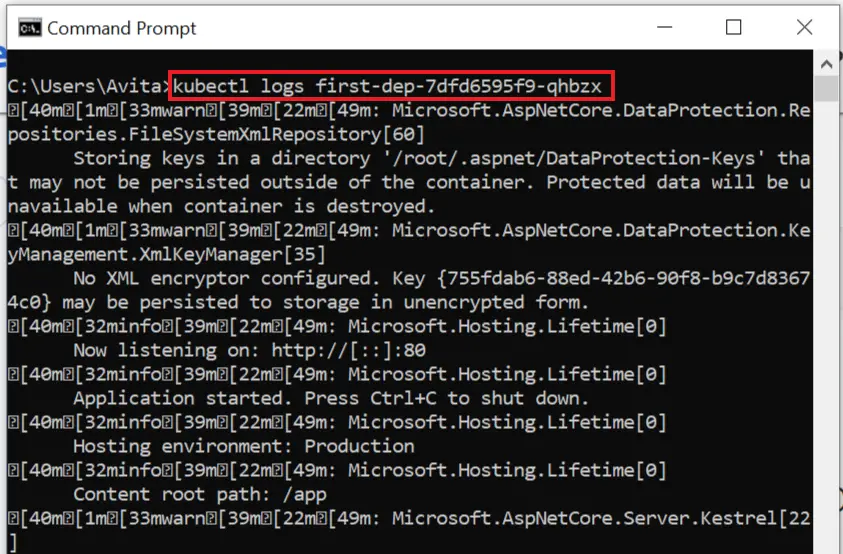
You can also check the logs of the Container which is running inside a Pod. The command for this is:
kubectl logs podname containernameA Pod can run one or more containers, you can know what containers a pod is running by the describe pod command:
kubectl describe pod first-dep-7dfd6595f9-qhbzxOn running the above command, I get a full description of the pod first-dep-7dfd6595f9-qhbzx. I also got the container’s name which the pod is running. Check the below given screenshot where I have found the container name is simpleweb.
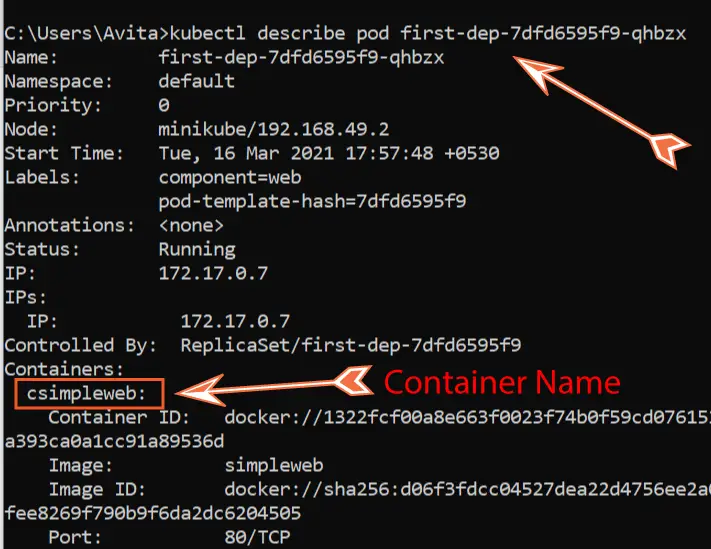
So, now I can run the below kubectl command to get the logs of this container.
kubectl describe pod first-dep-7dfd6595f9-qhbzx simplewebThe above command is very helpful in case your pod is running multi-containers and if any container goes down then you can check it’s logs.
Kubectl Bash Session
With kubectl you can start a bash session for a pod. The command is:
kubectl exec -it podname -- shAfter you enter the bash, run the ls command to see all the files and directories inside the container running in the pod. Check the below screenshot where I have marked this command.
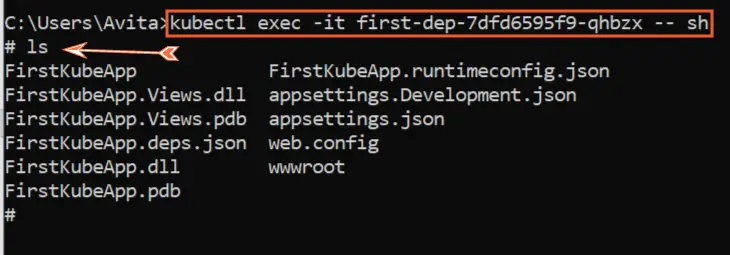
To come out of the bash type exit and press enter.
What is kubeconfig ?
A kubeconfig is a file used to configure access to Kubernetes. In windows it is located inside the folder C:\Users\{your-window-login}\.kube.
It is a yaml file without an extension and has a lot of configurations. I am showing a small part of my kubeconfig file.
apiVersion: v1
clusters:
- cluster:
    certificate-authority-data: LS0tLS1CRUdJTiBDRVJUSUZJQ0FURS0tLS
    server: https://kubernetes.docker.internal:6443
  name: docker-desktop
- cluster:
    certificate-authority: C:\Users\Avita\.minikube\ca.crt
    extensions:
    - extension:
        last-update: Tue, 16 Mar 2021 19:10:56 IST
        provider: minikube.sigs.k8s.io
        version: v1.17.1
      name: cluster_info
    server: https://127.0.0.1:52320
  name: minikube
contexts:
…
You can see it has a lot of configurations in key: value pairs. You do not have to edit this file from a text editor like Visual Studio.
Instead, there are kubectl command through which you add, modify or remove configurations from this file.
So, run kubectl config command in your command prompt which will give you a list of available command. These commands are:
- current-context – Displays the current-context.
- delete-cluster – Delete the specified cluster from the kubeconfig.
- delete-context – Delete the specified context from the kubeconfig.
- get-clusters – Display clusters defined in the kubeconfig.
- get-contexts – Describe one or many contexts.
- rename-context – Renames a context from the kubeconfig file.
- set – Sets an individual value in a kubeconfig file.
- set-cluster – Sets a cluster entry in kubeconfig.
- set-context – Sets a context entry in kubeconfig.
- set-credentials – Sets a user entry in kubeconfig.
- unset – Unsets an individual value in a kubeconfig file.
- use-context – Sets the current-context in a kubeconfig file.
- view – Display merged kubeconfig settings or a specified kubeconfig file
kubectl context and cluster
A context is a group of access parameters for accessing a particular Kubernetes cluster. All kubectl commands run against the current context.
Run the kubectl config get-contexts command which will show you only 1 context – docker-desktop. The * command shown for a context means it is the current context. Check the screenshot of this command.

Also run the kubectl config get-clusters command which will show only 1 cluster – docker-desktop. I have shown this in the below given image:

Suppose you now want to add your Azure Kubernetes Services (AKS) context so that you can access your AKS cluster right from your command prompt of your local pc. Then you will need to perform the following 2 steps. Note that you will need to have Azure CLI installed in your local pc.
Step 1 – Run az login command to login to your Azure account.
Step 2 – Run the command to create your AKS context and cluster entry to your kubeconfig.
az aks get-credentials --resource-group myResourceGroup --name myAKSClusterHere myResourceGroup is the resource group in your azure account and myAKSCluster is the name of your AKS cluster.
Your AKS context and cluster is created now and you can run the below 2 command to see them:
kubectl config get-clusters
kubectl config get-contexts
You will see a new entry called myAKSCluster added there. See the below screenshot.

Now if you run any kubectl command then they will run against your AKS cluster.
Let me show you this thing. When I ran the command kubectl get pods then I am getting the list of all the pods running in my AKS cluster and not in my local pc. See the below image.

Don’t forget to check which context you are using before running your kubectl command. When you are working in your local cluster make sure to change the current context by the command – kubectl config use-context docker-desktop.
In this ASP.NET Kubernetes Tutorial I covered all the necessary topics that will help you to manage your Kubernetes cluster efficiently. If you like my tutorial then kindly share it on your fb, twitter and other social account. This will help this article to reach other Kubernetes + asp.net core developers. Thank you.



 Welcome to YogiHosting - A Programming Tutorial Website. It is used by millions of people around the world to learn and explore about ASP.NET Core, Blazor, jQuery, JavaScript, Docker, Kubernetes and other topics.