Actions in ASP.NET Core

ASP.NET Core Action Methods are public methods defined inside the Controllers. These methods are mapped to incoming requests made from the client through routing rules.
Page Contents
An action method will look like:
public IActionResult NameofAction()
{
    return View();
}
Here IActionResult is the return type (also called as action result) and “NameofAction” is the name of the action. The return type of the action method can be anything like a normal C# function – IActionResult, ActionResult, JsonResult, string, StatusCodeResult being the commonly used ones.
IActionResult vs ActionResult – IActionResultis an interface while ActionResult is an abstract class derived from IActionResult interface. Most of the time you will be using IActionResult as the return type of action methods since you will be calling the View file to display information to the user. In WebAPIs you will be using ActionResult to send responses to the clients.
Action Methods returning Models to View
Action methods typical perform some work like database operation, mathematical calculation and so on. In the end it has to specify the outcome of this work to the user. So the result of the work is returned at the end to a “View” so that it may be displayed on the UI.
An Action Method can return 2 types of Models to a View. These are:
- Models containing C# data types like string, int, float, etc.
- Models containing C# classes like say Employee.cs, Person.cs, etc.
Let us understand how Action methods, Models and Views work together for both these 2 cases one by one.
We will create a new controller which will have few action methods that will perform common functions of a small company. Here I will continue with the same project which I made on my earlier tutorial on ASP.NET Core Controllers. If you haven’t checked it then make sure to do so.
Action Methods returning String type Model
Start by creating a new controller file called EmployeeController.cs inside the “Controllers” folder and add Index action methods to it. The HTTP POST “Index” action has 2 parameters – one receiving the id and other the name of the employee. See their code below.
using Microsoft.AspNetCore.Mvc;

namespace UnderstandingControllersViews.Controllers
{
    public class EmployeeController : Controller
    {
        public IActionResult Index()
        {
            return View();
        }

        [HttpPost]
        public IActionResult Index(int id, string name)
        {
            string welcomeMessage = $"Welcome Employee: {name} with id: {id}";
            return View((object)welcomeMessage);
        }
    }
}
The action method has a return type of IActionResult and it returns a string welcome message to a view at the end. This is done by calling the View() method. Note that to pass string messages to a view we need to cast them to object type. This thing I have done on the last line of the action method – View((object)welcomeMessage).
Next add the Razor view file called Index.cshtml inside the Views ➤ Employee folder and it will serve as the view for the action method. The code of the Index view is given below.
@model string;

<h2>Fill and submit the form</h2>

@{
	if (Model != null)
	{
		<h3 class="p-3 mb-2 bg-success text-white">@Model</h3>
	}
}

<form method="post">
	<div class="form-group">
		<label>Id:</label>
		<input class="form-control" name="id" />
	</div>
	<div class="form-group">
		<label>Name:</label>
		<input class="form-control" name="name" />
	</div>
	<div class="m-1">
		<button class="btn btn-primary" type="submit">Submit</button>
	</div>
</form>
Points to note:
- The view contains model of type string –
@model string. - There is a form to submit employee id and name.
- There is an if expression which checks if model is not empty which happens only when the action method returns a string welcome message to the view. This message is shown inside a h3 tag.
@{
    if (Model != null)
    {
        <h3 class="p-3 mb-2 bg-success text-white">@Model</h3>
    }
}
It’s time to test what we have made so far. So run your app and navigate to the url of Employee controller which for me is – https://localhost:7113/Employee. Fill the id and name on the fields and click the submit button. You will recieve a welcome message as shown by the image below.
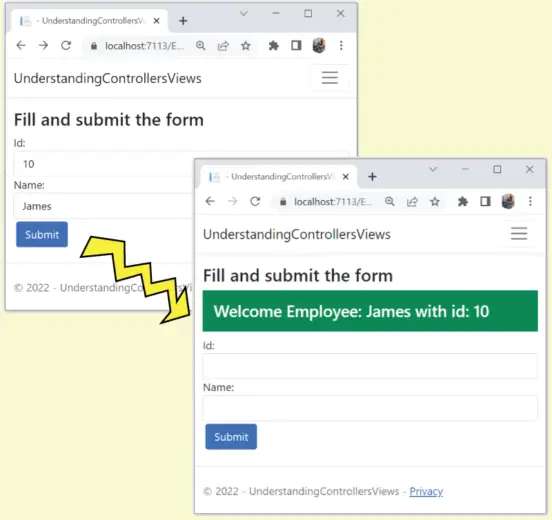
Note: In the same way we can also transfer other data types like int, float, etc from action methods to views.
Action Methods returning Class type Model
If we have to return more than one value to the view then the best way to achieve this is by returning a “class type” variable to the view as a Model. Take for example we have an Employee.cs class located inside the Models folder. This class has few fields related to the employees like name, salary, address and so on.
public class Employee
{
    public int Id { get; set; }
    public string Name { get; set; }
    public int Salary { get; set; }
    public string Designation { get; set; }
    public string Address { get; set; }
}
We can now use this class object to return multiple values to the view (ofcourse these will be the properties and variables of this class). So add a new action named Detail to the same “EmployeeController” class with the following code.
public IActionResult Detail()
{
    return View();
}

[HttpPost]
public IActionResult Detail(int id, string name)
{
    Employee emp = new Employee();
    emp.Id = id;
    emp.Name = name;
    emp.Salary = 1000;
    emp.Designation = "Manager";
    emp.Address = "New York";
    return View(emp);
}
The HttpGet type Detail action returns nothing to the View while the magic happens in the HttpPost type Detail action where an Employee class object is created and values are added to it’s properties. Finally this class object is returned to the view in the last line of the code – return View(emp).
Next, create Razor view file called “Detail.cshtml” inside the Views ➤ Employee folder and add the following code to it.
@model Employee;

<h2>Fill and submit the form</h2>

@{
	if (Model != null)
	{
		<h3 class="p-3 mb-2 bg-success text-white">
            Employee details: @Model.Id, @Model.Name, @Model.Salary,
            @Model.Designation, @Model.Address
        </h3>
	}
}

<form method="post">
	<div class="form-group">
		<label>Id:</label>
		<input class="form-control" name="id" />
	</div>
	<div class="form-group">
		<label>Name:</label>
		<input class="form-control" name="name" />
	</div>
	<div class="m-1">
		<button class="btn btn-primary" type="submit">Submit</button>
	</div>
</form>
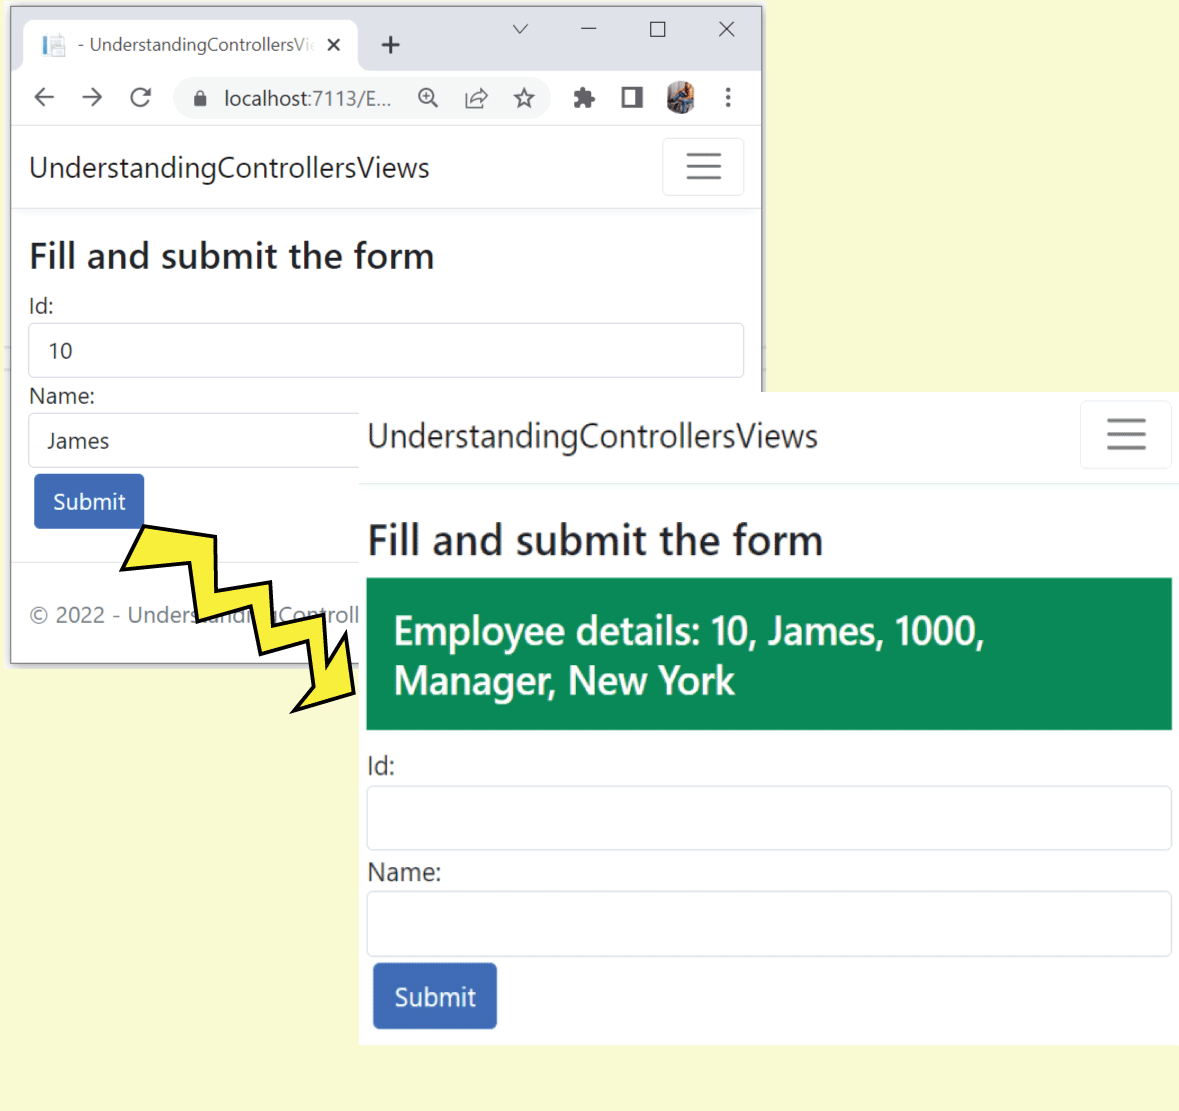
Note that this time I am defining the Model to be Employee type at the top of the view itself – @model Employee. Next I am showing the values of every property of “Employee” model inside h3 tag. You can now run the app and fill the form, on submitting you will see all the values of the employee. Check the below image which explains it’s working.
ViewResult Object
We have been using the View() method till now so let us learn a little bit more about it. The View method creates a ViewResult object by defining a model which will be transfered to the View. We already have seen how to transfer string and class type objects using this View method. The View() method has 4 different overloaded versions which are described in the below table:
| Method | Description |
|---|---|
View() |
Targets the default View to render it. Eg if the action method name is List and you are using the View() method (with empty parameter) then the List.cshtml view will be rendered. |
View("name_of_view") |
This version takes the view name in it’s parameter and this view will be rendered. Eg if you use View("Show") then the show.cshtml view will be rendered |
View(model) |
This version will render the default view by providing it with model data (class object). This is used to make the rendered view strongly typed. |
View("name_of_view", model) |
This version specifies the View by it’s name along with the model data that it will be provided with. |
Passing Data from Action Method to View
We can certainly transfer any type of data to the view from the action method by the help of a Model. This thing we have already covered in the above section. What if you don’t want to use this technique and still want to transfer data? Luckily, there are more ways to transfer data to the view. These are through ViewBag, TempData, and so on.
There are 3 different ways of tranferring data from Action Method to a View (without using a Model). These are:
- ViewBag
- TempData
- Session Variable
ViewBag
View Bag allows to define properties on a dynamic object on the action methods of the controllers. The ViewBag values can then be transfered to the Views where they can be shown on the UI.
I added a new action method called ViewBagExample on the ExampleController.cs file with the code shown in highlighted manner below.
using Microsoft.AspNetCore.Mvc;

namespace UnderstandingControllersViews.Controllers
{
    public class ExampleController : Controller
    {
        public IActionResult Index()
        {
            return View();
        }

        public IActionResult ViewBagExample()
        {
            ViewBag.CurrentDateTime = DateTime.Now;
            ViewBag.CurrentYear = DateTime.Now.Year;
            return View();
        }
    }
}
I have added 2 properties – CurrentDateTime & CurrentYear to the ViewBag variable. These contains the current datetime and current year.
Now on my View I can simply access these values like ViewBag.CurrentDateTime & ViewBag.CurrentYear. See the below code of the view file called ViewBagExample.cshtml where I am showing the values contained by the ViewBag variables inside h2 tag.
<h2>
    Current DateTime & Year: @ViewBag.CurrentDateTime and @ViewBag.CurrentYear
</h2>
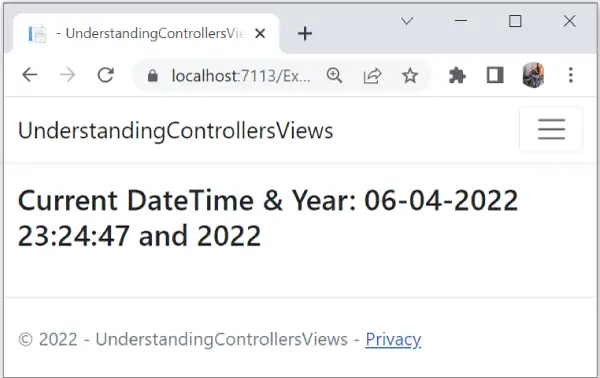
Now run the application and go to the URL – https://localhost:7113/Example/ViewBagExample, here you will see the current datetime and year.
- 1. ViewBag is lightweight method of transferring values to Controllers to Views.
- 2. ViewBag only transfers data from action methods to views, not visa-versa. ViewBag values are lost if redirection occurs in the action method.
- 3. It can contain both primitive or a complex type object.
- 4. Once the ViewBag values are read, DOTNET will remove it from the memory. This means to reuse these values you will have to store them in some variables.
TempData
You know that ViewBag values are lost in case there is a redirection on the action method therefore for such cases you use TempDate.TempData is similar to ViewBag except that it’s values live during redirections to.
Like ViewBag DOTNET automatically removes the values of the TempData as soon as they are read.
Let’s add 2 new actions in the Example Controller. These have the names – TempDataExample & TempDataShow. The codes for these 2 actions are given below:
public IActionResult TempDataExample()
{
    TempData["CurrentDateTime"] = DateTime.Now;
    TempData["CurrentYear"] = DateTime.Now.Year;
    return RedirectToAction("TempDataShow");
}

public IActionResult TempDataShow()
{
    return View();
}
The action called TempDataExample adds the current datetime and current year to 2 TempDate properties:
- 1. CurrentDateTime
- 2. CurrentYear
It then redirects the action method to the “TempDataShow” through RedirectToAction method as shown below:
return RedirectToAction("TempDataShow");The TempDataShow action simply invokes the default View with no model.
Now create the TempDataShow View inside the Views ➤ Example folder. Then add the below code to it:
<h2>
	Current DateTime & Year: @TempData["CurrentDateTime"] and @TempData["CurrentYear"]
</h2>
TempData stores values in dictionary manner so I am accessing these values using brackets ‘[]’.
Now run the application and go to the URL – https://localhost:44339/Example/TempDataExample, it will show the current datetime and year values.
Note: We can’t use ViewBag in this case as Viewbag values gets lost during redirection. You can check it by replacing the TempData with ViewBag in the TempDataShow View and the TempDataExample action.
What is the difference between ViewBag, ViewData and TempData? ViewBag is a dynamic object while ViewData is of Dictionary type. Like ViewData, TempData stores the values in a dictionary type. ViewBag values cannot persists during redirection so we have to use TempData for such cases.
The ‘Peek’ method allows you to get the value and also prevent it from deletion. This is because it does not tells MVC that the value has been read.
Use session to store the value permanently (until the session expires) for as many reads as you want and in any part of the application.
Session Variable
Session state is a storage of data while the user browses a website. Session state uses a store maintained by the app to persist data across requests from a client. You can use the data stored in the Session variable anywhere in your website.
First you need to enable session in ASP.NET Core app by adding the following 3 highlighted code lines in the Program.cs class.
var builder = WebApplication.CreateBuilder(args);

// Add services to the container.
builder.Services.AddControllersWithViews();

builder.Services.AddSession();
builder.Services.AddSingleton<IHttpContextAccessor, HttpContextAccessor>();

var app = builder.Build();

// Configure the HTTP request pipeline.
if (!app.Environment.IsDevelopment())
{
    app.UseExceptionHandler("/Home/Error");
    // The default HSTS value is 30 days. You may want to change this for production scenarios, see https://aka.ms/aspnetcore-hsts.
    app.UseHsts();
}

app.UseHttpsRedirection();
app.UseStaticFiles();

app.UseRouting();

app.UseAuthorization();

app.UseSession();

app.MapControllerRoute(
    name: "default",
    pattern: "{controller=Home}/{action=Index}/{id?}");

app.Run();
Here I have added session middleware and told dot net use it on my app. I also added a service of type IHttpContextAccessor which will be injected on the view and will provide me access to the session variable.
Create a new action called SessionExample inside the Example Controller with codes given below:
public IActionResult SessionExample()
{
    HttpContext.Session.SetString("CurrentDateTime", DateTime.Now.ToString());
    HttpContext.Session.SetInt32("CurrentYear", DateTime.Now.Year);
    return View();
}
The SetString() method will add any value as string to the session variable, similarly the SetInt32() method will add int value. In my case I am adding the current datetime and year as string and int values to the 2 session variables.
Now create a razor view file called SessionExample.cshtml inside the Views ➤ Example folder which will serve as the view for the action method. Add the following code to it:
@inject Microsoft.AspNetCore.Http.IHttpContextAccessor HttpContextAccessor
<h2>
	Current DateTime & Year:
	@HttpContextAccessor.HttpContext.Session.GetString("CurrentDateTime"),
	@HttpContextAccessor.HttpContext.Session.GetInt32("CurrentYear")
</h2>
I injected my service through the inject directive using ASP.NET Core Dependency Injection techinque which will help me to access session value through GetString and GetInt32 methods:
@HttpContextAccessor.HttpContext.Session.GetString("CurrentDateTime")
@HttpContextAccessor.HttpContext.Session.GetInt32("CurrentYear")To store complex data types like class variable in the session you have to first serialize them to json. Then to get the serialized value from session you have to De-serialize the session values. To do this add a new class called SessionExtensions.cs inside the Models folder of your app.
using System.Text.Json;

namespace UnderstandingControllersViews.Models
{
    public static class SessionExtensions
    {
        public static void Set<T>(this ISession session, string key, T value)
        {
            session.SetString(key, JsonSerializer.Serialize(value));
        }

        public static T? Get<T>(this ISession session, string key)
        {
            var value = session.GetString(key);
            return value == null ? default : JsonSerializer.Deserialize<T>(value);
        }
    }
}
Now in your action method serialize a class object (here person.cs) and store it on the session. For serialization we use Set<Type> extension method.
Person p = new Person(Name = "Yogi", Address = "Earth");
HttpContext.Session.Set<Person>("MyPersonClass", p);
On the view we can de-serialize the values from session variable through the Get<Type> extension method:
@{
    var p = HttpContextAccessor.HttpContext.Session.Get<Person>("MyPersonClass");
    <p>@p.Name, @p.Address</p>
}
Session’s cookie name and expiration time can be set inside the services.AddSession() method as shown below:
builder.Services.AddSession(options =>
{
    options.Cookie.Name = ".myapp";
    options.IdleTimeout = TimeSpan.FromSeconds(10);
});
Performing Redirections in Action Methods
There are many ways to perform redirection from an action method to another action method of the same or different controller. There are many methods for it like:
- Redirect
- RedirectPermanent
- RedirectToRoute
- RedirectToRoutePermanent
- RedirectToAction
- RedirectToActionPermanent
Redirect
The Redirect method is used to perform a temporary redirection (HTTP 302). It takes the redirection URL as a string argument and returns an instance of the RedirectResult class.
Example: The below Action method by the name of RedirectAction performs a temporary redirect to URL – /List/Search.
public RedirectResult RedirectAction() => Redirect("/List/Search");RedirectPermanent
RedirectPermanent method is similar to Redirect method except it redirects user permanently (HTTP 301).
Example: This time the action method by the name of RedirectAction performs a permanent redirect to URL – /List/Search.
public RedirectResult RedirectAction() => RedirectPermanent("/List/Search");RedirectToRoute
If you want to redirect user by following the routes of your application then you should use RedirectToRoute() method. It performs temporary redirection and takes an anonymous type as parameter. The properties of the anonymous type are then passed to the routing system to generate a URL.
The RedirectToRoute() method returns an instance of the RedirectToRouteResult. To perform redirection I can use the RedirectToRoute() method as shown below:
public RedirectToRouteResult Redirect() {
    RedirectToRoute(new { controller = "Admin", action = "Users", ID = "10" });
}
So it will redirect user to – /Admin/Users/10.
RedirectToRoutePermanent
The RedirectToRoutePermanent similar to RedirectToRoute method except it redirects user permanently.
Example:
public RedirectToRouteResult Redirect() {
    RedirectToRoutePermanent(new { controller = "Admin", action = "Users", ID = "10" });
}
RedirectToAction
The RedirectToAction method performs temporary redirection to a given action method. This method returns an instance of RedirectToActionResult class.
Now consider you apply RedirectToAction() method on the Index View as shown in the below code:
public class HomeController : Controller
{
    public RedirectToActionResult Index()
    {
        return RedirectToAction("List");
    }

    public RedirectToActionResult List()
    {
        return View();
    }
}
So this will redirect user to the List view of the same controller. The redirect URL in this case will be – /Home/List.
How do you call an action in the same controller? Use the overload of RedirectToAction method that takes a single parameter. For this parameter provide the name of the action method residing in the same controller.
How can we call a controller method from another controller? You can use the overload of RedirectToAction method that takes 2 parameters. The first parameter specfies the name of the controller while the second one specifies the action method of the controller.
If you give only one parameter value of the RedirectToAction method then ASP.NET Core assumes that you are referring to an action method in the current controller. So to redirect to the action of a different Controller you need to specify both the parameters. In the below code I am redirecting to the List action of Customer controller:
public RedirectToActionResult Index()
{
    return RedirectToAction("Customer","List");
}
The redirect url in this case will be /Customer/List.
Can we pass model to RedirectToAction? No you cannot but you can do this by other ways like using TempData or Session variables.
RedirectToActionPermanent
The RedirectToActionPermanent method performs permanent redirection. In all other cases it is similar to RedirectToAction method.
Example:
public RedirectToActionResult Index()
{
    return RedirectToActionPermanent("List");
}
Returning Different Types of Content from Action Methods
So far you have seen Action method returning string and View. But these are not the only things. In fact Actions Methods can return JSON and HTTP Status codes also. The below topics teaches you these methods.
Action method returning JSON
The method Json() returns JSON (JavaScript Object Notation) objects from Action methods. This method returns an object of JsonResult class.
The action method called ReturnJson located in the ExampleController return a JSON:
public JsonResult ReturnJson()
{
    return Json(new[] { "Brahma", "Vishnu", "Mahesh" });
}
Create the View called ReturnJson.cshtml inside the Views ➤ Example folder and show the JSON with @Model.
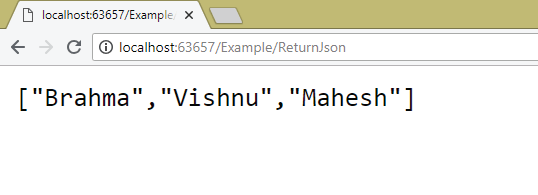
@ModelTo test it run the application and go to the URL – https://localhost:44339/Example/ReturnJson. You will see the JSON as shown in the given image:
Returning OK (HTTP Status Code 200) from Action
The OK method produces an empty HTTP Status Code 200 responses. It can be used to return objects in common format between the browser and the application with HTTP 200 status code.
The return type of this method is OkObjectResult class.
Example:
public OkObjectResult ReturnOk()
{
    return Ok(new string[] { "Brahma", "Vishnu", "Mahesh" });
}
In the View you can simply show the model data as @Model.
To return just an HTTP 200 status code without any data simply use an empty Ok() method.
Returning BadRequest (400), Unauthorized (401), NotFound (404) status codes from Action
The StatusCode method that resides inside the Microsoft.AspNetCore.Http namespace is used to return any type of status codes like BadRequest, Unauthorized, NotFound, etc.
The return type of this method is StatusCodeResult class of Microsoft.AspNetCore.Mvc namespace.
public StatusCodeResult ReturnBadRequst()
{
    return StatusCode(StatusCodes.Status400BadRequest);
}
public StatusCodeResult ReturnUnauthorized()
{
    return StatusCode(StatusCodes.Status401Unauthorized);
}
public StatusCodeResult ReturnNotFound()
{
    return StatusCode(StatusCodes.Status404NotFound);
    //or return NotFound();
}
You can download the full codes of this tutorial from the below link:
In this tutorial I explained Action Methods and their usage in Controllers. I hope you find it useful.
I will continue with Views in my next tutorial – Views in ASP.NET Core




 Welcome to YogiHosting - A Programming Tutorial Website. It is used by millions of people around the world to learn and explore about ASP.NET Core, Blazor, jQuery, JavaScript, Docker, Kubernetes and other topics.