How to send HTML Emails with Attachments in ASP.NET MVC
The System.Net.Mail namespace contains the MailMessage and SmtpClient classes that are used to Send SMTP emails from C#. In this ASP.NET MVC tutorial I will teach you with example how to send emails with multiple attachments added to them.
Find your Email Settings
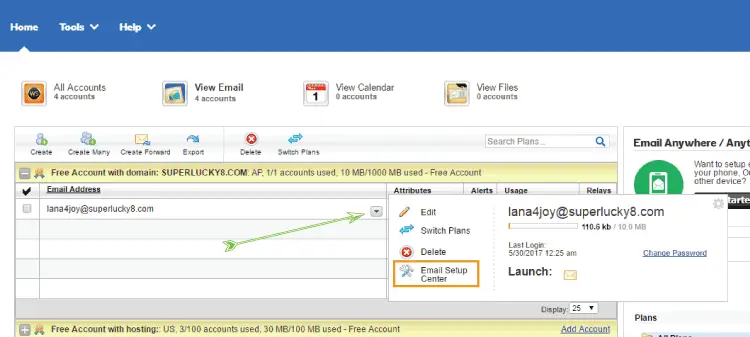
First go to your Email Setup Center which is located in your Workspace Email area of your web hosting account. See the below image where I have marked the Email Setup Center link located in YogiHosting account.
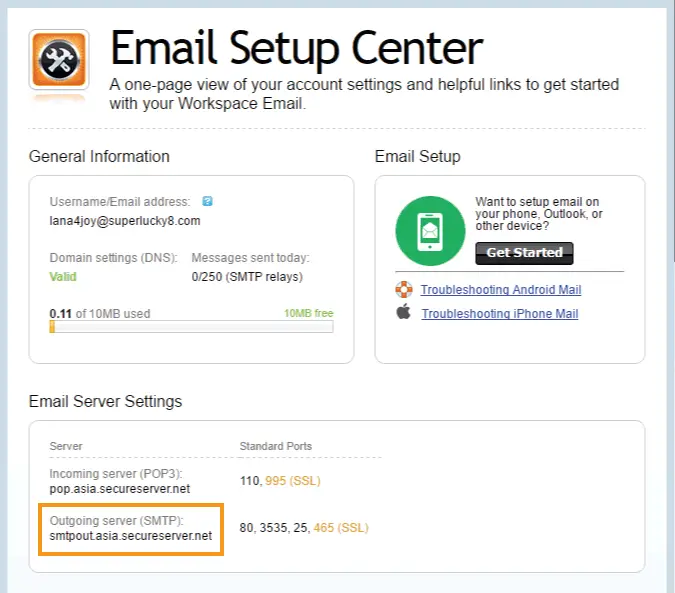
Next, on the Email Setup Center area, you will find the Outgoing Server (SMTP) settings. Note it down as it will be needed in the code.
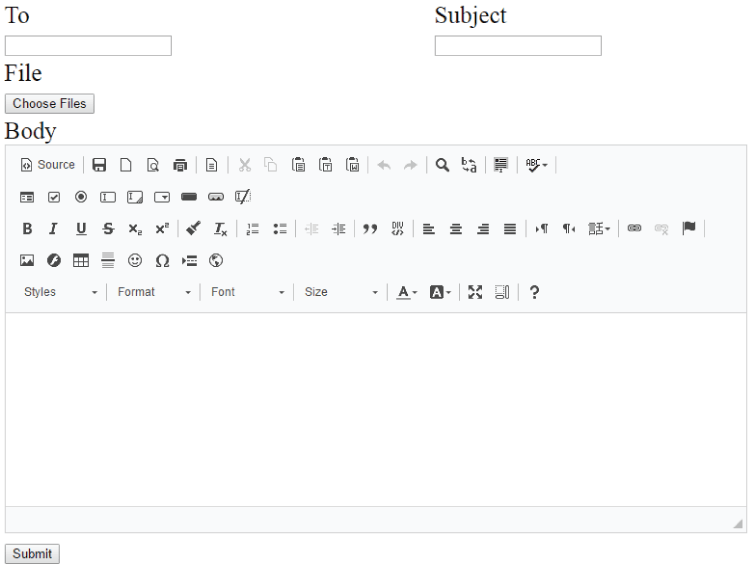
You have the SMTP settings now, so let’s build a form through which users can send HTML emails to any email address. This form will have the following fields:
- To – for entering the email address where the email will be send.
- Subject – for entering the email subject.
- Body – a text editor for entering the HTML content for the email’s body. I will use CKEditor for the body field. You can learn, how to integrate this editor, on my another tutorial – CKEditor.
- File – for entering one or many email attachments to the email.
This is how the email form will look:
Let us build the code, starting with the Model. Create a Model class called SendEmail and add the following code to it:
public class SendEmail
{
    [Required]
    [RegularExpression(@"^[A-Za-z0-9._%+-]+@[A-Za-z0-9.-]+\.[A-Za-z]{2,4}$", ErrorMessage = "Invalid email")]
    public string to { get; set; }

    [Required]
    public string subject { get; set; }

    [Required]
    public string body { get; set; }

    public HttpPostedFileBase[] file { get; set; }
}
The properties – to, subject & body are required ones, while I used an array of HttpPostedFileBase type for the ‘file’ field. This ‘file’ field will hold the email attachments.
Add the below code to View:
<script src="~/Content/Component/ckeditor/ckeditor.js" type="text/javascript" language="javascript"></script>
<h3>@ViewBag.Result</h3>
@using (Html.BeginForm("Index", "SendEmail", FormMethod.Post, new { enctype = "multipart/form-data" }))
    {
    <table>
        <tr>
            <td>
                @Html.LabelFor(model => model.to)
                @Html.EditorFor(model => model.to)
                @Html.ValidationMessageFor(model => model.to)
            </td>
            <td>
                @Html.LabelFor(model => model.subject)
                @Html.EditorFor(model => model.subject)
                @Html.ValidationMessageFor(model => model.subject)
            </td>
        </tr>
        <tr>
            <td>
                @Html.LabelFor(model => model.file)
                @Html.TextBoxFor(m => m.file, new { type = "file", multiple = "multiple" })
                @Html.ValidationMessageFor(model => model.file)
            </td>
        </tr>
        <tr>
            <td colspan="2">
                @Html.LabelFor(model => model.body)
                @Html.TextAreaFor(model => model.body)
                <script type="text/javascript" language="javascript">
                    CKEDITOR.replace(@Html.IdFor(model => model.body));
                </script>
                @Html.ValidationMessageFor(model => model.body)
            </td>
        </tr>
        <tr><td><button id="submitButton" type="submit">Submit</button></td></tr>
    </table>
}
Notice the ckeditor.js file reference on the View. It will change the body field into a Text Editor.
The code with does this work is:
@Html.TextAreaFor(model => model.body)
<script type="text/javascript" language="javascript">
    CKEDITOR.replace(@Html.IdFor(model => model.body));
</script>
Also add below CSS to style the form on the View.
<style>
    .emailDiv label {
        display: block;
        margin: 0;
        text-transform: capitalize;
    }

    table tr td > span {
        display: block;
        color: burlywood;
    }

    .emailDiv > form > div > div {
        padding-top: 25px;
    }

    table {
        width: 100%;
    }
</style>
Add the following namespaces to the controller:
using System.Net.Mail;
using System.IO;
Next add the below code to your controller:
[HttpPost]
[ValidateInput(false)]
public ActionResult Index(SendEmail sendEmail)
{
    string path = "~/Content/Upload/" + Guid.NewGuid() + "/";
    if (ModelState.IsValid)
    {
        MailMessage mailMessage = new MailMessage();
        mailMessage.From = new MailAddress("[email protected]");
        mailMessage.To.Add(new MailAddress(sendEmail.to));
        mailMessage.CC.Add(new MailAddress("[email protected]"));

        mailMessage.Subject = sendEmail.subject;
        mailMessage.IsBodyHtml = true;
        mailMessage.Body = sendEmail.body;

        if (sendEmail.file[0] != null)
        {
            Directory.CreateDirectory(Server.MapPath(path));
            foreach (HttpPostedFileBase file in sendEmail.file)
            {
                string filePath = Server.MapPath(path + file.FileName);
                file.SaveAs(filePath);

                mailMessage.Attachments.Add(new Attachment(Server.MapPath(path + file.FileName)));
            }
        }

        SmtpClient client = new SmtpClient();
        client.Credentials = new System.Net.NetworkCredential("[email protected]", "emailpassword");
        client.Host = "smtpout.asia.secureserver.net";

        try
        {
            client.Send(mailMessage);
            ViewBag.Result = "Mail Sent";
        }
        catch (Exception ex)
        {
            ViewBag.Result = ex.Message;
        }
    }

    return View();
}
I have an a folder called Upload on my website’s root. I created a folder inside this Upload folder. In that folder the attachment files will first be uploaded then they will be attached to the email.
- Next I am creating the MailMessage class object like MailMessage mailMessage = new MailMessage();, and then setting the ‘From, To, Subject and Body’ values to it.
- I have used the code – mailMessage.IsBodyHtml = true; so that I can use HTML elements on the mail body.
- Next I am looping through all the file items, and then uploading it to the server and at the same time attaching them to the ‘MailMessage’ Class like this – mailMessage.Attachments.Add(new Attachment(Server.MapPath(“FilePath”)));.
- Next I create the SmtpClient class object and set the ‘email, password & host’ values.
- Finally sending the email by using code – client.Send(mailMessage);.
Test the code by filling the to & subject text boxes and attach some files to the file upload control.
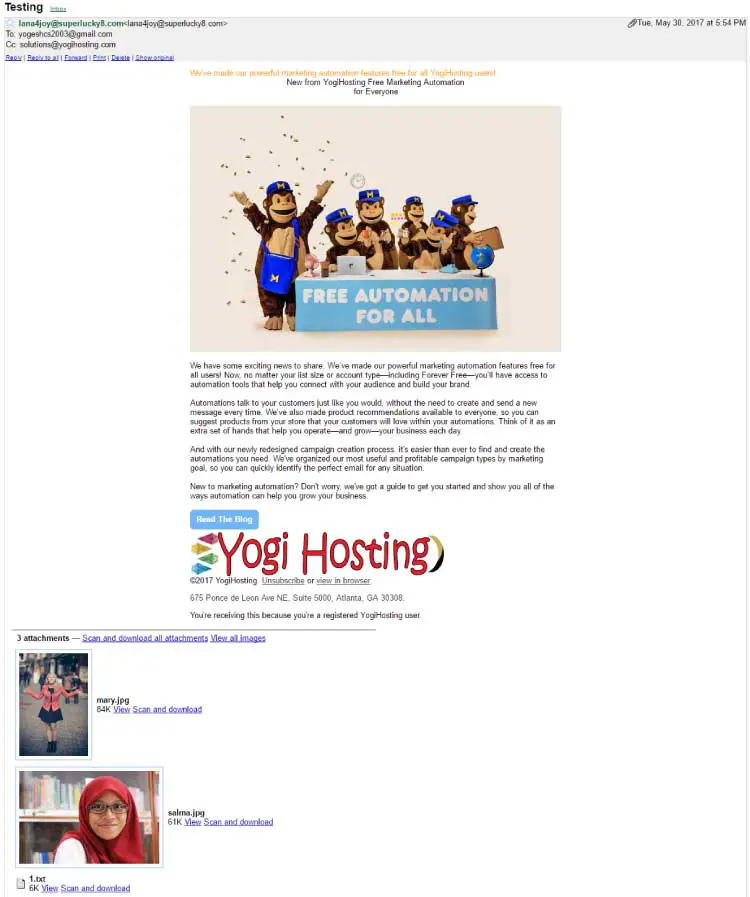
Since it is a HTML email so you can put any HTML Email Template to the body field.
I am providing you with an HTML Email Template which you can put to the body text editor:
<table border="0" cellpadding="0" cellspacing="0" style="border-collapse:collapse; max-width:600px!important; width:100%; margin:auto">
    <tbody>
        <tr>
            <td><span style="color:orange">We’ve made our powerful marketing automation features free for all YogiHosting users!</span></td>
        </tr>
        <tr>
            <td>
                <table border="0" cellpadding="0" cellspacing="0" style="border-collapse:collapse; min-width:100%; width:100%">
                    <tbody>
                        <tr>
                            <td>
                                <table align="left" border="0" cellpadding="0" cellspacing="0" style="border-collapse:collapse; max-width:100%; min-width:100%; width:100%">
                                    <tbody>
                                        <tr>
                                            <td style="text-align:center">
                                                <h2 style="font-style:normal; text-align:center!important">New from YogiHosting</h2>

                                                <h1 style="text-align:center">
                                                    Free Marketing Automation<br />
                                                    for Everyone
                                                </h1>
                                            </td>
                                        </tr>
                                    </tbody>
                                </table>
                            </td>
                        </tr>
                    </tbody>
                </table>

                <table border="0" cellpadding="0" cellspacing="0" style="border-collapse:collapse; min-width:100%; table-layout:fixed!important; width:100%">
                    <tbody>
                        <tr>
                            <td>
                                <table border="0" cellpadding="0" cellspacing="0" style="border-collapse:collapse; min-width:100%; width:100%">
                                    <tbody>
                                        <tr>
                                            <td> </td>
                                        </tr>
                                    </tbody>
                                </table>
                            </td>
                        </tr>
                    </tbody>
                </table>

                <table border="0" cellpadding="0" cellspacing="0" style="border-collapse:collapse; min-width:100%; width:100%">
                    <tbody>
                        <tr>
                            <td>
                                <table align="left" border="0" cellpadding="0" cellspacing="0" style="border-collapse:collapse; min-width:100%; width:100%">
                                    <tbody>
                                        <tr>
                                            <td style="text-align:center"><a href="http://www.google.com/url?q=http%3A%2F%2Fmailchimp.us1.list-manage.com%2Ftrack%2Fclick%3Fu%3Df7b9ee22124ff6454424dc10c%26id%3Dd1df84cbe0%26e%3Dcf4fa4ae46&sa=D&sntz=1&usg=AFQjCNGk8cgrVRRPTLggIfYkZ7LiElKSKg" rel="noreferrer" target="_blank" title=""><img alt="Facebook ads are here!" src="https://ci5.googleusercontent.com/proxy/OPb6D7XgBRcxgMp1xwv7FuYm3uIOf1isevxf4kmpXmyzskyaJzy4eh8zPWsxl27pnNB9nlArKs2wCBBeoK0-M0GDu6gWuiVDrcfc5IQ8whjFTWwgrUoKsRyD0UISwa6cmWOvGFcZtqWnptlscpVKFDVsQ8-MWQQ87Z1DaJw=s0-d-e1-ft#https://gallery.mailchimp.com/f7b9ee22124ff6454424dc10c/images/c2e9d1ba-d334-4b2b-b39d-b7ea0262700b.jpg" style="border:0; display:inline!important; max-width:1200px; min-height:auto; outline:none; padding-bottom:0; text-decoration:none; vertical-align:bottom; width:600px" /> </a></td>
                                        </tr>
                                    </tbody>
                                </table>
                            </td>
                        </tr>
                    </tbody>
                </table>

                <table border="0" cellpadding="0" cellspacing="0" style="border-collapse:collapse; min-width:100%; table-layout:fixed!important; width:100%">
                    <tbody>
                        <tr>
                            <td>
                                <table border="0" cellpadding="0" cellspacing="0" style="border-collapse:collapse; min-width:100%; width:100%">
                                    <tbody>
                                        <tr>
                                            <td> </td>
                                        </tr>
                                    </tbody>
                                </table>
                            </td>
                        </tr>
                    </tbody>
                </table>

                <table border="0" cellpadding="0" cellspacing="0" style="border-collapse:collapse; min-width:100%; width:100%">
                    <tbody>
                        <tr>
                            <td>
                                <table align="left" border="0" cellpadding="0" cellspacing="0" style="border-collapse:collapse; max-width:100%; min-width:100%; width:100%">
                                    <tbody>
                                        <tr>
                                            <td style="text-align:left">
                                                We have some exciting news to share: We’ve made our powerful marketing automation features free for all users! Now, no matter your list size or account type—including Forever Free—you’ll have access to automation tools that help you connect with your audience and build your brand.<br />
                                                <br />
                                                Automations talk to your customers just like you would, without the need to create and send a new message every time. We’ve also made product recommendations available to everyone, so you can suggest products from your store that your customers will love within your automations. Think of it as an extra set of hands that help you operate—and grow—your business each day.<br />
                                                <br />
                                                And with our newly redesigned campaign creation process, it's easier than ever to find and create the automations you need. We've organized our most useful and profitable campaign types by marketing goal, so you can quickly identify the perfect email for any situation.<br />
                                                <br />
                                                New to marketing automation? Don't worry, we've got a guide to get you started and show you all of the ways automation can help you grow your business.
                                            </td>
                                        </tr>
                                    </tbody>
                                </table>
                            </td>
                        </tr>
                    </tbody>
                </table>

                <table border="0" cellpadding="0" cellspacing="0" style="border-collapse:collapse; min-width:100%; table-layout:fixed!important; width:100%">
                    <tbody>
                        <tr>
                            <td>
                                <table border="0" cellpadding="0" cellspacing="0" style="border-collapse:collapse; min-width:100%; width:100%">
                                    <tbody>
                                        <tr>
                                            <td> </td>
                                        </tr>
                                    </tbody>
                                </table>
                            </td>
                        </tr>
                    </tbody>
                </table>
                <table border="0" cellpadding="0" cellspacing="0" style="border-collapse:collapse; min-width:100%; width:100%;margin:auto">
                    <tbody>
                        <tr>
                            <td>
                                <table border="0" cellpadding="0" cellspacing="0" style="background-color:#71b5f9; border-collapse:separate!important; border-radius:6px; border:3px none #71b5f9">
                                    <tbody>
                                        <tr>
                                            <td><a href="https://www.yogihosting.com/mailchimp-wordpress-plugin/" rel="noreferrer" style="font-weight:bold;letter-spacing:normal;line-height:100%;text-align:center;text-decoration:none;color:#ffffff;display:block;padding:10px" target="_blank" title="Read The Blog">Read The Blog</a></td>
                                        </tr>
                                    </tbody>
                                </table>
                            </td>
                        </tr>
                    </tbody>
                </table>
            </td>
        </tr>
        <tr>
            <td>
                <table align="center" border="0" cellpadding="0" cellspacing="0" style="border-collapse:collapse; max-width:600px; width:100%">
                    <tbody>
                        <tr>
                            <td>
                                <table align="left" border="0" cellpadding="0" cellspacing="0" style="border-collapse:collapse; width:140px">
                                    <tbody>
                                        <tr>
                                            <td><img alt="Yogihosting" src="https://www.yogihosting.com/wp-content/themes/yogi-yogihosting/Images/logo.png" /></td>
                                        </tr>
                                    </tbody>
                                </table>

                                <table align="left" border="0" cellpadding="0" cellspacing="0" style="border-collapse:collapse">
                                    <tbody>
                                        <tr>
                                            <td style="text-align:center">
                                                <p style="text-align:left">©2017 YogiHosting. <a href="https://www.yogihosting.com" rel="noreferrer" style="color:#373737;text-decoration:underline" target="_blank">Unsubscribe</a> or <a href="https://www.yogihosting.com" rel="noreferrer" style="color:#373737;text-decoration:underline" target="_blank">view in browser</a>.</p>

                                                <p style="text-align:left"><a href="#m_2096715531228527644_" rel="noreferrer" style="color:#373737;text-decoration:none">675 Ponce de Leon Ave NE, Suite 5000, Atlanta, GA 30308.</a></p>

                                                <p style="text-align:left">You're receiving this because you're a registered YogiHosting user.</p>
                                            </td>
                                        </tr>
                                    </tbody>
                                </table>
                            </td>
                        </tr>
                    </tbody>
                </table>
            </td>
        </tr>
    </tbody>
</table>
Finally Click the button to send the email.
It normally takes 5 to 10 seconds for the email to reach the inbox (also check the spam folder if you don’t find it).
Download link:
You can also use the CC and BCC fields, just like in regular email message:
mailMessage.CC.Add("[email protected]");
mailMessage.Bcc.Add("email2@ website1.com");




 Welcome to YogiHosting - A Programming Tutorial Website. It is used by millions of people around the world to learn and explore about ASP.NET Core, Blazor, jQuery, JavaScript, Docker, Kubernetes and other topics.