Areas and Routing in ASP.NET Core
The concept of Routing is very vast and I have covered it in 6 tutorials which are:
- 1. Learn ASP.NET Core Convention-Based Routing
- 2. What is Endpoint Routing, Implementing it from start [with codes]
- 3. Learn ASP.NET Core Route Constraint in details with lots of examples
- 4. ASP.NET Core Attribute Routing
- 5. ASP.NET Core Routing Generating URLs
- 6. Areas and Routing in ASP.NET Core
So make sure you cover each of these one by one.
ASP.NET Core Areas represent a functional segment of the application. It can be administration, billing, sales, etc. If our application becomes very large then it will have many controllers, Models & Views. We can create multiple Areas to distribute the application files into them. This will help us to manage our application in a better way.
Areas have their own MVC folder structure i.e. they have their own folders for Controllers, Model and Views.
Page Contents
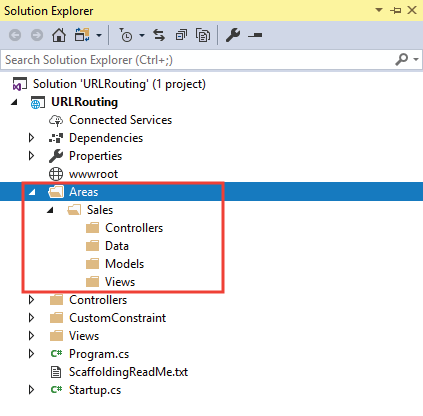
To create a new Area in an app, right click on the application name on the solution explorer and select Add ➤ New Folder and name this folder Areas. Create another folder inside this newly created Areas folder and name it as Sales. Now create folders for Controllers, Models & Views inside it. I have illustrated it on the below image:
Add a Route for the area in the Program.cs class of the app. I have shown this in the below code.
app.MapControllerRoute(
    name: "areas",
    pattern: "{area:exists}/{controller=Home}/{action=Index}");
The area segment matches URLs that target controllers in specific areas. The exists tag applies a constraint that the route must match an area. This area route matches all controllers with the [Area("Area name")] attribute.
Remember that we must add the areas routes before less specific routes.
To understand how the Sales Area will work, first create a new class called Product.cs inside the Areas ➤ Sales ➤ Models folder.
namespace RouteLinks.Areas.Sales.Models
{
    public class Product
    {
        public string Name { get; set; }
        public int Quantity { get; set; }
        public int Price { get; set; }
    }
}
Next create a new controller inside Areas ➤ Sales ➤ Controllers folder, and name it HomeController.cs. Add the below code to it:
using Microsoft.AspNetCore.Mvc;
using RouteLinks.Areas.Sales.Models;

namespace RouteLinks.Areas.Sales.Controllers
{
    [Area("Sales")]
    public class HomeController : Controller
    {
        public IActionResult Index()
        {
            Product[] productArray = new Product[] {
                new Product { Name = "Pants", Quantity = 5, Price=100 },
                new Product { Name = "Shirts", Quantity = 10, Price=80 },
                new Product { Name = "Shoes", Quantity = 15, Price=50 }
            };
            return View(productArray);
        }
    }
}
Notice the [Area("Sales")] attribute applied to the Controller. It is used to associate a Controller with the Sales area.
ASP.NET Core Tag Helpers not working in Areas ? We have to register Tag Helpers in the Razor View Imports file of the areas otherwise tag helpers will not work. Create Razor View Imports file called _ViewImports.cshtml to the Areas ➤ Sales ➤ Views folder and register the tag helpers by adding the below code to it.
@addTagHelper *, Microsoft.AspNetCore.Mvc.TagHelpersThe final part is adding an Index View which you add inside the Areas ➤ Admin ➤ Views ➤ Home folder having the contents as shown below:
@using RouteLinks.Areas.Sales.Models;
@model Product[]
@{ Layout = null; }

<!DOCTYPE html>
<html>
<head>
    <title>Routing</title>
</head>
<body>
    <table>
        <tr>
            <th>Name</th>
            <th>Quantity</th>
            <th>Price</th>
        </tr>
        @foreach (Product p in Model)
        {
            <tr>
                <td>@p.Name</td>
                <td>@p.Quantity</td>
                <td>@p.Price</td>
            </tr>
        }
    </table>
</body>
</html>
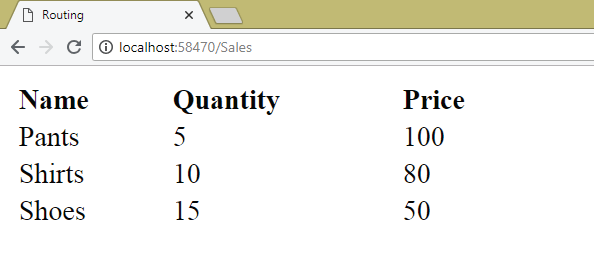
The View will simply show all the products in an HTML table format. Run the application and go to the URL – https://localhost:7248/Sales. We will see the Index Action of the Home Controller of the Sales Area is invoked and the products are shown on the browser.
Generating Links to Areas through Routing
The asp-action="action_name" tag helper creates a link to an controller’s action method of the same area.
Example: Create a link by adding the below code to the Index Action of the Home Controller of the Sales Area.
<a asp-action="List">Link1</a>The link formed will be:
<a href="/Sales/Home/List/">Link1</a>To target another Controller’s action method of the same Area we can use the asp-controller="controller_name" tag helper as shown below:
<a asp-action="List" asp-controller="Report">Link</a>The link formed in this case is:
<a href="/Sales/Report/List/">Link</a>The ‘asp-area’ Tag Helper
The asp-area tag helper targets the area segment of the app. To test it create a new area in your application and name it Employee.
We follow the same procedure – first create a new folder called “Employee” inside the Areas folder. Next, create folders for Controllers, Models & Views inside this newly created folder.
Add a Controller by name HomeController to the Employee area’s Controllers folder with the codes shown below:
using Microsoft.AspNetCore.Mvc;

namespace RouteLinks.Areas.Employee.Controllers
{
    [Area("Employee")]
    public class HomeController : Controller
    {
        public IActionResult Index()
        {
            return View();
        }
    }
}
Now go to the Index View located at Areas ➤ Sales ➤ Views ➤ Home and create an anchor tag by using asp-area tag helper.
<a asp-action="List" asp-controller="Home" asp-area="Employee">Link3</a>You will find the link formed in this case is:
<a href="/Employee/Home/List">Link3</a>We can link to non area controllers from the areas controllers by using asp-area="" tag helper.
To test it add the below code to the Index View of the Index action of Home Controller given in the Sales area:
<a asp-area="" asp-action="List" asp-controller="Home">Link4</a>The link formed in this case will be:
<a href="/Home/List/">Link4</a>
You can download the full codes of this tutorial from the below link:
I explained all about Areas and Routing feature of ASP.NET Core . Use it to create URLs in the way you want. I hope you will find it very helpful.



 Welcome to YogiHosting - A Programming Tutorial Website. It is used by millions of people around the world to learn and explore about ASP.NET Core, Blazor, jQuery, JavaScript, Docker, Kubernetes and other topics.