


Please Consider Donating us
We are helping millions of Beginners and Professionals to learn new programming technologies.
Please consider donating us:



ASP.NET MVC – Client Side Validation of Controls like Textbox, Dropdownlist, Checkbox, Radiobutton with jQuery

In ASP.NET MVC, Client Side Validation is performed using jQuery along with two plugins: jQuery Validation and jQuery Unobtrusive Validation.
Download jQuery, jQuery Validation & jQuery Unobtrusive Validation from NuGet
The first step is to add all three libraries to your project. You can easily install them using NuGet Package Manager.
Run the following commands in NuGet Package Manager Console.
- 1. For jQuery – PM ➤ Install-Package jQuery -Version 3.7.1
- 2. For jQuery Validation – PM ➤ Install-Package jQuery.Validation
- 3. For jQuery Unobtrusive Validation – PM ➤ Install-Package jQuery.Validation.Unobtrusive
You will find the 3 files will be added to the Scripts folder of your application.
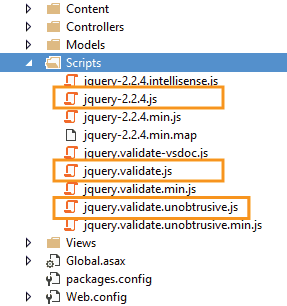
Adding Reference of jQuery, jQuery Validation & jQuery Unobtrusive Validation in View
First, add the below codes to the BundleConfig.cs file which is kept inside the App_Start folder:
bundles.Add(new ScriptBundle("~/jQuery").Include("~/Scripts/jquery-3.7.1.js"));
bundles.Add(new ScriptBundle("~/jQueryValidate").Include("~/Scripts/jquery.validate.js"));
bundles.Add(new ScriptBundle("~/Unobtrusive").Include("~/Scripts/jquery.validate.unobtrusive.js"));
Next, go to your View and enable ClientValidationEnabled and UnobtrusiveJavaScriptEnabled by adding the below code on top of the View:
@{
    HtmlHelper.ClientValidationEnabled = true;
    HtmlHelper.UnobtrusiveJavaScriptEnabled = true;
}
And reference the jQuery and 2 plugins by adding the below code to the bottom of the View:
@Scripts.Render("~/jQuery")
@Scripts.Render("~/jQueryValidate")
@Scripts.Render("~/Unobtrusive")
You are now ready to do Client Side Validation with jQuery in your View.
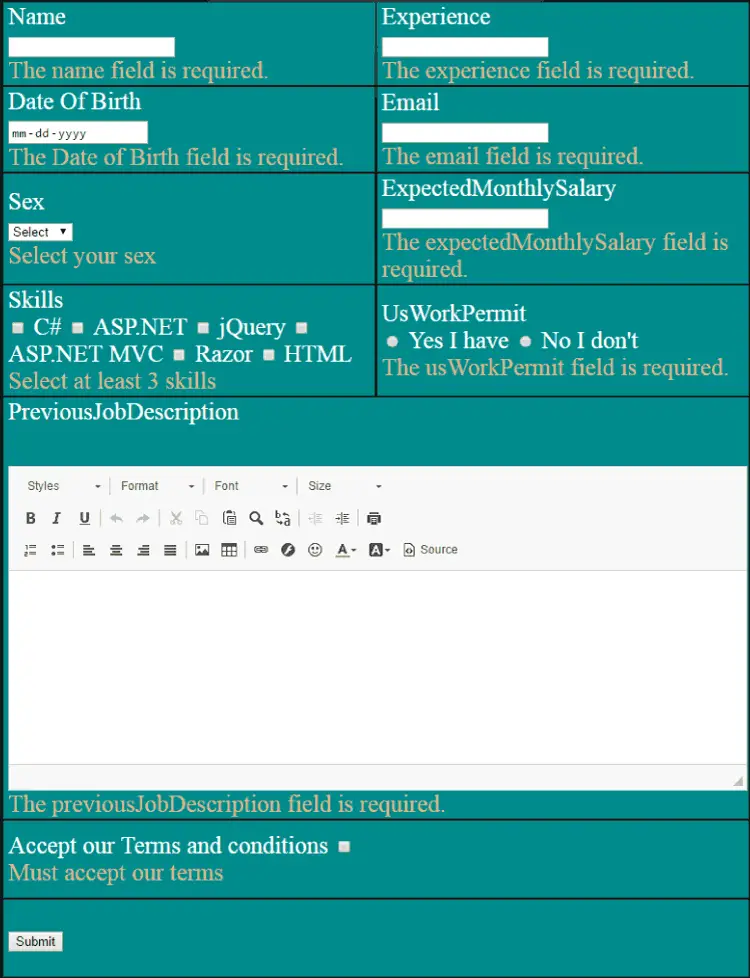
Example: In this tutorial, I will add jQuery validation to the Job Application form. First, refer to my previous tutorial, Server Side Validation, where I created this form and implemented server-side validation using Data Annotations.
Client Side Validation on Job Application Form
I will have to create a JS file where jQuery codes will be written. These codes will do my Client Side Validation.
Right click on the Scripts folder and add a new JavaScript File. Give it a name as custom.validation.js.
Add the following 2 lines of code to this file:
$(function () {
}(jQuery));
You will also reference this file in your View. So first go to BundleConfig.cs file and add the below code to it:
bundles.Add(new ScriptBundle("~/CustomValidation").Include("~/Scripts/custom.validation.js"));
And in your view, add the below code after you reference the Unobtrusive js file.
@Scripts.Render("~/CustomValidation")
Earlier, I created four classes in the CustomValidation.cs file to implement server-side validation. Now, I will extend three of these classes — ValidBirthDate, SexValidation, and RequiredTerms — to add client-side validation for the corresponding controls.
For Client Validation to work, derive all these 3 classes from IClientValidatable interface and add GetClientValidationRules() method to them.
- 1. Let us first extend the ValidBirthDate class.
Go to the CustomValidation.cs file and inherit it from IClientValidatable interface. Then add GetClientValidationRules() method to it. The updated code of this class is:
public sealed class ValidBirthDate : ValidationAttribute, IClientValidatable { //code for ValidationResult public IEnumerable<ModelClientValidationRule> GetClientValidationRules(ModelMetadata metadata, ControllerContext context) { ModelClientValidationRule mvr = new ModelClientValidationRule(); mvr.ErrorMessage = ErrorMessage; mvr.ValidationType = "validbirthdate"; mvr.ValidationParameters.Add("min", "01-25-1970"); mvr.ValidationParameters.Add("max", "01-25-2000"); return new[] { mvr }; } }Explanation: I added the GetClientValidationRules() method, which returns the client-side validation rules for the class. Inside this method, I create an instance of the ModelClientValidationRule class and set its ErrorMessage, ValidationParameters and ValidationType properties.
Note that the ValidationType must be set to the name of the jQuery function that will be invoked to perform the client-side validation.
The ErrorMessage property contains the validation message passed to this method from the model. In my model, I used the following code:
[ValidBirthDate(ErrorMessage = "DOB Should be between 01-25-1970 & 01-25-2000")]
Here, the text DOB Should be between 01-25-1970 & 01-25-2000 and will be set for the ErrorMessage.
I added 2 ValidationParameters to this method which are ‘min’ and ‘max’, and these parameters will be sent to my jQuery validbirthdate function.
Next, I have to add validbirthdate() function in the custom.validation.js file, like shown below:
$(function () {

    /*Date of Birth*/
    jQuery.validator.addMethod('validbirthdate', function (value, element, params) {
        var minDate = new Date(params["min"]);
        var maxDate = new Date(params["max"]);
        var dateValue = new Date(value);
        if (dateValue > minDate && dateValue < maxDate)
            return true;
        else
            return false;
    });

    jQuery.validator.unobtrusive.adapters.add('validbirthdate', ['min', 'max'], function (options) {
        var params = {
            min: options.params.min,
            max: options.params.max
        };

        options.rules['validbirthdate'] = params;
        if (options.message) {
            options.messages['validbirthdate'] = options.message;
        }
    });
    /*End*/

}(jQuery));
Explanation
Here in the js file, I created 2 methods – jQuery.validator.addMethod() and jQuery.validator.unobtrusive.adapters.add().jQuery.validator.addMethod()This method takes 3 parameters – value, element, params.
- value – contains the value of the control. Here it will provide the value of birthDate control.
- element – contains the ‘id’ of the control. Here it contains id of the birthDate control.
- params – are the parameters sent to this method from the GetClientValidationRules() method. Here these are ‘min’ and ‘max’.
In jQuery.validator.addMethod(), I wrote the jQuery code to extract the values of the min and max parameters. It then checks whether the date entered in the birthDate control falls within this range. If the date is within the specified range, the function returns ‘true’; otherwise, it returns false.
jQuery.validator.addMethod()This method connects the jQuery Unobtrusive Validation plugin with the validbirthdate method and displays the appropriate client-side validation error message. It has 3 parameter –
a. name of jQuery function
b. name of parameters passed
c. The call back function.In the jQuery.validator.unobtrusive.adapters.add() method, I have to set the rules (for marking parameters) and messages.
The rules are set to the parameters passed and the message is set to the options.message.
HTML Created For the birthDate ControlIf you run you application and inspect the birthDate control with Chrome Developer Tools in the browser, then you will see the html of the control has some data attributes added to it. It’s HTML will look like:
<input class="text-box single-line" data-val="true" data-val-date="The field Date of Birth must be a date." data-val-required="The Date of Birth field is required." data-val-validbirthdate="DOB Should be between 01-25-1970 & 01-25-2000" data-val-validbirthdate-max="01-25-2000" data-val-validbirthdate-min="01-25-1970" id="birthDate" name="birthDate" type="date" value="">
These added attributes come because I have enabled the ClientValidationEnabled & UnobtrusiveJavaScriptEnabled in my view.
These data attributes are:- data-val that is set to true and specifies that this input needs validation.
- data-val-required is the error message to be displayed if a value is not provided.
- data-val-date is the error message to be displayed if a value is not a date.
- data-val-validbirthdate is the error message to be displayed if the value fails validation on my custom function called validbirthdate.
- data-val-validbirthdate-max for storing the value of ‘max’ parameter.
- data-val-validbirthdate-min for storing the value of ‘min’ parameter.
The data attributes store the information required to perform Client Side Validation. This is why you only need a small amount of jQuery code, along with these attributes, to implement jQuery Validations.
- 2. Extend the SexValidation class.
I have a dropdownlist that allows for sex selection. I will extend this class now.
Add the GetClientValidationRules() to it so the code becomes:
public class SexValidation : ValidationAttribute, IClientValidatable { //code for ValidationResult public IEnumerable<ModelClientValidationRule> GetClientValidationRules(ModelMetadata metadata, ControllerContext context) { ModelClientValidationRule mvr = new ModelClientValidationRule(); mvr.ErrorMessage = ErrorMessage; mvr.ValidationType = "sexvalidation"; return new[] { mvr }; } }Explanation: In the GetClientValidationRules() method set the ‘ErrorMessage’ and ‘ValidationType’.
Next, you have to add sexvalidation function in the custom.validation.js file, like shown below:
/*Sex*/
jQuery.validator.addMethod('sexvalidation', function (value, element, params) {
    if ((value != "M") && (value != "F"))
        return false;
    else
        return true;
});

jQuery.validator.unobtrusive.adapters.add('sexvalidation', function (options) {
    options.rules['sexvalidation'] = {};
    options.messages['sexvalidation'] = options.message;
});
/*End*/
Explanation
I wrote the jQuery code to check whether the selected value in the dropdown list is either M or F. If the selected value is neither of these, the method returns false; otherwise, it returns true.
In jQuery.validator.unobtrusive.adapters.add(), I define the validation rules and error messages. Since no parameters are passed to this method from the GetClientValidationRules() method of SexValidation, I set the parameters to {}.
The messages is assigned using options.message.
- 3. Extend the RequiredTerms class.
The Terms checkbox must be checked by the user before the form can be submitted. Now, let’s implement client-side validation for this checkbox.
Update the RequiredTerms class with the code shown below:
public sealed class RequiredTerms : ValidationAttribute, IClientValidatable
{
    //ValidatioResult code

    public IEnumerable<ModelClientValidationRule> GetClientValidationRules(ModelMetadata metadata, ControllerContext context)
    {
        ModelClientValidationRule mvr = new ModelClientValidationRule();
        mvr.ErrorMessage = ErrorMessage;
        mvr.ValidationType = "termsvalidation";
        return new[] { mvr };
    }
}
Explanation
I am setting the error message and specifying termsvalidation as the jQuery function that will be called to perform client-side validation for this checkbox.
Go to custom.validation.js file and add the below jQuery code:
/*Terms Validation*/
jQuery.validator.addMethod('termsvalidation', function (value, element, params) {
    if (value != "true")
        return false;
    else
        return true;
});

jQuery.validator.unobtrusive.adapters.add('termsvalidation', function (options) {
    options.rules['termsvalidation'] = {};
    options.messages['termsvalidation'] = options.message;
});
/*End*/
Explanation
Here I am just checking whether the checkbox is not checked. If not checked I return true else false.
Client Side Validation of Skills Property
To validate the user’s skills, I want to ensure that they select at least three skills. Since Skills is a collection property rather than a simple property, I will need to write custom jQuery code in the View to perform this validation.
After @Scripts.Render(“~/CustomValidation”) code, add the below custom jQuery code to your View.
<script>
    $(document).ready(function () {
        $("form").submit(function () {
            Validate();
        });

        $("[id *= Skill]").click(function () {
            Validate();
        });

        function Validate() {
            var errorElement = $('span[data-valmsg-for="skills"]');
            var errorMessage = "Select at least 3 skills";

            if ($("[id *= Skill]:checked").length < 3)
                errorElement.addClass('field-validation-error').removeClass('field-validation-valid').text(errorMessage);
            else
                errorElement.addClass('field-validation-valid').removeClass('field-validation-error').text('');
        }

    });
</script>
Explanation: When the form is submitted, I call the Validate() method, where I find the error <span> element associated with these six checkboxes. I then check whether fewer than three checkboxes have been selected. If so, I display the appropriate error message in the “span” element.
I have also created the click event for all these 6 checkboxes and calling the Validate() method in it. So whenever any of these checkboxes is checked or unchecked then the Validate() method is called.
In this way you can validate the controls using custom jQuery code.
Client Side Validation of CKEditor (PreviousJobDescription property)
I have added a CKEditor for the PreviousJobDescription property. CKEditor hides the original <textarea> and displays the editor in its place. The actual validation is performed on the hidden <textarea>, not directly on the CKEditor instance.
For the Client Side Validation to work correctly with CKEditor, you first need to make the <textarea> visible and then call CKEditor’s updateElement() method to synchronize the editor content with the underlying textarea.
I added the following custom jQuery code to the button’s client-side event in the View:
$("#submitButton").click(function () {
    $("#previousJobDescription").show();
    CKupdate();
});
function CKupdate() {
    CKEDITOR.instances["previousJobDescription"].updateElement();
}
Run the project and navigate to the form containing the validation fields. Now, click the Submit button without entering valid values in the required fields. You will see the client-side validation error messages displayed next to the corresponding controls. These messages are generated immediately in the browser, so the form does not need to be submitted to the server before the user is informed about the validation errors.
Take some time to test the different validation rules, such as required fields, dropdown selections, checkboxes, date ranges, collection properties, and the CKEditor field. Correct the invalid values and submit the form again to verify that the error messages disappear when the input becomes valid.
You can also download the complete source code from the link given below and use it as a reference while implementing custom client-side validation in ASP.NET Core MVC.
SHARE THIS ARTICLE


Related Tutorials:




ABOUT THE AUTHOR
I hope you enjoyed reading this tutorial. If it helped you then consider buying a cup of coffee for me. This will help me in writing more such good tutorials for the readers. Thank you.

HELLO EVERYONE
 Welcome to YogiHosting - A Programming Tutorial Website. It is used by millions of people around the world to learn and explore about ASP.NET Core, Blazor, jQuery, JavaScript, Docker, Kubernetes and other topics.
SUBSCRIBE TO NEWSLETTER
Enter your email address to subscribe to this blog and receive notifications of new posts by email.
Join 90K other subscribers