Blazor QuickGrid Database Binding tutorial
Blazor QuickGrid component is used to display data from the database in tabular manner. Features like sorting & paging can also be added to it very easily. In this tutorial we are going to implement Blazor QuickGrid component in Blazor Web App from the very beginning. The source codes for this project is available from my GitHub repository.
Page Contents
Blazor Web App
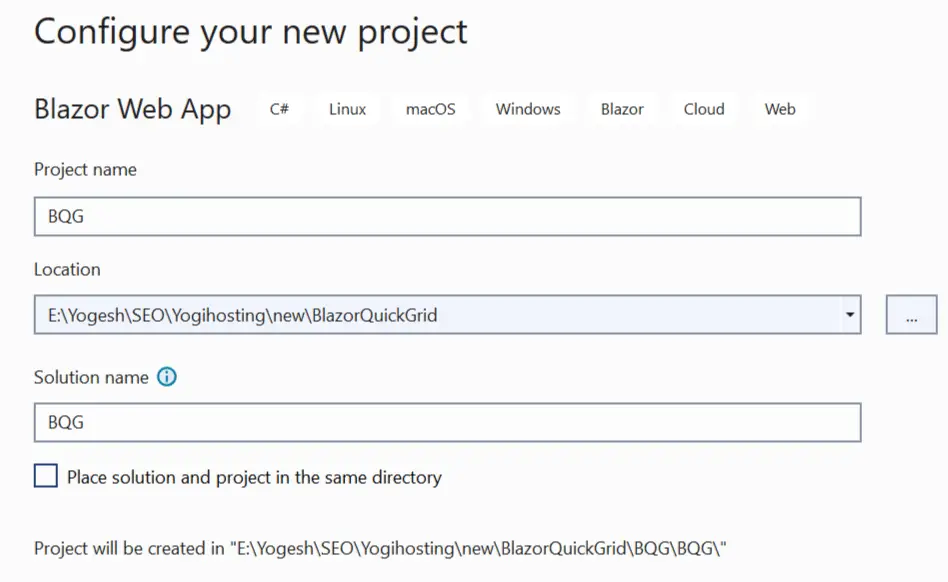
In Visual Studio create a new Blazor Web App project.

Name the project as BQG or any name of your choice.
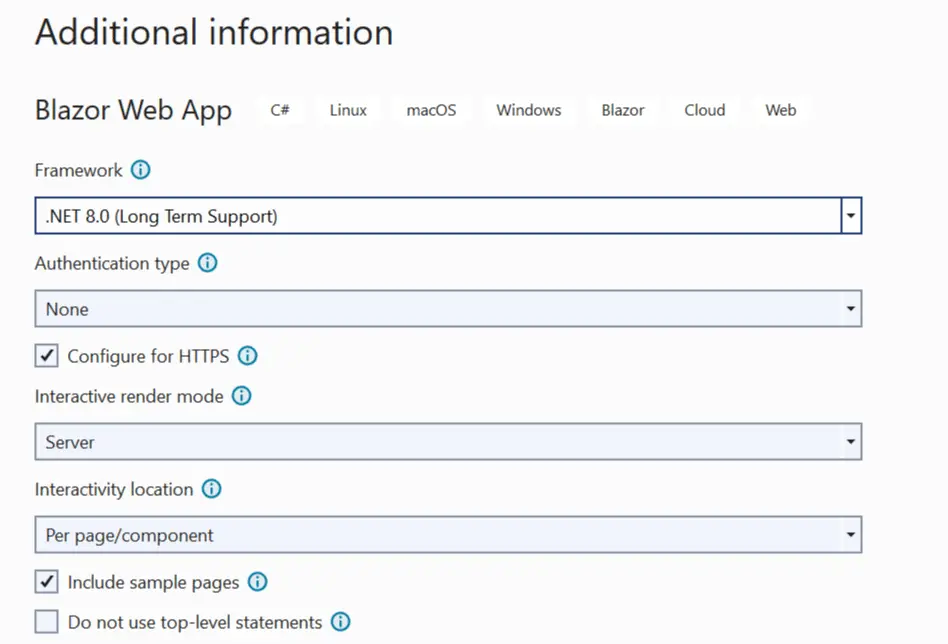
Next, select the .NET 8.0 version and keep all the settings as it is. Click the Create button.
Once the project is created we have to install the QuickGrid package called Microsoft.AspNetCore.Components.QuickGrid from NuGet.

We are now ready to use QuickGrid but before that we have to add Entity Framework Core which will help to read data from the database.
Configuring Database and Entity Framework Core
The QuickGrid will bind the Student records from the database with the help of Entity Framework Core so we need to install Microsoft.EntityFrameworkCore.SqlServer package to the project.
Next, add the database connection string to the appsettings.json file as shown below.
{
  "ConnectionStrings": {
    "DefaultConnection": "Server=(localdb)\\MSSQLLocalDB;Database=SchoolDB;MultipleActiveResultSets=True"
  }
}
The database name in our case is SchoolDB and we are using MSSQLLocalDB for the server.
Now we will create a new folder called Data on the project root. In this folder we will create class files for the “Student” entity, Database Conext and dummy student records that will be inserted to the database.
So, to the Data folder, add a new class called Student.cs and add the following code to it.
using System.ComponentModel.DataAnnotations;

namespace BQG.Data
{
    public class Student
    {
        public int Id { get; set; }

        [Required]
        [StringLength(50)]
        public string Name { get; set; }

        [Range(8, 15)]
        public int Age { get; set; }

        public DateTime DOB { get; set; }

        [Range(5, 10)]
        public int Standard { get; set; }

        [Required]
        public string Sex { get; set; }

        [Required]
        [StringLength(50)]
        public string School { get; set; }
    }
}
The above class contains the necessary student’s fields like Name, Schoo, age, etc.
Next, to the same Data folder, create a new class class DataContext.cs which serves as the DbContext for Entity Framework Core. It’s code is given below.
using Microsoft.EntityFrameworkCore;

namespace BQG.Data
{
    public class DataContext : DbContext
    {
        public DataContext(DbContextOptions<DataContext> options) : base(options) { }
        public DbSet<Student> Student { get; set; }

        protected override void OnModelCreating(ModelBuilder modelBuilder)
        {
        }
    }
}
We will also create a class called DbInitializer.cs to the “Data” folder. In this class there are 10 dummy student records. These records will be inserted to the database. The code of DbInitializer.cs is given below:
namespace BQG.Data
{
    public static class DbInitializer
    {
        public static void Initialize(DataContext context)
        {
            // Look for any students.
            if (context.Student.Any())
            {
                return;   // DB has been seeded
            }

            var students = new Student[]
            {
                new Student { Name = "Amit Singh", Age = 8, DOB = Convert.ToDateTime("2014/07/20"), Standard = 6,Sex = "Male", School = "St. Thomas" },
                new Student { Name = "George McMillan", Age = 9, DOB = Convert.ToDateTime("2015/05/10"), Standard = 7,Sex = "Male", School = "St. Dominic" },
                new Student { Name = "Vince McMahon", Age = 10, DOB = Convert.ToDateTime("2017/02/28"), Standard = 8,Sex = "Male", School = "DBP" },
                new Student { Name = "Paul Levesque", Age = 12, DOB = Convert.ToDateTime("2018/07/05"), Standard = 9,Sex = "Male", School = "Francis College" },
                new Student { Name = "John Cena", Age = 15, DOB = Convert.ToDateTime("2020/07/20"), Standard = 10,Sex = "Male", School = "The Hindu" },
                new Student { Name = "Stephanie McMahon ", Age = 10, DOB = Convert.ToDateTime("2018/04/09"), Standard = 8,Sex = "Female", School = "Angels" },
                new Student { Name = "Shawn Michaels", Age = 9, DOB = Convert.ToDateTime("2016/03/08"), Standard = 9,Sex = "Male", School = "Physics Walla" },
                new Student { Name = "Donald Trump", Age = 13, DOB = Convert.ToDateTime("2014/01/25"), Standard = 10,Sex = "Male", School = "St. Thomas" },
                new Student { Name = "Kamala Harris", Age = 14, DOB = Convert.ToDateTime("2016/09/01"), Standard = 9,Sex = "Female", School = "DPS" },
                new Student { Name = "Melania Trump", Age = 14, DOB = Convert.ToDateTime("2017/05/20"), Standard = 9,Sex = "Female", School = "DPS" }
            };

            context.Student.AddRange(students);
            context.SaveChanges();
        }
    }
}
In the Program.cs we are going to create the database and call the DbInitializer.cs class to insert the dummy records. The code to be added is given below.
using (var scope = app.Services.CreateScope())
{
    var services = scope.ServiceProvider;

    var context = services.GetRequiredService<DataContext>();
    context.Database.EnsureCreated();
    DbInitializer.Initialize(context);
}
Finally, we add a factory pattern to resolve an EF Core database context that will read data from the database. So add the following code to the Program.cs class.
builder.Services.AddDbContextFactory<DataContext>(options =>
  options.UseSqlServer(builder.Configuration.GetConnectionString("DefaultConnection")));
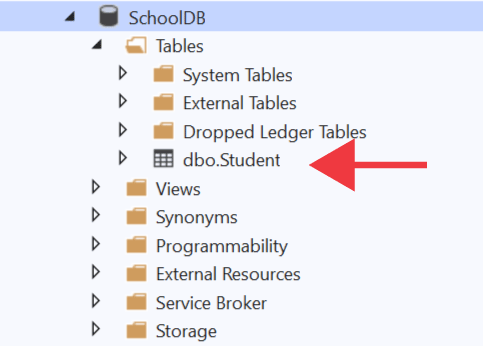
We can now run the project and the database with dummy student records will be created. We have shown this in the below image:
QuickGrid : Displaying data from the database
We are now ready to read students data from the database and display them in a QuickGrid component. So first we need to install the package called Microsoft.AspNetCore.Components.QuickGrid.EntityFrameworkAdapter.
Register this package in the Program.cs file as shown below.
builder.Services.AddQuickGridEntityFrameworkAdapter();Now, inside the Components/Pages folder create a new Razor Component called StudentGrid.razor.
In this component import the necessary namespaces as given below:
@using BQG.Data
@using Microsoft.AspNetCore.Components.QuickGrid
@using Microsoft.EntityFrameworkCore
Next define the component’s url to be “/student-grid”.
@page "/student-grid"The QuickGrid component will perform paging and sorting so we add an interactive render mode as shown by the code below.
@rendermode InteractiveServerRecall that earlier we added a factory pattern in the program class. Now in this component we will use it’s object, we do this by injecting the database context factory object with the @inject directive. The factory pattern requires disposal of the database context, so the component needs to implement the IAsyncDisposable interface with the @implements directive.Check the below code.
@implements IAsyncDisposable
@inject IDbContextFactory<DataContext> DbFactory
Now the component will receive the data from the database in the form or DbSet<T>. Here T in our case will be the Student entity.
Now add the QuickGrid component along with Paginator component, which renders only the current page data, as shown below.
<QuickGrid Items="context.Student" Pagination="pagination" Theme="corporate">
    <PropertyColumn Property="@(s => s.Id)" Sortable="true" />
    <PropertyColumn Property="@(s => s.Name)" Sortable="true" Title="Student Name" />
    <PropertyColumn Property="@(s => s.Age)" Sortable="true" />
    <PropertyColumn Property="@(s => s.DOB)" Format="yyyy-MM-dd" Sortable="true" />
    <PropertyColumn Property="@(s => s.Standard)" Sortable="true" />
    <PropertyColumn Property="@(s => s.Sex)" Sortable="true" />
    <PropertyColumn Property="@(s => s.School)" Sortable="true" />
</QuickGrid>

<Paginator State="pagination" />
In the code block add the following codes:
@code {

    private DataContext context = default!;

    protected override void OnInitialized()
    {
    context = DbFactory.CreateDbContext();
    }

    public async ValueTask DisposeAsync() => await context.DisposeAsync();

    PaginationState pagination = new PaginationState { ItemsPerPage = 4 };
}
Let me explain all these stuffs in details. The QuickGrid is provided with the data source though the “Items” property and it’s value is given as “context.Student”.
<QuickGrid Items="context.Student">
...
</QuickGrid>
In the OnInitialized lifecycle method we assign the database context which is “DbFactory” to the “context” field.
context = DbFactory.CreateDbContext();Coming to the pagination part where we defined PaginationState variable and set the page size as 4.
PaginationState pagination = new PaginationState { ItemsPerPage = 4 };Now, to the QuickGrid’s Pagination property (Pagination=”pagination”) and to the Paginator component’s “State” property, assign the PaginationState object.
<QuickGrid Items="context.Student" Pagination="pagination" Theme="corporate">
...
</QuickGrid>

<Paginator State="pagination" />
The QuickGrid’s PropertyColumn fields shows the colums of our Student entity. Here we have provided with the student’s fields as shown below.
<PropertyColumn Property="@(s => s.Id)" Sortable="true" />
<PropertyColumn Property="@(s => s.Name)" Sortable="true" Title="Student Name" />
<PropertyColumn Property="@(s => s.Age)" Sortable="true" />
<PropertyColumn Property="@(s => s.DOB)" Format="yyyy-MM-dd" Sortable="true" />
<PropertyColumn Property="@(s => s.Standard)" Sortable="true" />
<PropertyColumn Property="@(s => s.Sex)" Sortable="true" />
<PropertyColumn Property="@(s => s.School)" Sortable="true" />
Note that Sortable is set to be true (Sortable=”true”) for columns that will support the sorting feature.
We have also set the format and title for some columns – Format=”yyyy-MM-dd” and Title=”Student Name”.
For styling purpose we have set the theme as Theme=”corporate” and defined it’s style on the StudentGrid.razor component.
<style>
    .quickgrid[theme=corporate] {
        font-family: 'Comic Sans MS', 'Times New Roman', serif;
        color: red;
        border: 1px solid #CCC;
        font-size:20px;
    }

    .quickgrid[theme=corporate] thead{
        background-color:antiquewhite;
    }

        .quickgrid[theme=corporate] .col-title {
            gap: 0.4rem; /* Separate the sort indicator from title text */
            font-weight: bold;
            text-transform: uppercase;
        }

        .quickgrid[theme=corporate] .sort-indicator {
            color: blue;
        }

        .quickgrid[theme=corporate] button.col-title:hover, .quickgrid[theme=corporate] .col-options-button:hover {
            background-color: hotpink;
        }

        .quickgrid[theme=corporate] button.col-title:active, .quickgrid[theme=corporate] .col-options-button:active {
            background-color: yellow;
        }
</style>
Let’s run the project and open the url – https://localhost:7027/student-grid. We will see the student’s records with pagination links. Check the image shown below:

We have 10 student records with 3 pages. We can move through pages by the navigation links. We can also sort the colums in ascending/descending order by clicking their names.
QuickGrid : Filtering data from the database
We can also create filtering of data for QuickGrid quite easily. Let us create a feature where students are filtered by their names and their data is shown on QuickGrid component.
First we add a search type input box and provide data binding feature with @bind Razor directive. So when value of input box is changed the “studentName” field is re-bind with the database value.
<input type="search" @bind="studentName" @bind:event="oninput" />Next, with LINQ operator we filter the data before passing it to the Items parameter of QuickGrid.
private string studentName = string.Empty;
private IQueryable<Student> filteredStudent => context.Student.Where(m => m.Name!.Contains(studentName));
Check the full code of the razor component below.
@using BQG.Data

@using Microsoft.AspNetCore.Components.QuickGrid

@using Microsoft.EntityFrameworkCore

@rendermode InteractiveServer

@implements IAsyncDisposable

@inject IDbContextFactory<DataContext> DbFactory

@page "/student-search"

<h1>Blazor QuickGrid - Students Search</h1>

<p>
    <input type="search" @bind="studentName" @bind:event="oninput" />
</p>

<QuickGrid Items="filteredStudent" Pagination="pagination">
    <PropertyColumn Property="@(s => s.Id)" Sortable="true" />
    <PropertyColumn Property="@(s => s.Name)" Sortable="true" Title="Student Name" />
    <PropertyColumn Property="@(s => s.Age)" Sortable="true" />
    <PropertyColumn Property="@(s => s.DOB)" Format="yyyy-MM-dd" Sortable="true" />
    <PropertyColumn Property="@(s => s.Standard)" Sortable="true" />
    <PropertyColumn Property="@(s => s.Sex)" Sortable="true" />
    <PropertyColumn Property="@(s => s.School)" Sortable="true" />
</QuickGrid>

<Paginator State="pagination" />

@code {
    private string studentName = string.Empty;

    private DataContext context = default!;

    protected override void OnInitialized()
    {
    context = DbFactory.CreateDbContext();
    }

    private IQueryable<Student> filteredStudent => context.Student.Where(m => m.Name!.Contains(studentName));

    public async ValueTask DisposeAsync() => await context.DisposeAsync();

    PaginationState pagination = new PaginationState { ItemsPerPage = 4 };
}
The below image shows the filter of records done by entering “Kamala” on the search box and the filtered student record is displayed on the QuickGrid component.

Conclusion
In this tutorial we learned how to display data on QuickGrid component of Blazor. We also performed sorting, pagination and filtering of records that are displayed from the database. Don’t forget to download the source code from my GitHub repo.





 Welcome to YogiHosting - A Programming Tutorial Website. It is used by millions of people around the world to learn and explore about ASP.NET Core, Blazor, jQuery, JavaScript, Docker, Kubernetes and other topics.