Blazor WebAssembly Authentication with ASP.NET Core Identity
Blazor WebAssembly apps can be secured with ASP.,NET Core Identity. We can provide login and logout feature for users through Identity so that only authenticated users are allowed to access the Blazor WebAssembly app.
Here in this tutorial we are going to create 2 apps which are:-
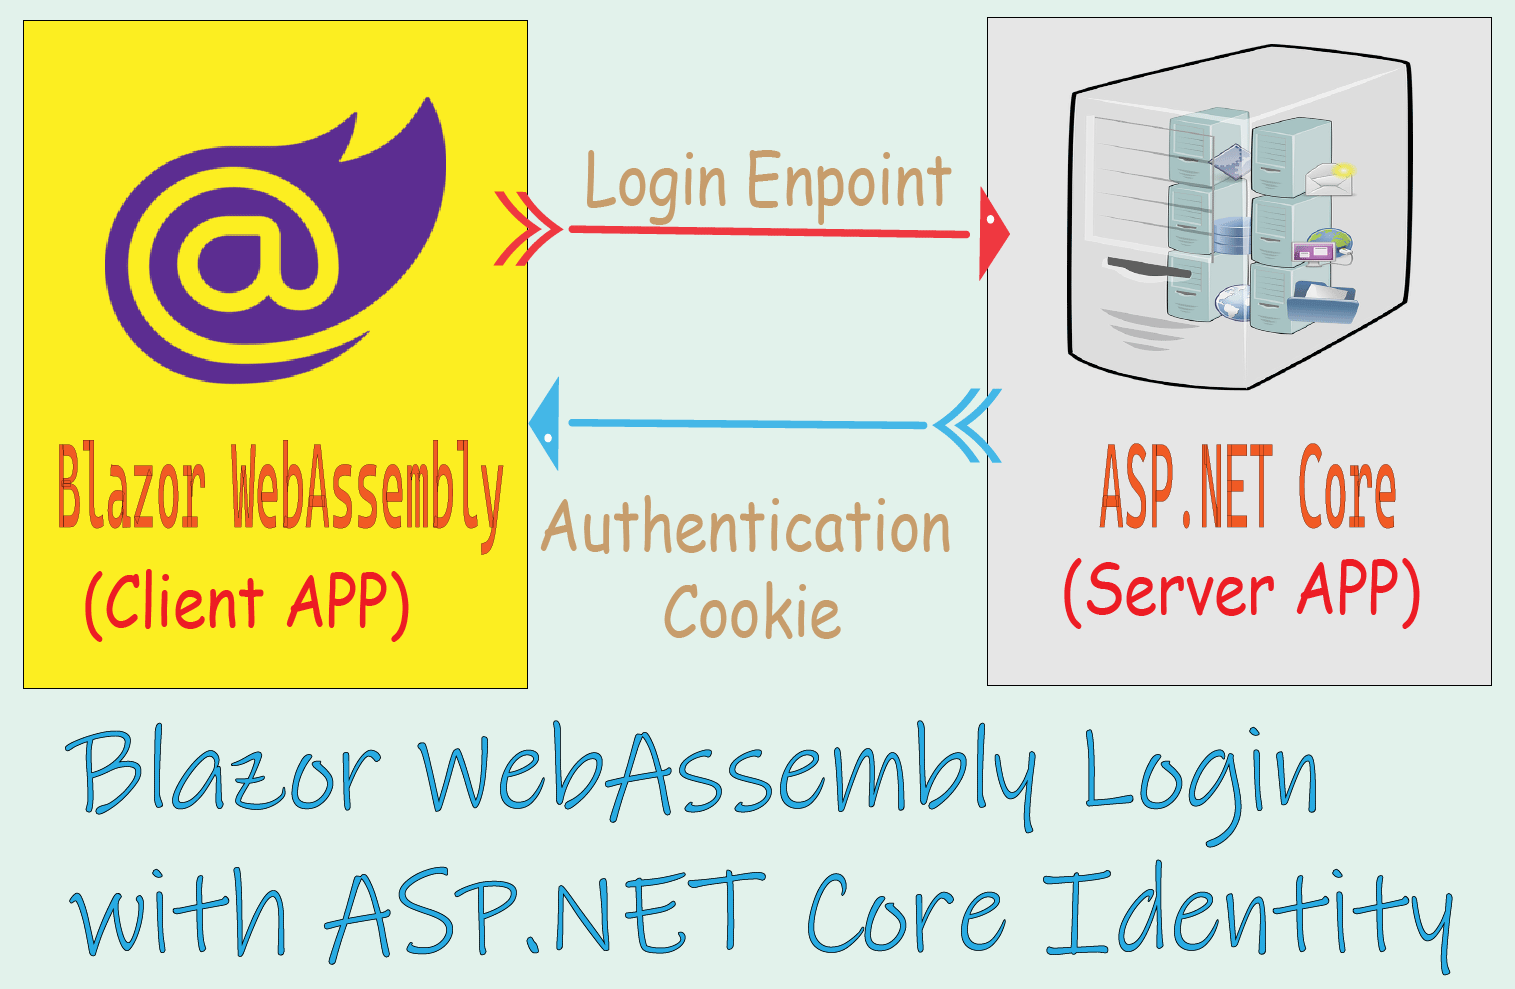
- AuthServer -it’s a server app in ASP.NET Core MVC that will have ASP.NET Core Identity implemented in it. It will allow Blazor WebAssembly app to perform authentication feature by calling login endpoints. On successful login an Identity Cookie is stored for the client.
- BWClient – it’s a client app in Blazor WebAssembly. It’s a frontend app through which user can perform authentication process. This client app calls the server app’s endpoints to perform login, login, registration and other tasks.
The whole working process is explained in the below image:
AuthServer – an ASP.NET Core Server app
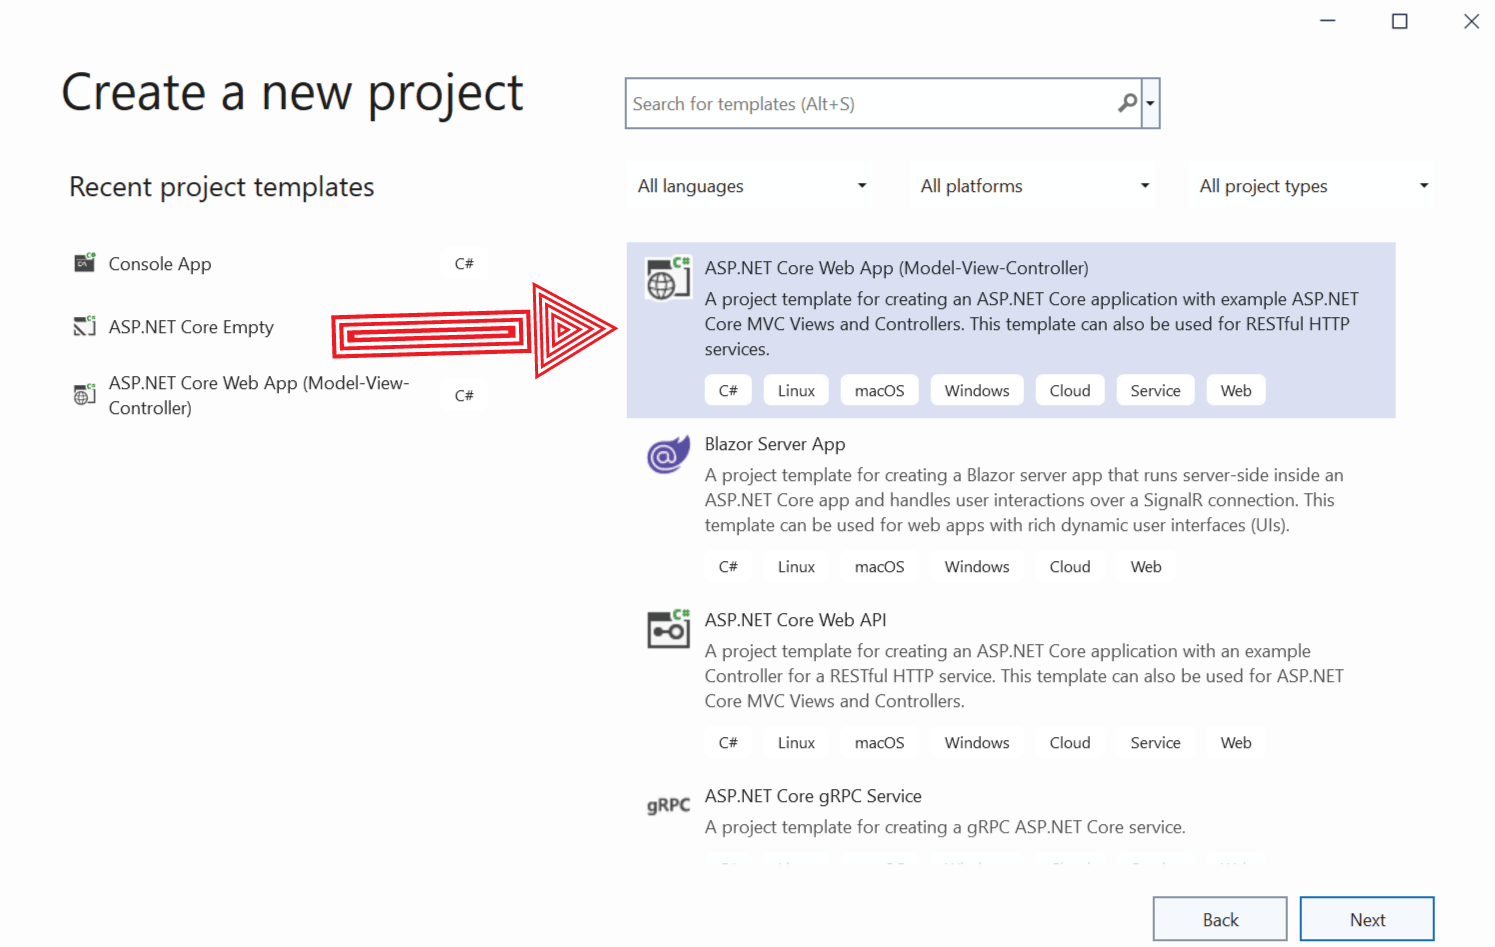
Create a new ASP.NET Core MVC app and name it AuthServer.
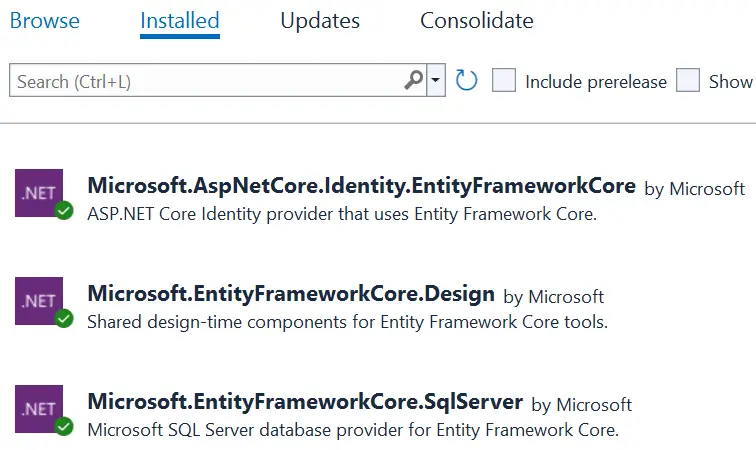
In this app we will add ASP.NET Core Identity feature so that users can login, logout, register and perform other authentication steps. So install the following 3 packages from NuGet.
- Microsoft.AspNetCore.Identity.EntityFrameworkCore
- Microsoft.EntityFrameworkCore.SqlServer
- Microsoft.EntityFrameworkCore.Design
Next, add the connection string inside the appsettings.json as shown below.
{
  "ConnectionStrings": {
    "DefaultConnection": "Server=(localdb)\\MSSQLLocalDB;Database=MSSQLLocalDB;Trusted_Connection=True;MultipleActiveResultSets=true"
  }
}
We are using MSSQLLocalDB for the database and we name the database as MSSQLLocalDB.
IdentityUser and IdentityDbContext classes
We will now add Identity User and database context class. So create 2 classes – AppUser.cs and AppDbContext.cs with the following code.
using Microsoft.AspNetCore.Identity;

namespace AuthServer
{
    class AppUser : IdentityUser
    {
        public IEnumerable<IdentityRole>? Roles { get; set; }
    }
}
using Microsoft.AspNetCore.Identity.EntityFrameworkCore;
using Microsoft.EntityFrameworkCore;

namespace AuthServer
{
    class AppDbContext(DbContextOptions<AppDbContext> options) : IdentityDbContext<AppUser>(options)
    {
    }
}
Seeding Database
Create a new class called SeedData.cs. In this class we will seed the ASP.NET Core database with 2 roles – Administrator & Manager. We also create a new user – [email protected] with Passw0rd! as password to the database. This user is also given the Administrator & Manager. roles. The full code of this class is given below.
using Microsoft.AspNetCore.Identity;
using Microsoft.EntityFrameworkCore;

namespace AuthServer;

public class SeedData
{
    public static async Task InitializeAsync(IServiceProvider serviceProvider)
    {
        using var context = new AppDbContext(serviceProvider.GetRequiredService<DbContextOptions<AppDbContext>>());
        context.Database.EnsureCreated();
        if (context.Users.Any())
        {
            return;
        }

        string[] roles = [ "Administrator", "Manager" ];
        using var roleManager = serviceProvider.GetRequiredService<RoleManager<IdentityRole>>();

        foreach (var role in roles)
        {
            if (!await roleManager.RoleExistsAsync(role))
            {
                await roleManager.CreateAsync(new IdentityRole(role));
            }
        }

        using var userManager = serviceProvider.GetRequiredService<UserManager<AppUser>>();

        var user = new AppUser
        {
            Email = "[email protected]",
            NormalizedEmail = "[email protected]",
            UserName = "[email protected]",
            NormalizedUserName = "[email protected]",
            EmailConfirmed = true,
            SecurityStamp = Guid.NewGuid().ToString("D")
        };

        await userManager.CreateAsync(user, "Passw0rd!");
        await userManager.AddToRolesAsync(user, roles);

        await context.SaveChangesAsync();
    }
}
Adding Authentication Configurations on Program class
We will now add the necessary authentication configurations inside the Program.cs class. The full code of this class is given below:
using AuthServer;
using Microsoft.AspNetCore.Identity;
using Microsoft.AspNetCore.Mvc;
using Microsoft.EntityFrameworkCore;
using System.Security.Claims;

var builder = WebApplication.CreateBuilder(args);

// Establish cookie authentication
builder.Services.AddAuthentication(IdentityConstants.ApplicationScheme).AddIdentityCookies();

// Configure authorization
builder.Services.AddAuthorizationBuilder();

builder.Services.AddDbContext<AppDbContext>(options => options.UseSqlServer(builder.Configuration["ConnectionStrings:DefaultConnection"]));

// Add identity and opt-in to endpoints
builder.Services.AddIdentityCore<AppUser>()
    .AddRoles<IdentityRole>()
    .AddEntityFrameworkStores<AppDbContext>()
    .AddApiEndpoints();

// Add a CORS policy for the client
builder.Services.AddCors(
    options => options.AddPolicy(
        "wasm",
        policy => policy.WithOrigins("https://localhost:7241")
            .AllowAnyMethod()
            .SetIsOriginAllowed(pol => true)
            .AllowAnyHeader()
            .AllowCredentials()));

var app = builder.Build();

if (builder.Environment.IsDevelopment())
{
    // Seed the database
    await using var scope = app.Services.CreateAsyncScope();
    await SeedData.InitializeAsync(scope.ServiceProvider);

}

// Create routes for the identity endpoints
app.MapIdentityApi<AppUser>();

app.MapPost("/Logout", async (SignInManager<AppUser> signInManager, [FromBody] object empty) =>
{
    if (empty != null)
    {
        await signInManager.SignOutAsync();
        return Results.Ok();
    }
    return Results.Unauthorized();
}).RequireAuthorization();

// Activate the CORS policy
app.UseCors("wasm");

app.UseHttpsRedirection();

app.MapGet("/roles", (ClaimsPrincipal user) =>
{
    if (user.Identity is not null && user.Identity.IsAuthenticated)
    {
        var identity = (ClaimsIdentity)user.Identity;
        var roles = identity.FindAll(identity.RoleClaimType)
            .Select(c =>
                new
                {
                    c.Issuer,
                    c.OriginalIssuer,
                    c.Type,
                    c.Value,
                    c.ValueType
                });

        return TypedResults.Json(roles);
    }

    return Results.Unauthorized();
}).RequireAuthorization();

app.MapGet("/", () => "Hello World!");

app.Run();
Let’s explain all the codes in this class one by one.
Starting from the top, we added ASP.NET Core Identity and it’s endpoints.
builder.Services.AddDbContext<AppDbContext>(options => options.UseSqlServer(builder.Configuration["ConnectionStrings:DefaultConnection"]));

builder.Services.AddIdentityCore<AppUser>()
    .AddRoles<IdentityRole>()
    .AddEntityFrameworkStores<AppDbContext>()
    .AddApiEndpoints();
The Blazor WebAssembly app will need Identity Cookies for holding the user session on successful login so we add Cookie Authentication to the program class. User identity with cookie authentication is added by calling AddAuthentication and AddIdentityCookies methods. The below code lines do this work.
builder.Services.AddAuthentication(IdentityConstants.ApplicationScheme).AddIdentityCookies();
builder.Services.AddAuthorizationBuilder();
We also need to add endpoints for registering, logging in and out using ASP.NET Core Identity. This is done by the below code line.
app.MapIdentityApi<AppUser>();Logout and Roles Endpoints
We defined the /Logut endpoint for signing out Blazor WASM users from ASP.NET Core Identity. This endpoint is called only if the user is authenticated therefore we have added RequireAuthorization() method at the last.
app.MapPost("/Logout", async (SignInManager<AppUser> signInManager, [FromBody] object empty) =>
{
    if (empty != null)
    {
        await signInManager.SignOutAsync();
        return Results.Ok();
    }
    return Results.Unauthorized();
}).RequireAuthorization();
We also defined /roles endpoints. It will return all the claims for the user in JSON format. This endpoint also requires authentication.
app.MapGet("/roles", (ClaimsPrincipal user) =>
{
    if (user.Identity is not null && user.Identity.IsAuthenticated)
    {
        var identity = (ClaimsIdentity)user.Identity;
        var roles = identity.FindAll(identity.RoleClaimType)
            .Select(c =>
                new
                {
                    c.Issuer,
                    c.OriginalIssuer,
                    c.Type,
                    c.Value,
                    c.ValueType
                });

        return TypedResults.Json(roles);
    }

    return Results.Unauthorized();
}).RequireAuthorization();
CORS policy for the Blazor WebAssembly client
A Cross-Origin Resource Sharing (CORS) policy is needed to permit requests between out Client (Blazor WASM) and Server (ASP.NET Core) apps. See the below code where a policy by the name “wasm” is created. The url – https://localhost:7241 is the URL of our ASP.NET Core app which should be different in your case. Check the launchSettings.json file to find your app’s url and relace it with this url.
// Add a CORS policy for the client
builder.Services.AddCors(
    options => options.AddPolicy(
        "wasm",
        policy => policy.WithOrigins("https://localhost:7241")
            .AllowAnyMethod()
            .SetIsOriginAllowed(pol => true)
            .AllowAnyHeader()
            .AllowCredentials()));

app.UseCors("wasm");
Calling the Seed class
Finally we also called the SeedData.cs class which will create the database and seed it with a test identity user.
if (builder.Environment.IsDevelopment())
{
    // Seed the database
    await using var scope = app.Services.CreateAsyncScope();
    await SeedData.InitializeAsync(scope.ServiceProvider);
}
Congrats, this completes Server app. You can now run this app which will create the database and add a test Identiy User.
We now move to the Client Blazor WASM app.
Blazor WebAssembly – a Blazor WebAssembly Client app
Create a new Blazor WebAssembly Standalone app in Visual Studio and name it BWClient.
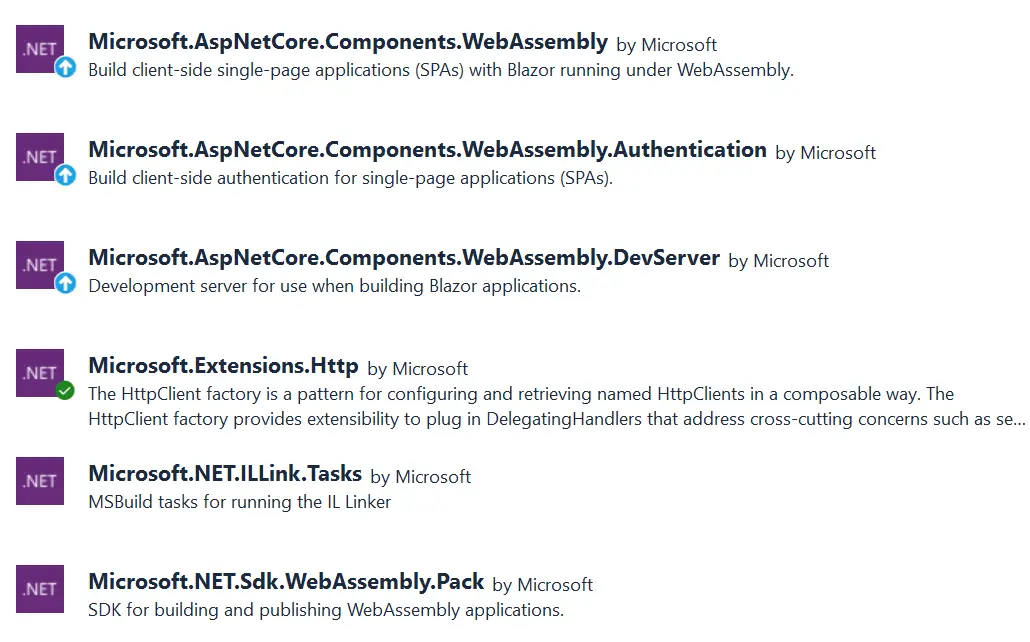
blazor webassembly standalone app.png from Blazor webassembly googleMake sure to add the following packages to it.
- Microsoft.AspNetCore.Components.WebAssembly
- Microsoft.AspNetCore.Components.WebAssembly.Authentication
- Microsoft.AspNetCore.Components.WebAssembly.DevServer
- Microsoft.Extensions.Http
- Microsoft.NET.ILLink.Tasks
- Microsoft.NET.Sdk.WebAssembly.Pack
Cookie and User Management classes
To the Identity ➤ Models folder we add 3 classes, which are given below:
namespace BWClient.Identity.Models
{
    /// <summary>
    /// Response for login and registration.
    /// </summary>
    public class FormResult
    {
        /// <summary>
        /// Gets or sets a value indicating whether the action was successful.
        /// </summary>
        public bool Succeeded { get; set; }

        /// <summary>
        /// On failure, the problem details are parsed and returned in this array.
        /// </summary>
        public string[] ErrorList { get; set; } = [];
    }
}
this class will use for communicating the Response for login and registration.
namespace BWClient.Identity.Models
{
    /// <summary>
    /// Basic user information to register and login.
    /// </summary>
    public class UserBasic
    {
        /// <summary>
        /// The email address.
        /// </summary>
        public string Email { get; set; } = string.Empty;

        /// <summary>
        /// The password.
        /// </summary>
        public string Password { get; set; } = string.Empty;
    }
}
This class will hold the user information during registeration and login process.
namespace BWClient.Identity.Models
{
    /// <summary>
    /// User info from identity endpoint to establish claims.
    /// </summary>
    public class UserInfo
    {
        /// <summary>
        /// The email address.
        /// </summary>
        public string Email { get; set; } = string.Empty;

        /// <summary>
        /// A value indicating whether the email has been confirmed yet.
        /// </summary>
        public bool IsEmailConfirmed { get; set; }

        /// <summary>
        /// The list of claims for the user.
        /// </summary>
        public Dictionary<string, string> Claims { get; set; } = [];
    }
}
This class will contain User info got by calling identity endpoint on the server app.
Next we will add 3 classes inside Identity folder for managing the cookies and accounts of the users. Note that these classes are provided by Microsoft itself. These 3 classes are given below:
using BWClient.Identity.Models;

namespace BWClient.Identity
{
    /// <summary>
    /// Account management services.
    /// </summary>
    public interface IAccountManagement
    {
        /// <summary>
        /// Login service.
        /// </summary>
        /// <param name="email">User's email.</param>
        /// <param name="password">User's password.</param>
        /// <returns>The result of the request serialized to <see cref="FormResult"/>.</returns>
        public Task<FormResult> LoginAsync(string email, string password);

        /// <summary>
        /// Log out the logged in user.
        /// </summary>
        /// <returns>The asynchronous task.</returns>
        public Task LogoutAsync();

        /// <summary>
        /// Registration service.
        /// </summary>
        /// <param name="email">User's email.</param>
        /// <param name="password">User's password.</param>
        /// <returns>The result of the request serialized to <see cref="FormResult"/>.</returns>
        public Task<FormResult> RegisterAsync(string email, string password);

        public Task<bool> CheckAuthenticatedAsync();
    }
}
This class provides account management services.
using System.Net.Http.Json;
using System.Security.Claims;
using System.Text.Json;
using Microsoft.AspNetCore.Components.Authorization;
using BWClient.Identity.Models;
using System.Text;

namespace BWClient.Identity
{
    /// <summary>
    /// Handles state for cookie-based auth.
    /// </summary>
    public class CookieAuthenticationStateProvider : AuthenticationStateProvider, IAccountManagement
    {
        /// <summary>
        /// Map the JavaScript-formatted properties to C#-formatted classes.
        /// </summary>
        private readonly JsonSerializerOptions jsonSerializerOptions =
            new()
            {
                PropertyNamingPolicy = JsonNamingPolicy.CamelCase,
            };

        /// <summary>
        /// Special auth client.
        /// </summary>
        private readonly HttpClient _httpClient;

        /// <summary>
        /// Authentication state.
        /// </summary>
        private bool _authenticated = false;

        /// <summary>
        /// Default principal for anonymous (not authenticated) users.
        /// </summary>
        private readonly ClaimsPrincipal Unauthenticated =
            new(new ClaimsIdentity());

        /// <summary>
        /// Create a new instance of the auth provider.
        /// </summary>
        /// <param name="httpClientFactory">Factory to retrieve auth client.</param>
        public CookieAuthenticationStateProvider(IHttpClientFactory httpClientFactory)
            => _httpClient = httpClientFactory.CreateClient("Auth");

        /// <summary>
        /// Register a new user.
        /// </summary>
        /// <param name="email">The user's email address.</param>
        /// <param name="password">The user's password.</param>
        /// <returns>The result serialized to a <see cref="FormResult"/>.
        /// </returns>
        public async Task<FormResult> RegisterAsync(string email, string password)
        {
            string[] defaultDetail = ["An unknown error prevented registration from succeeding."];

            try
            {
                // make the request
                var result = await _httpClient.PostAsJsonAsync(
                    "register", new
                    {
                        email,
                        password
                    });

                // successful?
                if (result.IsSuccessStatusCode)
                {
                    return new FormResult { Succeeded = true };
                }

                // body should contain details about why it failed
                var details = await result.Content.ReadAsStringAsync();
                var problemDetails = JsonDocument.Parse(details);
                var errors = new List<string>();
                var errorList = problemDetails.RootElement.GetProperty("errors");

                foreach (var errorEntry in errorList.EnumerateObject())
                {
                    if (errorEntry.Value.ValueKind == JsonValueKind.String)
                    {
                        errors.Add(errorEntry.Value.GetString()!);
                    }
                    else if (errorEntry.Value.ValueKind == JsonValueKind.Array)
                    {
                        errors.AddRange(
                            errorEntry.Value.EnumerateArray().Select(
                                e => e.GetString() ?? string.Empty)
                            .Where(e => !string.IsNullOrEmpty(e)));
                    }
                }

                // return the error list
                return new FormResult
                {
                    Succeeded = false,
                    ErrorList = problemDetails == null ? defaultDetail : [.. errors]
                };
            }
            catch { }

            // unknown error
            return new FormResult
            {
                Succeeded = false,
                ErrorList = defaultDetail
            };
        }

        /// <summary>
        /// User login.
        /// </summary>
        /// <param name="email">The user's email address.</param>
        /// <param name="password">The user's password.</param>
        /// <returns>The result of the login request serialized to a <see cref="FormResult"/>.</returns>
        public async Task<FormResult> LoginAsync(string email, string password)
        {
            try
            {
                // login with cookies
                var result = await _httpClient.PostAsJsonAsync(
                    "login?useCookies=true", new
                    {
                        email,
                        password
                    });

                // success?
                if (result.IsSuccessStatusCode)
                {
                    // need to refresh auth state
                    NotifyAuthenticationStateChanged(GetAuthenticationStateAsync());

                    // success!
                    return new FormResult { Succeeded = true };
                }
            }
            catch { }

            // unknown error
            return new FormResult
            {
                Succeeded = false,
                ErrorList = ["Invalid email and/or password."]
            };
        }

        /// <summary>
        /// Get authentication state.
        /// </summary>
        /// <remarks>
        /// Called by Blazor anytime and authentication-based decision needs to be made, then cached
        /// until the changed state notification is raised.
        /// </remarks>
        /// <returns>The authentication state asynchronous request.</returns>
        public override async Task<AuthenticationState> GetAuthenticationStateAsync()
        {
            _authenticated = false;

            // default to not authenticated
            var user = Unauthenticated;

            try
            {
                // the user info endpoint is secured, so if the user isn't logged in this will fail
                var userResponse = await _httpClient.GetAsync("manage/info");

                // throw if user info wasn't retrieved
                userResponse.EnsureSuccessStatusCode();

                // user is authenticated,so let's build their authenticated identity
                var userJson = await userResponse.Content.ReadAsStringAsync();
                var userInfo = JsonSerializer.Deserialize<UserInfo>(userJson, jsonSerializerOptions);

                if (userInfo != null)
                {
                    // in our system name and email are the same
                    var claims = new List<Claim>
                    {
                        new(ClaimTypes.Name, userInfo.Email),
                        new(ClaimTypes.Email, userInfo.Email)
                    };

                    // add any additional claims
                    claims.AddRange(
                        userInfo.Claims.Where(c => c.Key != ClaimTypes.Name && c.Key != ClaimTypes.Email)
                            .Select(c => new Claim(c.Key, c.Value)));

                    // tap the roles endpoint for the user's roles
                    var rolesResponse = await _httpClient.GetAsync("roles");

                    // throw if request fails
                    rolesResponse.EnsureSuccessStatusCode();

                    // read the response into a string
                    var rolesJson = await rolesResponse.Content.ReadAsStringAsync();

                    // deserialize the roles string into an array
                    var roles = JsonSerializer.Deserialize<RoleClaim[]>(rolesJson, jsonSerializerOptions);

                    // if there are roles, add them to the claims collection
                    if (roles?.Length > 0)
                    {
                        foreach (var role in roles)
                        {
                            if (!string.IsNullOrEmpty(role.Type) && !string.IsNullOrEmpty(role.Value))
                            {
                                claims.Add(new Claim(role.Type, role.Value, role.ValueType, role.Issuer, role.OriginalIssuer));
                            }
                        }
                    }

                    // set the principal
                    var id = new ClaimsIdentity(claims, nameof(CookieAuthenticationStateProvider));
                    user = new ClaimsPrincipal(id);
                    _authenticated = true;
                }
            }
            catch { }

            // return the state
            return new AuthenticationState(user);
        }

        public async Task LogoutAsync()
        {
            const string Empty = "{}";
            var emptyContent = new StringContent(Empty, Encoding.UTF8, "application/json");
            await _httpClient.PostAsync("Logout", emptyContent);
            NotifyAuthenticationStateChanged(GetAuthenticationStateAsync());
        }

        public async Task<bool> CheckAuthenticatedAsync()
        {
            await GetAuthenticationStateAsync();
            return _authenticated;
        }

        public class RoleClaim
        {
            public string? Issuer { get; set; }
            public string? OriginalIssuer { get; set; }
            public string? Type { get; set; }
            public string? Value { get; set; }
            public string? ValueType { get; set; }
        }
    }
}
This class handles cookie-based authentication and also performs the account management of the user. The function RegisterAsync() registers a new user by calling the “register” endpoint, LoginAsync() perfoms the login procedure of a user on ASP.NET Core Identity setup in Server app. It calls the “login?useCookies=true” endpoint. The LogoutAsync() performs the logout of the user from Identity. It calls the “Logout” endpoint.
Also see the GetAuthenticationStateAsync() function where “manage/info” and “roles” endpoints are called to get the state of the current user.
using Microsoft.AspNetCore.Components.WebAssembly.Http;

namespace BWClient.Identity
{
    /// <summary>
    /// Handler to ensure cookie credentials are automatically sent over with each request.
    /// </summary>
    public class CookieHandler : DelegatingHandler
    {
        /// <summary>
        /// Main method to override for the handler.
        /// </summary>
        /// <param name="request">The original request.</param>
        /// <param name="cancellationToken">The token to handle cancellations.</param>
        /// <returns>The <see cref="HttpResponseMessage"/>.</returns>
        protected override Task<HttpResponseMessage> SendAsync(HttpRequestMessage request, CancellationToken cancellationToken)
        {
            // include cookies!
            request.SetBrowserRequestCredentials(BrowserRequestCredentials.Include);

            return base.SendAsync(request, cancellationToken);
        }
    }
}
This class ensures cookie credentials are sent with each request to the server app.
We now move to _Imports.razor where we import the necessary namespaces.
@using System.Net.Http
@using System.Net.Http.Json
@using Microsoft.AspNetCore.Components.Forms
@using Microsoft.AspNetCore.Components.Routing
@using Microsoft.AspNetCore.Components.Web
@using Microsoft.AspNetCore.Components.Web.Virtualization
@using Microsoft.AspNetCore.Components.WebAssembly.Http
@using Microsoft.JSInterop
@using BWClient
@using BWClient.Layout
@using Microsoft.AspNetCore.Components.Authorization
@using Microsoft.AspNetCore.Authorization
Program class
To the Program.cs we add register authentication and authorization services. We also defined http client endpoint as https://localhost:7241 which is the url of the server app. The code of the program class should look lik:
using BWClient;
using BWClient.Identity;
using Microsoft.AspNetCore.Components.Authorization;
using Microsoft.AspNetCore.Components.Web;
using Microsoft.AspNetCore.Components.WebAssembly.Hosting;

var builder = WebAssemblyHostBuilder.CreateDefault(args);
builder.RootComponents.Add<App>("#app");
builder.RootComponents.Add<HeadOutlet>("head::after");

// register the cookie handler
builder.Services.AddScoped<CookieHandler>();

// set up authorization
builder.Services.AddAuthorizationCore();

// register the custom state provider
builder.Services.AddScoped<AuthenticationStateProvider, CookieAuthenticationStateProvider>();

// register the account management interface
builder.Services.AddScoped(
    sp => (IAccountManagement)sp.GetRequiredService<AuthenticationStateProvider>());

// configure client for auth interactions
builder.Services.AddHttpClient(
    "Auth",
    opt => opt.BaseAddress = new Uri("https://localhost:7241"))
    .AddHttpMessageHandler<CookieHandler>();

builder.Services.AddScoped(sp => new HttpClient { BaseAddress = new Uri(builder.HostEnvironment.BaseAddress) });

await builder.Build().RunAsync();
We now move to NavMenu.razor component where we can show areas of the blazor app to authenticated users only. Here we use AuthorizeView and Authorized compoents. See the highlighted code given below.
<div class="top-row ps-3 navbar navbar-dark">
    <div class="container-fluid">
        <a class="navbar-brand" href="">BWClient</a>
        <button title="Navigation menu" class="navbar-toggler" @onclick="ToggleNavMenu">
            <span class="navbar-toggler-icon"></span>
        </button>
    </div>
</div>

<div class="@NavMenuCssClass nav-scrollable" @onclick="ToggleNavMenu">
    <nav class="flex-column">
        <div class="nav-item px-3">
            <NavLink class="nav-link" href="" Match="NavLinkMatch.All">
                <span class="bi bi-house-door-fill-nav-menu" aria-hidden="true"></span> Home
            </NavLink>
        </div>
        <div class="nav-item px-3">
            <NavLink class="nav-link" href="counter">
                <span class="bi bi-plus-square-fill-nav-menu" aria-hidden="true"></span> Counter
            </NavLink>
        </div>
        <div class="nav-item px-3">
            <NavLink class="nav-link" href="weather">
                <span class="bi bi-list-nested-nav-menu" aria-hidden="true"></span> Weather
            </NavLink>
        </div>
        <AuthorizeView>
            <Authorized>
                <div class="nav-item px-3">
                    <NavLink class="nav-link" href="private-page">
                        <span class="bi bi-key" aria-hidden="true"></span> Private Page
                    </NavLink>
                </div>
                <div class="nav-item px-3">
                    <NavLink class="nav-link" href="private-manager-page">
                        <span class="bi bi-key" aria-hidden="true"></span> Private Manager Page
                    </NavLink>
                </div>
                <div class="nav-item px-3">
                    <NavLink class="nav-link" href="private-editor-page">
                        <span class="bi bi-key" aria-hidden="true"></span> Private Editor Page
                    </NavLink>
                </div>
            </Authorized>
        </AuthorizeView>
    </nav>
</div>

@code {
    private bool collapseNavMenu = true;

    private string? NavMenuCssClass => collapseNavMenu ? "collapse" : null;

    private void ToggleNavMenu()
    {
        collapseNavMenu = !collapseNavMenu;
    }
}
Register, Login and Logout UI
To the Pages ➤ Identity folder we add 3 razor components for Register a new user, login and logout steps. These razor componets are given below:
@page "/register"
@using BWClient.Identity
@inject IAccountManagement Acct

<PageTitle>Register</PageTitle>

<h1>Register</h1>

<AuthorizeView>
    <Authorized>
        <div class="alert alert-success">You're already logged in as @context.User.Identity?.Name.</div>
    </Authorized>
    <NotAuthorized>
        @if (success)
        {
            <div class="alert alert-success">You successfully registered. Now you can <a href="login">login</a>.</div>
        }
        else
        {
            if (errors)
            {
                foreach (var error in errorList)
                {
                    <div class="alert alert-danger">@error</div>
                }
            }
            <div class="flex-outer">
                <div class="m-1">
                    <label for="email">
                        Email:
                    </label>
                    <input autofocus autocomplete="on" required id="email" name="emailInput" placeholder="Enter your email address" type="email" @bind-value="email" />
                </div>
                <div class="m-1">
                    <label for="password">
                        Password:
                    </label>
                    <input required id="password" name="passwordInput" placeholder="Enter your password" type="password" @bind-value="password" /><br />
                </div>
                <div class="m-1">
                    <label for="confirmPassword">
                        Retype password:
                    </label>
                    <input required id="confirmPassword" name="confirmPasswordInput" placeholder="Re-enter your password" type="password" @bind-value="confirmPassword" />
                </div>
                <div class="m-1">
                    <button class="btn btn-primary" @onclick="DoRegisterAsync">Register</button>
                </div>
            </div>
        }
    </NotAuthorized>
</AuthorizeView>

@code {
    private bool success, errors;
    private string email = string.Empty;
    private string password = string.Empty;
    private string confirmPassword = string.Empty;
    private string[] errorList = [];

    public async Task DoRegisterAsync()
    {
        success = errors = false;
        errorList = [];

        if (string.IsNullOrWhiteSpace(email))
        {
            errors = true;
            errorList = ["Email is required."];

            return;
        }

        if (string.IsNullOrWhiteSpace(password))
        {
            errors = true;
            errorList = ["Password is required."];

            return;
        }

        if (string.IsNullOrWhiteSpace(confirmPassword))
        {
            errors = true;
            errorList = ["Please confirm your password."];

            return;
        }

        if (password != confirmPassword)
        {
            errors = true;
            errorList = ["Passwords don't match."];

            return;
        }

        var result = await Acct.RegisterAsync(email!, password!);

        if (result.Succeeded)
        {
            success = true;
            email = password = confirmPassword = string.Empty;
        }
        else
        {
            errors = true;
            errorList = result.ErrorList;
        }
    }
}
@page "/login"
@using BWClient.Identity
@inject IAccountManagement Acct

<PageTitle>Login</PageTitle>

<h1>Login</h1>

<AuthorizeView>
    <Authorized>
        <div class="alert alert-success">You're logged in as @context.User.Identity?.Name.</div>
    </Authorized>
    <NotAuthorized>
        @if (errors)
        {
            @foreach (var error in errorList)
            {
                <div class="alert alert-danger">@error</div>
            }
        }
        <div class="flex-outer">
            <div class="m-1">
                <label for="email">
                    Email:
                </label>
                <input required id="email" name="emailInput" placeholder="Enter your email address" type="email" @bind-value="email" />
            </div>
            <div class="m-1">
                <label for="password">
                    Password:
                </label>
                <input required id="password" name="passwordInput" placeholder="Enter your password" type="password" @bind-value="password" />
            </div>
            <div class="m-1">
                <button class="btn btn-primary" @onclick="DoLoginAsync">Login</button>
            </div>
        </div>
    </NotAuthorized>
</AuthorizeView>

@code {
    private bool success, errors;
    private string email = string.Empty;
    private string password = string.Empty;
    private string[] errorList = [];

    public async Task DoLoginAsync()
    {
        success = errors = false;
        errorList = [];

        if (string.IsNullOrWhiteSpace(email))
        {
            errors = true;
            errorList = ["Email is required."];

            return;
        }

        if (string.IsNullOrWhiteSpace(password))
        {
            errors = true;
            errorList = ["Password is required."];

            return;
        }

        var result = await Acct.LoginAsync(email!, password!);

        if (result.Succeeded)
        {
            success = true;
            email = password = string.Empty;
        }
        else
        {
            errors = true;
            errorList = result.ErrorList;
        }
    }
}
@page "/logout"
@using BWClient.Identity
@inject IAccountManagement Acct

<PageTitle>Logout</PageTitle>

<h1>Logout</h1>

<AuthorizeView @ref="authView">
    <Authorized>
        <div class="alert alert-info">Logging you out...</div>
    </Authorized>
    <NotAuthorized>
        <div class="alert alert-success">You're logged out. <a href="/login">Log in.</a></div>
    </NotAuthorized>
</AuthorizeView>

@code {
    private AuthorizeView? authView;

    protected override async Task OnInitializedAsync()
    {
        if (await Acct.CheckAuthenticatedAsync())
        {
            await Acct.LogoutAsync();
        }

        await base.OnInitializedAsync();
    }
}
Creating Pages Authorized for Authenticated users
Inside the Pages folder we create 3 razor components for representing pages. These pages are authorized for viewing only by authenticated users. These pages are:
@page "/private-page"
@attribute [Authorize]
@using System.Security.Claims

<PageTitle>Private Page</PageTitle>

<h1>Private Page</h1>

<AuthorizeView>
    <p>Hello, @context.User.Identity?.Name! You're authenticated, so you can see this page that shows your claims.</p>
</AuthorizeView>

<h2>Claims</h2>

@if (claims.Count() > 0)
{
    <ul>
        @foreach (var claim in claims)
        {
            <li><b>@claim.Type:</b> @claim.Value</li>
        }
    </ul>
}

@code {
    private IEnumerable<Claim> claims = Enumerable.Empty<Claim>();

    [CascadingParameter]
    private Task<AuthenticationState>? AuthState { get; set; }

    protected override async Task OnInitializedAsync()
    {
        if (AuthState == null)
        {
            return;
        }

        var authState = await AuthState;
        claims = authState.User.Claims;
    }
}
It can only be viewed by logged in users.
@page "/private-manager-page"
@attribute [Authorize(Roles = "Manager")]
@using System.Security.Claims

<PageTitle>Private Manager Page</PageTitle>

<h1>Private Manager Page</h1>

<AuthorizeView>
    <p>Hello, @context.User.Identity?.Name! You're authenticated and you have a <b>Manager</b> role claim, so you can see this page.</p>
</AuthorizeView>

<h2>Claims</h2>

@if (claims.Count() > 0)
{
    <ul>
        @foreach (var claim in claims)
        {
            <li><b>@claim.Type:</b> @claim.Value</li>
        }
    </ul>
}

@code {
    private IEnumerable<Claim> claims = Enumerable.Empty<Claim>();

    [CascadingParameter]
    private Task<AuthenticationState>? AuthState { get; set; }

    protected override async Task OnInitializedAsync()
    {
        if (AuthState == null)
        {
            return;
        }

        var authState = await AuthState;
        claims = authState.User.Claims;
    }
}
It is authorized for authenticated user who are in Manager role.
@page "/private-editor-page"
@attribute [Authorize(Roles = "Editor")]
@using System.Security.Claims

<PageTitle>Private Editor Page</PageTitle>

<h1>Private Editor Page</h1>

<AuthorizeView>
    <p>Hello, @context.User.Identity?.Name! You're authenticated and you have an <b>Editor</b> role claim, so you can see this page.</p>
</AuthorizeView>

<h2>Claims</h2>

@if (claims.Count() > 0)
{
    <ul>
        @foreach (var claim in claims)
        {
            <li><b>@claim.Type:</b> @claim.Value</li>
        }
    </ul>
}

@code {
    private IEnumerable<Claim> claims = Enumerable.Empty<Claim>();

    [CascadingParameter]
    private Task<AuthenticationState>? AuthState { get; set; }

    protected override async Task OnInitializedAsync()
    {
        if (AuthState == null)
        {
            return;
        }

        var authState = await AuthState;
        claims = authState.User.Claims;
    }
}
It is authorized for authenticated user who are in Editor role.
Congratulations, we completed Blazor WebAssembly Client application. We now will test the working of both the apps.
Testing Blazor WebAssembly Authentication and Authorization features
Run both the Server and Client app. In the client Blazor Wasm app, on the top, you will see login link. Click it to open the login form.
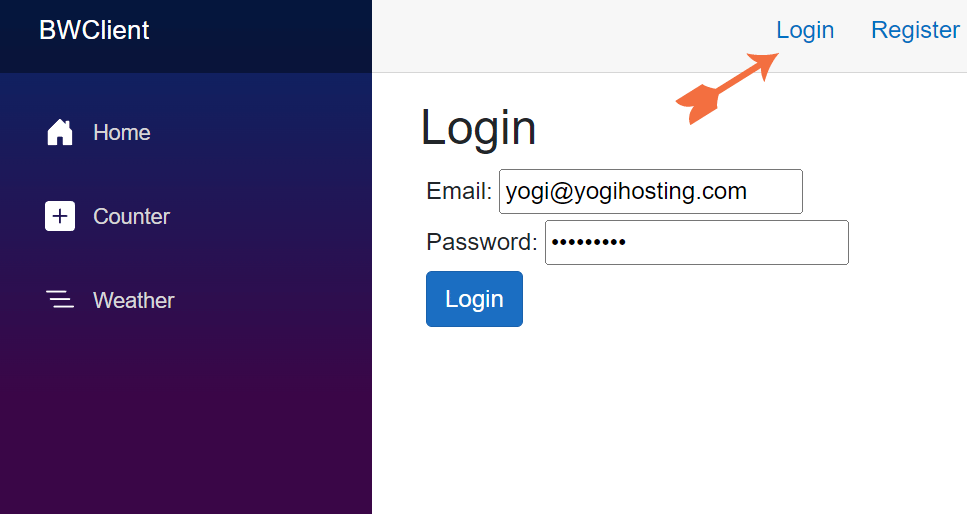
In this form enter the Email – [email protected], password – Passw0rd!. Recall this user was created when we seeded the database.
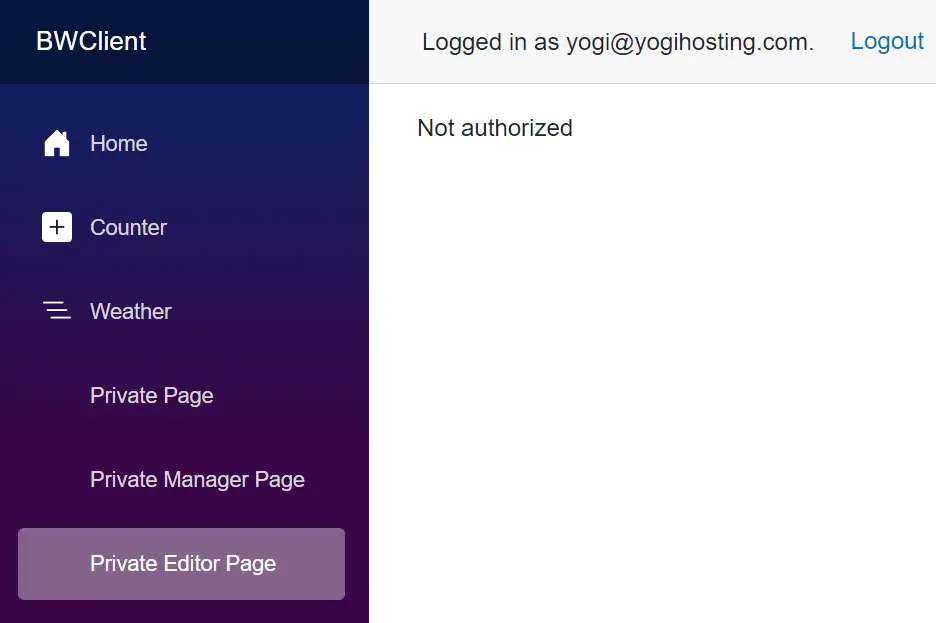
Click the Login button. We will see the messageLogged in as [email protected] along with the Logout button.
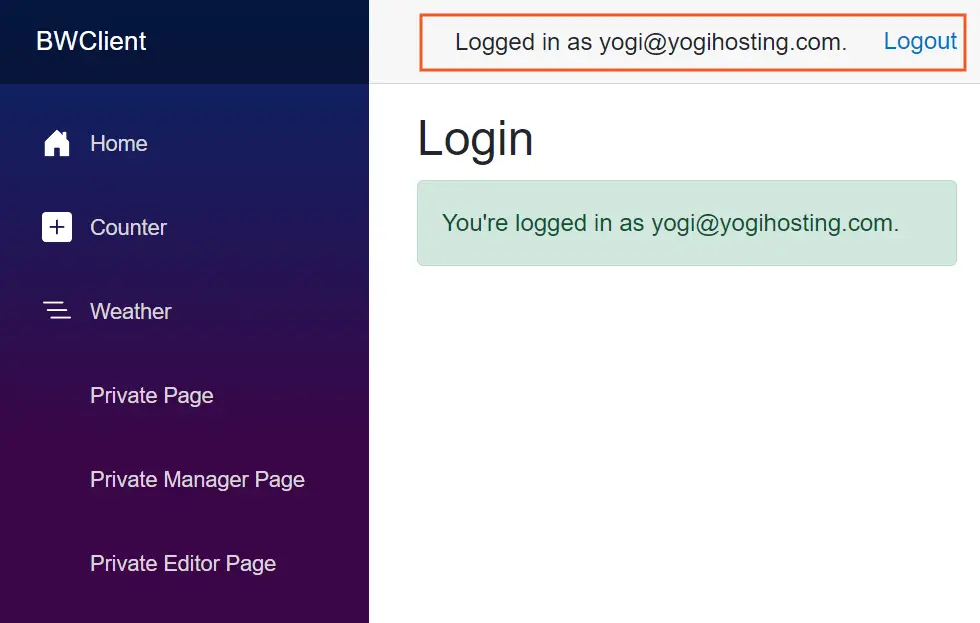
On the left panel, there are links to private, manager and editor pages. Click the private and manager pages. You will be authorized to view them as the current user is in manager role.
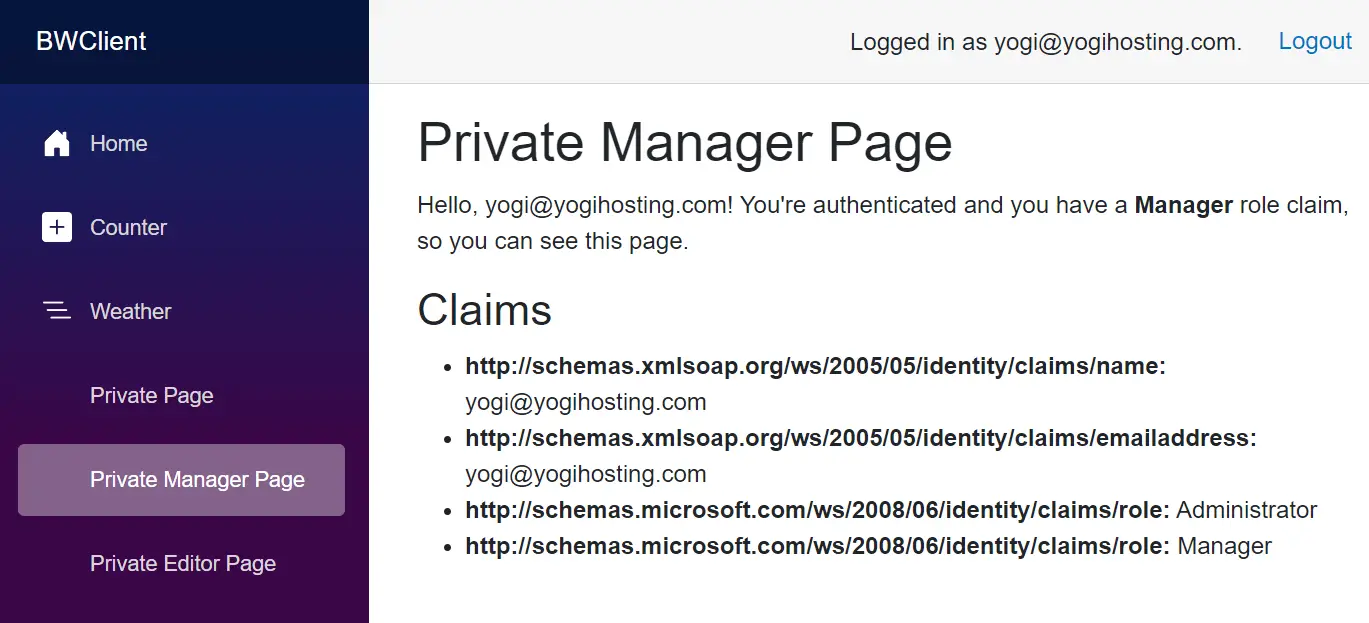
However when you click on the Editor page then you will get the message – Not authorized. This is because this page can only be viewed by users in Editor role, and the current user is in Manager role but not in Editor role.
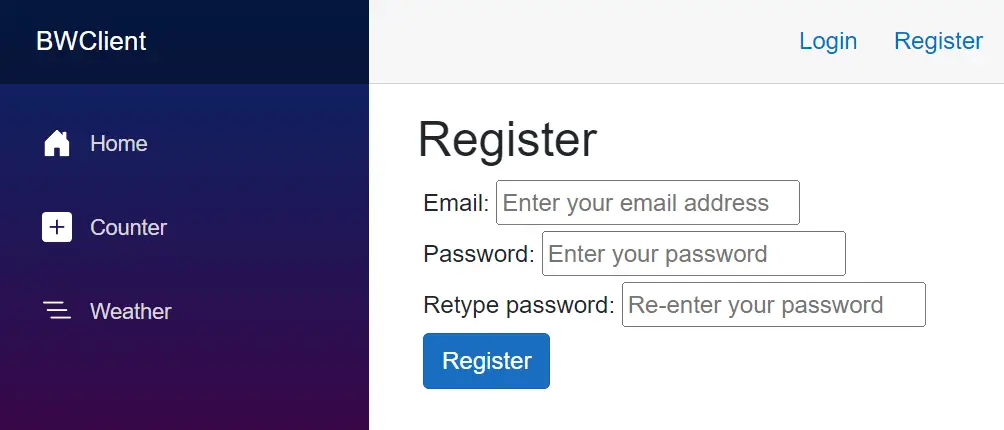
Their is also register a new user page. Click the Logout link, then you will see Register link at the top. Click on it to open the register form. From here you can register a new identity User.
The Blazor Wasm Authentication and Authorization features are working properly and it’s time to wrap up this tutorial.
In this tutorial we successfully implemented Blazor WebAssembly Authentication and Authoriazation feature from ASP.NET Core Identity. We also added Cookie Authentication feature which will maintain the logged in user’s session. Don’t foget to download the full source codes from my GitHub repository.




 Welcome to YogiHosting - A Programming Tutorial Website. It is used by millions of people around the world to learn and explore about ASP.NET Core, Blazor, jQuery, JavaScript, Docker, Kubernetes and other topics.