How to perform CRUD Operations in Dapper
In this Dapper CRUD operations tutorial we will be building CREATE, READ, UPDATE & DELETE features for 3 tables in a database. These tables are:
- School
- SchoolDetail
- Teacher
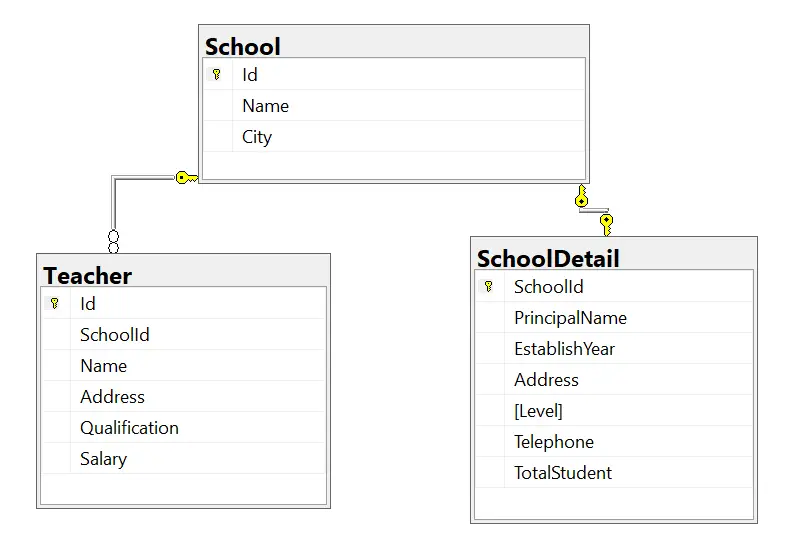
The database table have the following relationships:
- One-to-One – The ‘School’ & ‘SchoolDetail’ tables have one-to-one relationship among them. This means every School record can have 0 or 1 related SchoolDetail record.
- One-to-Many – The ‘School’ & ‘Teacher’ tables have one-to-many relationship among them. This means a School can have 0 or more teachers, similary every teacher must be accociated with a school.
The database diagram is given below.
Page Contents
Database
Next, create a database on your SQL Server Express LocalDB or any version of SQL Server and name it DapperStart or any other name of your choice.
Now run the following 3 scripts to create the School, SchooDetail and Teacher table.
CREATE TABLE [dbo].[School] (
    [Id]   INT          IDENTITY (1, 1) NOT NULL,
    [Name] VARCHAR (50) NOT NULL,
    [City] VARCHAR (50) NOT NULL,
    PRIMARY KEY CLUSTERED ([Id] ASC)
);

CREATE TABLE [dbo].[SchoolDetail] (
    [SchoolId]      INT           NOT NULL,
    [PrincipalName] VARCHAR (50)  NOT NULL,
    [EstablishYear] INT           NOT NULL,
    [Address]       VARCHAR (100) NOT NULL,
    [Level]         VARCHAR (100) NOT NULL,
    [Telephone]     VARCHAR (50)  NOT NULL,
    [TotalStudent]  INT           NOT NULL,
    PRIMARY KEY CLUSTERED ([SchoolId] ASC),
    CONSTRAINT [FK_SchoolDetail_School] FOREIGN KEY ([SchoolId]) REFERENCES [dbo].[School] ([Id])
);

CREATE TABLE [dbo].[Teacher] (
    [Id]            INT           IDENTITY (1, 1) NOT NULL,
    [SchoolId]      INT           NOT NULL,
    [Name]          VARCHAR (50)  NOT NULL,
    [Address]       VARCHAR (100) NOT NULL,
    [Qualification] VARCHAR (50)  NOT NULL,
    [Salary]        MONEY         NOT NULL,
    CONSTRAINT [PK_Teacher] PRIMARY KEY CLUSTERED ([Id] ASC),
    CONSTRAINT [FK_School_Teacher] FOREIGN KEY ([SchoolId]) REFERENCES [dbo].[School] ([Id])
);
Recall that the School & SchoolDetail tables have One-to-One relationship. The School and Teacher tables have One-to-Many relationship.
ASP.NET Core App and Database
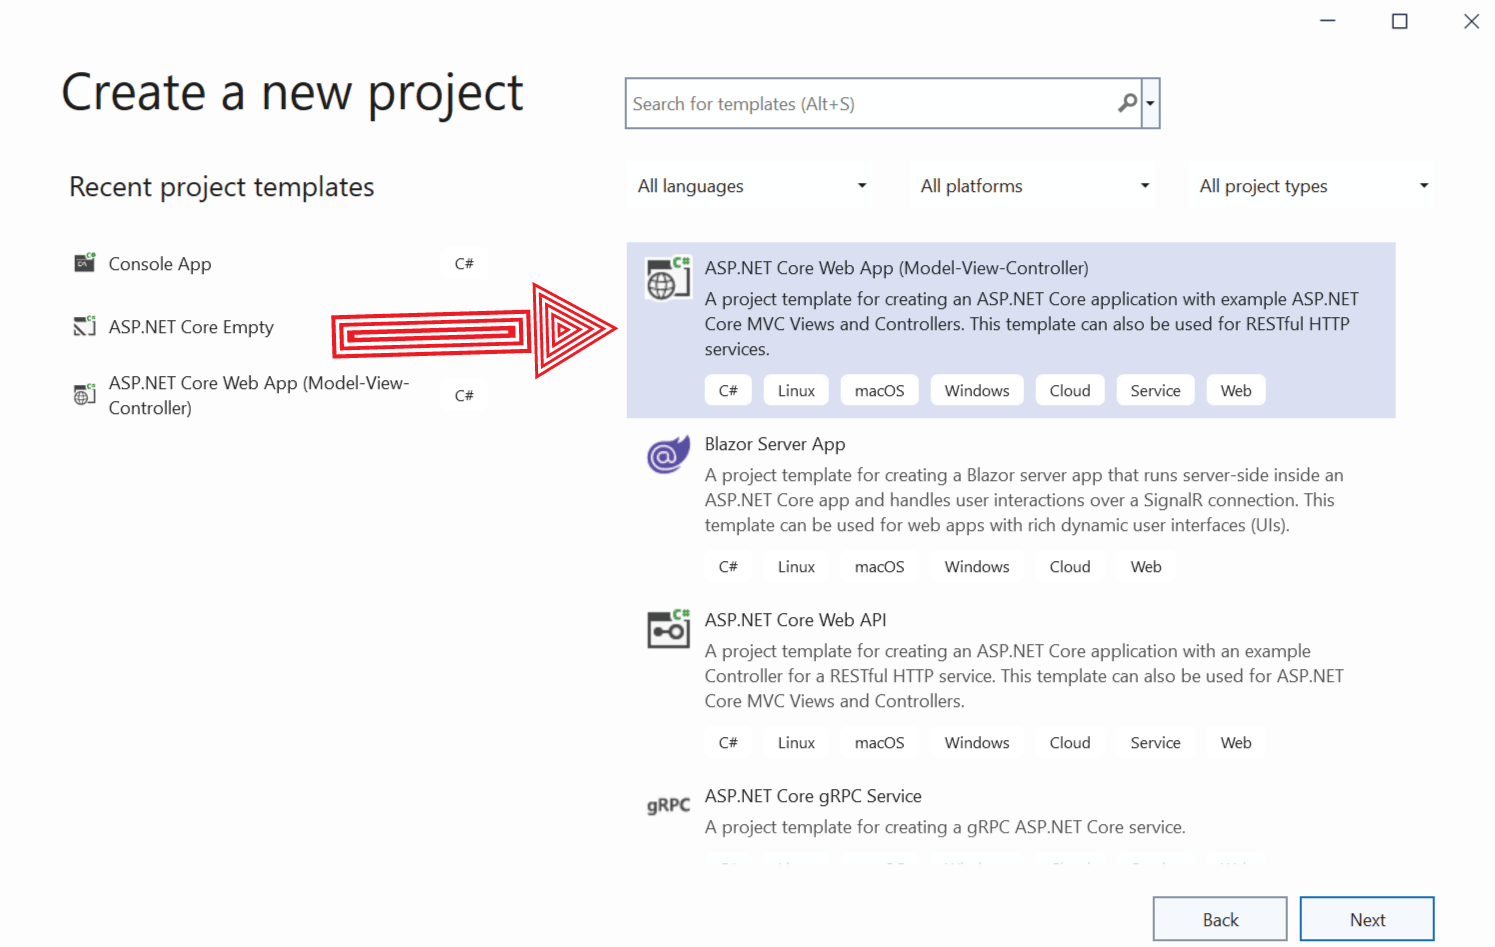
In Visual Studio, create a new ASP.NET Core Web App (Model-View-Controller), and name it anything of your choice. I have named it DapperStart.
Next, Install Dapper by running the following command:
PM> Install-Package DapperConnection String
Create a connection string to the database inside the appsettings.json file. The code is given below:
{
  "ConnectionStrings": {
    "DefaultConnection": "Data Source=(localdb)\\MSSQLLocalDB;Initial Catalog=DapperStart;Integrated Security=True;Connect Timeout=30;Encrypt=False;TrustServerCertificate=False;ApplicationIntent=ReadWrite;MultiSubnetFailover=False"
  }
}
Add this connection string to the services and make it available to the controllers through dependency injection.
So, create a Connections.cs class inside the Models folder.
public class Connections
{
    public string DefaultConnection { get; set; }
}
Next, add the following code line to the Program.cs.
builder.Services.Configure<Connections>(builder.Configuration.GetSection("ConnectionStrings"));The DefaultConnection property of the Connections.cs will be filled with the connection string value given on appsettings.json.
We can now inject it to the controllers. It will be discussed in the next section.
Create / Update Records with Dapper
Lets start building the create & update feature for School, SchoolDetail and Teacher with Dapper. Both these features are very much similar and share most of the codes so we are going to build them together. Later we will integrate them with rest of the features.
Create & Update School
This is how the create and update school screen will look:
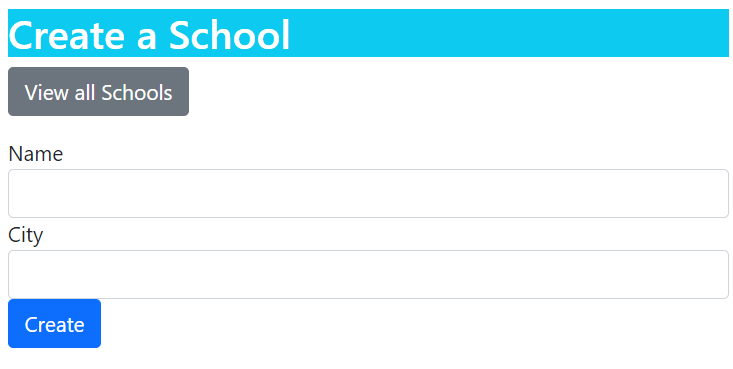
Start by creating School.cs inside the Models folder:
public class School
{
    public int Id { get; set; }

    public string Name { get; set; }

    public string City { get; set; }

    public SchoolDetail? SchoolDetail { get; set; }

    public List<Teacher>? Teacher { get; set; }
}
It has Name, City properties of type string. Then their is SchoolDetail property which will contain related SchoolDetail record. Their is also a property type list of Teacher, which will contain all the teachers of a school.
Add the Create.cshml razor view inside the Views ➤ School folder with the following code.
@model School

@{
    ViewData["Title"] = "Create a School";
}

<h1 class="bg-info text-white">Create a School</h1>
<a asp-action="ReadSSD" class="btn btn-secondary">View all Schools</a>

<div asp-validation-summary="All" class="text-danger"></div>

<form method="post">
    <div class="form-group">
        <label asp-for="Name"></label>
        <input type="text" asp-for="Name" class="form-control" />
        <span asp-validation-for="Name" class="text-danger"></span>
    </div>
    <div class="form-group">
        <label asp-for="City"></label>
        <input type="text" asp-for="City" class="form-control" />
        <span asp-validation-for="City" class="text-danger"></span>
    </div>
    <button type="submit" class="btn btn-primary">Create</button>
</form>
Now create a new controller called SchoolController.cs. Next inject the Controllers.cs class object to it.
private IOptions<Connections> cs;

public SchoolController(IOptions<Connections> cs)
{
    this.cs = cs;
}
Add the Create action methods whose codes are given below.
public IActionResult Create()
{
    return View();
}

[HttpPost]
public IActionResult Create(School school)
{
    if (ModelState.IsValid)
    {
        string myCS = cs.Value.DefaultConnection;

        var sql = @"Insert into School(Name, City) values (@Name, @City)";

        using (var connection = new SqlConnection(myCS))
        {
            var rowsAffected = connection.Execute(sql, new { Name = school.Name, City = school.City});
        }

        return RedirectToAction("ReadSSD");
    }
    else
        return View();
}
Code Explanation: The record is created by the Dapper Execute method which executes a SQL insert query. The insert query has @Name and @City parameters. In the Execute method we provide these values from the “school” parametere of the action method – connection.Execute(sql, new { Name = school.Name, City = school.City});.
Next, moving to Update feature. Add the Update.cshml razor view inside the Views ➤ School folder with the following code.
@model School

@{
    ViewData["Title"] = "Update a School";
}

<h1 class="bg-info text-white">Update a School</h1>
<a asp-action="ReadSSD" class="btn btn-secondary">View all Schools</a>

<div asp-validation-summary="All" class="text-danger"></div>

<form method="post">
    <div class="form-group">
        <label asp-for="Id"></label>
        <input type="text" asp-for="Id" readonly class="form-control" />
    </div>
    <div class="form-group">
        <label asp-for="Name"></label>
        <input type="text" asp-for="Name" class="form-control" />
        <span asp-validation-for="Name" class="text-danger"></span>
    </div>
    <div class="form-group">
        <label asp-for="City"></label>
        <input type="text" asp-for="City" class="form-control" />
        <span asp-validation-for="City" class="text-danger"></span>
    </div>
    <button type="submit" class="btn btn-primary">Create</button>
</form>
Now add the Update actions to the controller. See their codes given below:
public IActionResult Update(int id)
{
    string myCS = cs.Value.DefaultConnection;
    string query = "SELECT * FROM School Where Id=@Id";

    var school = new School();
    using (var connection = new SqlConnection(myCS))
    {
        school = connection.Query<School>(query, new { Id = id }).FirstOrDefault();
    }

    return View(school);
}

[HttpPost]
public IActionResult Update(School school)
{
    if (ModelState.IsValid)
    {
        string myCS = cs.Value.DefaultConnection;

        var sql = @"Update School SET Name=@Name, City=@City WHERE Id=@Id";

        using (var connection = new SqlConnection(myCS))
        {
            var rowsAffected = connection.Execute(sql, new { Name = school.Name, City = school.City, Id = school.Id });
        }

        return RedirectToAction("ReadSSD");
    }
    else
        return View();
}
The SchoolId is sent to the last parameter of the URL, example – https://localhost:7268/School/Update/1. Here school id 1 is sent in the url.
The rest of the code is fairly simple and executes the Update School SQL command.
Create & Update School Detail
We move to School Detail section. The create and update features are very similar and will be done in the same action method of the controller.
This is how the create/update school detail screen will look:
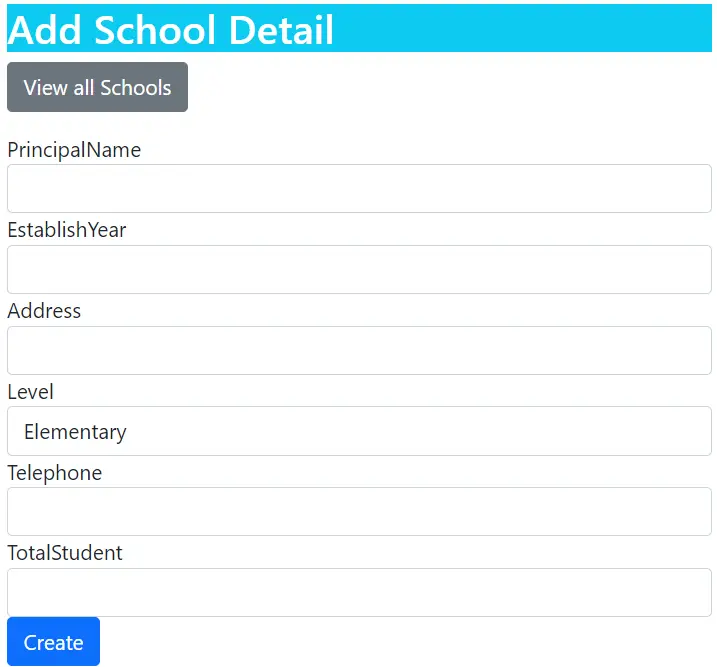
First add the SchoolDetail.cs class inside the Models folder.
public class SchoolDetail
{
    public int SchoolId { get; set; }
    public string PrincipalName { get; set; }
    public int EstablishYear { get; set; }
    public string Address { get; set; }
    public string Level { get; set; }
    public string Telephone { get; set; }
    public int TotalStudent { get; set; }
}
Next, add CreateUpdate.cshml razor view inside the Views ➤ SchoolDetail folder with the following code.
@model SchoolDetail

@{
    ViewData["Title"] = "Add School Detail";
}

<h1 class="bg-info text-white">Add School Detail</h1>
<a asp-controller="School" asp-action="ReadSSD" class="btn btn-secondary">View all Schools</a>

<div asp-validation-summary="All" class="text-danger"></div>

<form method="post">
    <div class="form-group">
        <label asp-for="PrincipalName"></label>
        <input type="text" asp-for="PrincipalName" class="form-control" />
        <span asp-validation-for="PrincipalName" class="text-danger"></span>
    </div>
    <div class="form-group">
        <label asp-for="EstablishYear"></label>
        <input type="text" asp-for="EstablishYear" class="form-control" />
        <span asp-validation-for="EstablishYear" class="text-danger"></span>
    </div>
    <div class="form-group">
        <label asp-for="Address"></label>
        <input type="text" asp-for="Address" class="form-control" />
        <span asp-validation-for="Address" class="text-danger"></span>
    </div>
    <div class="form-group">
        <label asp-for="Level"></label>
        <select asp-for="Level"class="form-control">
            <option>Elementary</option>
            <option>Intermediate</option>
            <option>High School</option>
        </select>
        <span asp-validation-for="Level" class="text-danger"></span>
    </div>
    <div class="form-group">
        <label asp-for="Telephone"></label>
        <input type="text" asp-for="Telephone" class="form-control" />
        <span asp-validation-for="Telephone" class="text-danger"></span>
    </div>
    <div class="form-group">
        <label asp-for="TotalStudent"></label>
        <input type="text" asp-for="TotalStudent" class="form-control" />
        <span asp-validation-for="TotalStudent" class="text-danger"></span>
    </div>
    <button type="submit" class="btn btn-primary">Create</button>
</form>
This view will be used for both creating and updating a School Detail record for a particular school.
Next, create a new controller called SchoolDetailController.cs and add the following code to it.
public class SchoolDetailController : Controller
{
    private IOptions<Connections> cs;

    public SchoolDetailController(IOptions<Connections> cs)
    {
        this.cs = cs;
    }

    public IActionResult Read()
    {
        return View();
    }

    public IActionResult CreateUpdate(int id)
    {
        string myCS = cs.Value.DefaultConnection;
        string query = "SELECT * FROM SchoolDetail Where SchoolId=@SchoolId";

        var sd = new SchoolDetail();
        using (var connection = new SqlConnection(myCS))
        {
            sd = connection.Query<SchoolDetail>(query, new { SchoolId = id }).FirstOrDefault();
        }

        return View(sd);
    }

    [HttpPost]
    public IActionResult CreateUpdate(SchoolDetail schoolDetail, int id)
    {
        if (ModelState.IsValid)
        {
            string myCS = cs.Value.DefaultConnection;

            using (var connection = new SqlConnection(myCS))
            {
                var rowsAffected = connection.Execute("CreateUpdateSchoolDetail", new { SchoolId = id, PrincipalName = schoolDetail.PrincipalName, EstablishYear = schoolDetail.EstablishYear, Address = schoolDetail.Address, Level = schoolDetail.Level, Telephone = schoolDetail.Telephone, TotalStudent = schoolDetail.TotalStudent }, commandType: CommandType.StoredProcedure);
            }

            return RedirectToAction("ReadSSD", "School");
        }
        else
            return View();
    }

}
Code Explanation: The CreateUpdate action will perform both the creation & updation of the records. The SchoolId will be send to the last parameter of the URL, example – https://localhost:7268/SchoolDetail/CreateUpdate/1. Here we have sent school id 1 to the url. The action method will fetch the SchoolDetail record for the school 1 and display it on the view. Check that it is executing the SELECT SQL Command.
SELECT * FROM SchoolDetail Where SchoolId=@SchoolId
Once the form is filled and submitted the stored procedure CreateUpdateSchoolDetail will be executed. This stored procedure code is given below:
CREATE PROCEDURE [dbo].[CreateUpdateSchoolDetail]
	@SchoolId        INT,
	@PrincipalName   VARCHAR(50),
	@EstablishYear   INT,
	@Address         VARCHAR(100),
	@Level           VARCHAR(50),
	@Telephone       VARCHAR(50),
	@TotalStudent    INT
AS
    DECLARE @Total AS INT
	SET @Total = (SELECT Count(*) FROM SchoolDetail WHERE SchoolId=@SchoolId)
	IF @Total = 0
	  INSERT into SchoolDetail(SchoolId, PrincipalName, EstablishYear, Address, Level, Telephone, TotalStudent) values (@SchoolId, @PrincipalName, @EstablishYear, @Address, @Level, @Telephone, @TotalStudent)
	ELSE
	  UPDATE SchoolDetail SET PrincipalName=@PrincipalName, EstablishYear=@EstablishYear, Address=@Address, Level=@Level, Telephone=@Telephone, TotalStudent=@TotalStudent WHERE SchoolId=@SchoolId
The SP takes @SchoolId and all the school details in it’s parameter. It checks if the record of the school is already present in the SchoolDetail table, so that it can update it. Else it creates a new SchoolDetail record.
Create & Update Teacher
The create and update teacher screen will look as shown below:
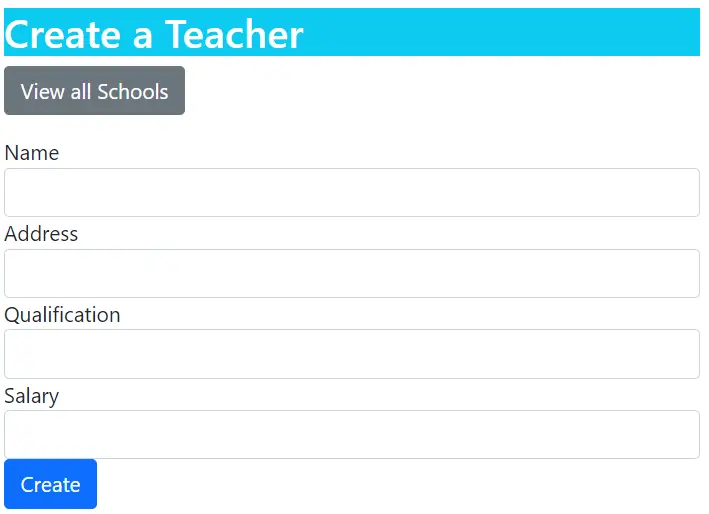
Add Teacher.cs class inside the Models folder:
public class Teacher
{
    public int Id { get; set; }
    public int SchoolId { get; set; }
    public string Name { get; set; }
    public string Address { get; set; }
    public string Qualification { get; set; }
    public int Salary { get; set; }
}
Next, add Create.cshml razor view inside the Views ➤ Teacher folder with the following code.
@model Teacher

@{
    ViewData["Title"] = "Create a Teacher";
}

<h1 class="bg-info text-white">Create a Teacher</h1>
<a asp-controller="School" asp-action="ReadST" class="btn btn-secondary">View all Schools</a>

<div asp-validation-summary="All" class="text-danger"></div>

<form method="post">
    <div class="form-group">
        <label asp-for="Name"></label>
        <input type="text" asp-for="Name" class="form-control" />
        <span asp-validation-for="Name" class="text-danger"></span>
    </div>
    <div class="form-group">
        <label asp-for="Address"></label>
        <input type="text" asp-for="Address" class="form-control" />
        <span asp-validation-for="Address" class="text-danger"></span>
    </div>
    <div class="form-group">
        <label asp-for="Qualification"></label>
        <input type="text" asp-for="Qualification" class="form-control" />
        <span asp-validation-for="Qualification" class="text-danger"></span>
    </div>
    <div class="form-group">
        <label asp-for="Salary"></label>
        <input type="text" asp-for="Salary" class="form-control" />
        <span asp-validation-for="Salary" class="text-danger"></span>
    </div>
    <button type="submit" class="btn btn-primary">Create</button>
</form>
Finally, add TeacherController.cs inside the Controller folder and add the following code to it.
public class TeacherController : Controller
{
    private IOptions<Connections> cs;

    public TeacherController(IOptions<Connections> cs)
    {
        this.cs = cs;
    }

    public IActionResult Read()
    {
        return View();
    }

    public IActionResult Create()
    {
        return View();
    }

    [HttpPost]
    public IActionResult Create(Teacher teacher, int id)
    {
        if (ModelState.IsValid)
        {
            string myCS = cs.Value.DefaultConnection;

            var sql = @"Insert into Teacher(SchoolId, Name, Address, Qualification, Salary) values (@SchoolId, @Name, @Address, @Qualification, @Salary)";

            using (var connection = new SqlConnection(myCS))
            {
                var rowsAffected = connection.Execute(sql, new { SchoolId = id, Name = teacher.Name, Address = teacher.Address, Qualification = teacher.Qualification, Salary = teacher.Salary });
            }

            return RedirectToAction("ReadST", "School");
        }
        else
            return View();
    }
}
Code Explanation: The SchoolId will be send to the last parameter of the URL, example – https://localhost:7268/Teacher/Create/1. Here we have sent school id 1 to the url. It is then added to the Execute method’s parameter – SchoolId = id. A new teacher record will be created and associated with the school id in the url.
Moving to update, add Update.cshml razor view inside the Views ➤ Teacher folder with the following code.
@model Teacher

@{
    ViewData["Title"] = "Update a Teacher";
}

<h1 class="bg-info text-white">Update a Teacher</h1>
<a asp-controller="School" asp-action="ReadST" class="btn btn-secondary">View all Schools</a>

<div asp-validation-summary="All" class="text-danger"></div>

<form method="post">
    <div class="form-group">
        <label asp-for="Name"></label>
        <input type="text" asp-for="Name" class="form-control" />
        <span asp-validation-for="Name" class="text-danger"></span>
    </div>
    <div class="form-group">
        <label asp-for="Address"></label>
        <input type="text" asp-for="Address" class="form-control" />
        <span asp-validation-for="Address" class="text-danger"></span>
    </div>
    <div class="form-group">
        <label asp-for="Qualification"></label>
        <input type="text" asp-for="Qualification" class="form-control" />
        <span asp-validation-for="Qualification" class="text-danger"></span>
    </div>
    <div class="form-group">
        <label asp-for="Salary"></label>
        <input type="text" asp-for="Salary" class="form-control" />
        <span asp-validation-for="Salary" class="text-danger"></span>
    </div>
    <button type="submit" class="btn btn-primary">Update</button>
</form>
Next, add the Update actions to the controller. The code is shown below:
public IActionResult Update(int id)
{
    string myCS = cs.Value.DefaultConnection;
    string query = "SELECT * FROM Teacher Where Id=@Id";

    var teacher = new Teacher();
    using (var connection = new SqlConnection(myCS))
    {
        teacher = connection.Query<Teacher>(query, new { Id = id }).FirstOrDefault();
    }

    return View(teacher);
}

[HttpPost]
public IActionResult Update(Teacher teacher, int id)
{
    if (ModelState.IsValid)
    {
        string myCS = cs.Value.DefaultConnection;

        var sql = @"Update Teacher SET Name=@Name, Address=@Address, Qualification=@Qualification, Salary=@Salary WHERE Id=@Id";

        using (var connection = new SqlConnection(myCS))
        {
            var rowsAffected = connection.Execute(sql, new { Name = teacher.Name, Address = teacher.Address, Qualification = teacher.Qualification, Salary = teacher.Salary, Id = id });
        }

        return RedirectToAction("ReadST", "School");
    }
    else
        return View();
}
Code Explanation: The TeacherId will be send to the last parameter of the URL, example – https://localhost:7268/Teacher/Update/1. Here we have sent teacher id 1 to the url. It is then added to the Execute method’s parameter – Id = id. The teacher record will be updated with the new values.
Read Records with Dapper
In the Read records section there will be 2 screens:
- School and School Details – showing records from these 2 tables which are in one-to-one relationship.
- School and Teacher – showing records from these 2 tables which are in one-to-many relationship.
The first screen is shown below. The School records are shown in yellow background while the school details are shown besides them in blue background. Their is also an Update button given to edit their details.

In the next screen shown below the school records are shown in yellow background and the teachers in a school are shown below them in blue background. The Update button is given for editing purpose.
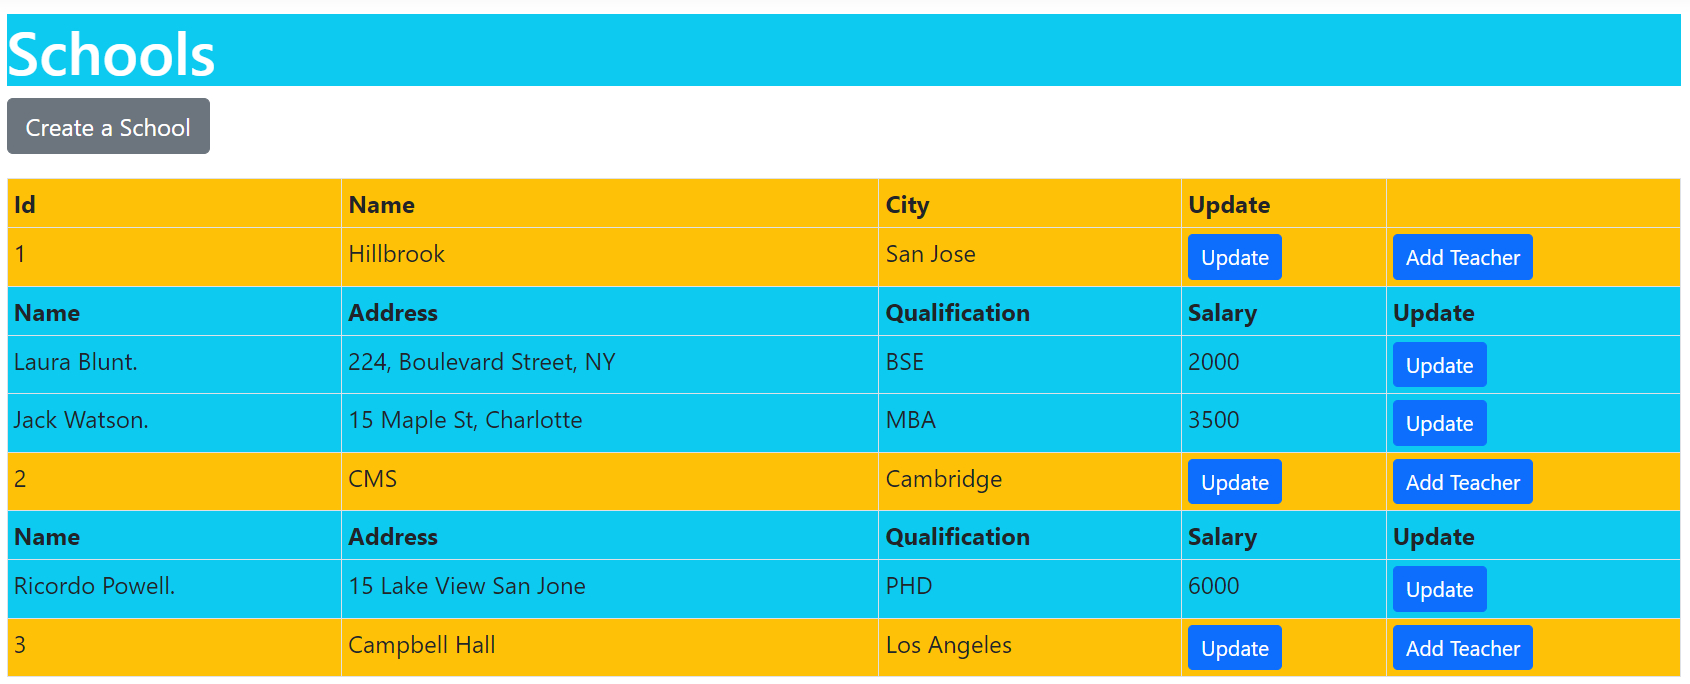
Let’s start with creating School & SchoolDetail screen. So, add ReadSSD.cshml razor view inside the Views ➤ School folder with the following code. It creates a html table and displays School and SchoolDetail records.
@model List<School>

@{
    ViewData["Title"] = "School & SchoolDetail";
}

<h1 class="bg-info text-white">Schools & SchoolDetail</h1>
<a asp-action="Create" class="btn btn-secondary">Create a School</a>

<div asp-validation-summary="All" class="text-danger"></div>

<table class="table table-sm table-bordered">
    <tr>
        <th class="bg-warning">Id</th>
        <th class="bg-warning">Name</th>
        <th class="bg-warning">City</th>
        <th class="bg-warning">Update</th>
        <th class="bg-info">PrincipalName</th>
        <th class="bg-info">EstablishYear</th>
        <th class="bg-info">Address</th>
        <th class="bg-info">Level</th>
        <th class="bg-info">Telephone</th>
        <th class="bg-info">TotalStudent</th>
        <th class="bg-info">Update</th>
    </tr>
    @foreach (School s in Model)
    {
        <tr>
            <td class="bg-warning">@s.Id</td>
            <td class="bg-warning">@s.Name</td>
            <td class="bg-warning">@s.City</td>
            <td class="bg-warning">
                <a class="btn btn-sm btn-primary" asp-action="Update" asp-route-id="@s.Id">
                    Update
                </a>
            </td>
            <td class="bg-info">@s.SchoolDetail?.PrincipalName</td>
            <td class="bg-info">@s.SchoolDetail?.EstablishYear</td>
            <td class="bg-info">@s.SchoolDetail?.Address</td>
            <td class="bg-info">@s.SchoolDetail?.Level</td>
            <td class="bg-info">@s.SchoolDetail?.Telephone</td>
            <td class="bg-info">@s.SchoolDetail?.TotalStudent</td>
            <td class="bg-info">
                <a class="btn btn-sm btn-primary" asp-controller="SchoolDetail" asp-action="CreateUpdate" asp-route-id="@s.Id">
                    Update
                </a>
            </td>
        </tr>
    }
</table>
Notice the 2 update links are provided for updating School and SchooDetail records.
<a class="btn btn-sm btn-primary" asp-action="Update" asp-route-id="@s.Id">Update</a>

<a class="btn btn-sm btn-primary" asp-controller="SchoolDetail" asp-action="CreateUpdate" asp-route-id="@s.Id">Update</a>
Next, to the SchoolController.cs, add ReadSSD action as shown below.
public IActionResult ReadSSD()
{
    string myCS = cs.Value.DefaultConnection;

    string sql = "SELECT * FROM School AS A LEFT JOIN SchoolDetail AS B ON A.Id = B.SchoolId;";

    List<School> schools;
    using (var connection = new SqlConnection(myCS))
    {

        schools = connection.Query<School, SchoolDetail, School>(
                sql,
                (school, schoolDetail) =>
                {
                    school.SchoolDetail = schoolDetail;
                    return school;
                },
                splitOn: "SchoolId")
            .Distinct()
            .ToList();
    }

    return View(schools);
}
Code Explanation: We used an LEFT JOIN SQL Query to fetch records from both School and SchoolDetail table. Then with Dapper Query method, executed the sql query and got the records to a School object called ‘schools’.
The Query method takes 3 parameters Query<School, SchoolDetail, School> and after processing the records set, which the LEFT JOIN Query gives, returns a School object. The “splitOn” tells what column(s) to use to split the data into multiple objects and so we are able to map a single row to multiple objects.
Next, we move to School and Teacher screen. So, add ReadST.cshml razor view inside the Views ➤ School folder. It creates a html table and displays School and Teacher records. The teacher records are displayed below the school records. The code is given below:
@model List<School>

@{
    ViewData["Title"] = "School & Teacher";
}

<h1 class="bg-info text-white">Schools & Teacher</h1>
<a asp-action="Create" class="btn btn-secondary">Create a School</a>

<div asp-validation-summary="All" class="text-danger"></div>

<table class="table table-sm table-bordered">
    <tr>
        <th class="bg-warning">Id</th>
        <th class="bg-warning">Name</th>
        <th class="bg-warning">City</th>
        <th class="bg-warning">Update</th>
        <th class="bg-warning"></th>
    </tr>
    @foreach (School s in Model)
    {
        <tr class="bg-warning">
            <td>@s.Id</td>
            <td>@s.Name</td>
            <td>@s.City</td>
            <td class="bg-warning">
                <a class="btn btn-sm btn-primary" asp-action="Update" asp-route-id="@s.Id">
                    Update
                </a>
            </td>
            <td class="bg-warning">
                <a class="btn btn-sm btn-primary" asp-controller="Teacher" asp-action="Create" asp-route-id="@s.Id">
                    Add Teacher
                </a>
            </td>
        </tr>
        @if (s.Teacher[0] != null)
        {
            <tr>
                <th class="bg-info">Name</th>
                <th class="bg-info">Address</th>
                <th class="bg-info">Qualification</th>
                <th class="bg-info">Salary</th>
                <th class="bg-info">Update</th>
            </tr>

            @foreach (Teacher t in s.Teacher)
            {
                <tr class="bg-info">
                    <td>@t.Name.</td>
                    <td>@t.Address</td>
                    <td>@t.Qualification</td>
                    <td>@t.Salary</td>
                    <td>
                        <a class="btn btn-sm btn-primary" asp-controller="Teacher" asp-action="Update" asp-route-id="@t.Id">
                            Update
                        </a>
                    </td>
                </tr>
            }
        }
    }
</table>
Notice the update links provided for updating School and Teacher records.
<a class="btn btn-sm btn-primary" asp-action="Update" asp-route-id="@s.Id">Update</a>

<a class="btn btn-sm btn-primary" asp-controller="Teacher" asp-action="Update" asp-route-id="@t.Id">Update</a>
There is also a link to add teacher records.
<a class="btn btn-sm btn-primary" asp-controller="Teacher" asp-action="Create" asp-route-id="@s.Id">Add Teacher</a>Now add ReadST action method to the SchoolController.cs. It’s code is given below:
public IActionResult ReadST()
{
    string myCS = cs.Value.DefaultConnection;

    string sql = "SELECT * FROM School AS A LEFT JOIN Teacher AS B ON A.Id = B.SchoolId;";

    List<School> schools;
    using (var connection = new SqlConnection(myCS))
    {
        var dictionary = new Dictionary<int, School>();


        schools = connection.Query<School, Teacher, School>(
        sql,
        (school, teacher) =>
        {
            School e;

            if (!dictionary.TryGetValue(school.Id, out e))
            {
                e = school;
                e.Teacher = new List<Teacher>();
                dictionary.Add(e.Id, e);
            }

            e.Teacher.Add(teacher);
            return e;
        },
        splitOn: "Id")
        .Distinct()
        .ToList();
    }

    return View(schools);
}
Code Explanation: This code is similar to the previous code, here Left Join query is used between School and Teacher tables. The Dapper Query method takes School and Teacher objects as inputs and returns School object after processing – Query<School, Teacher, School>.
Delete Records with Dapper
The delete records feature will be created on the 2 screens – “School & SchoolDetails” and “School & Teacher”.
In the razor view file ReadSSD.cshtml, add Delete button as shown in the highlighted code below.
@model List<School>

@{
    ViewData["Title"] = "School & SchoolDetail";
}

<h1 class="bg-info text-white">Schools & SchoolDetail</h1>
<a asp-action="Create" class="btn btn-secondary">Create a School</a>

<div asp-validation-summary="All" class="text-danger"></div>

<table class="table table-sm table-bordered">
    <tr>
        <th class="bg-warning">Id</th>
        <th class="bg-warning">Name</th>
        <th class="bg-warning">City</th>
        <th class="bg-warning">Update</th>
        <th class="bg-warning">Delete</th>
        <th class="bg-info">PrincipalName</th>
        <th class="bg-info">EstablishYear</th>
        <th class="bg-info">Address</th>
        <th class="bg-info">Level</th>
        <th class="bg-info">Telephone</th>
        <th class="bg-info">TotalStudent</th>
        <th class="bg-info">Update</th>
        <th class="bg-info">Delete</th>
    </tr>
    @foreach (School s in Model)
    {
        <tr>
            <td class="bg-warning">@s.Id</td>
            <td class="bg-warning">@s.Name</td>
            <td class="bg-warning">@s.City</td>
            <td class="bg-warning">
                <a class="btn btn-sm btn-primary" asp-action="Update" asp-route-id="@s.Id">
                    Update
                </a>
            </td>
            <td class="bg-warning">
                <form asp-action="Delete" asp-route-id="@s.Id" method="post">
                    <button type="submit" class="btn btn-sm btn-danger">
                        Delete
                    </button>
                </form>
            </td>
            <td class="bg-info">@s.SchoolDetail?.PrincipalName</td>
            <td class="bg-info">@s.SchoolDetail?.EstablishYear</td>
            <td class="bg-info">@s.SchoolDetail?.Address</td>
            <td class="bg-info">@s.SchoolDetail?.Level</td>
            <td class="bg-info">@s.SchoolDetail?.Telephone</td>
            <td class="bg-info">@s.SchoolDetail?.TotalStudent</td>
            <td class="bg-info">
                <a class="btn btn-sm btn-primary" asp-controller="SchoolDetail" asp-action="CreateUpdate" asp-route-id="@s.Id">
                    Update
                </a>
            </td>
            <td class="bg-info">
                <form asp-controller="SchoolDetail" asp-action="Delete" asp-route-id="@s.Id" method="post">
                    <button type="submit" class="btn btn-sm btn-danger">
                        Delete
                    </button>
                </form>
            </td>
        </tr>
    }
</table>
The screen will now look with the delete buttons as shown below:

The first Delete button is for deleting School records while the second one deletes the SchoolDetail records.
In the SchoolController add the Delete action method:
[HttpPost]
public IActionResult Delete(int id)
{
    string myCS = cs.Value.DefaultConnection;

    var sql = @"Delete From SchoolDetail Where SchoolId = @Id";

    using (var connection = new SqlConnection(myCS))
    {
        var result = connection.Execute(sql, new { Id = id });
    }

    return RedirectToAction("ReadSSD", "School");
}
It takes school id in it’s parameter and executes the DELETE SQL Query.
Next, add the Delete action to the SchoolController.cs file:
[HttpPost]
public IActionResult Delete(int id)
{
    string myCS = cs.Value.DefaultConnection;

    var sql1 = @"Delete From SchoolDetail Where SchoolId = @Id";
    var sql2 = @"Delete From Teacher Where SchoolId = @Id";
    var sql3 = @"Delete From School Where Id = @Id";

    using (var connection = new SqlConnection(myCS))
    {
        var result1 = connection.Execute(sql1, new { Id = id });
        var result2 = connection.Execute(sql2, new { Id = id });
        var result3 = connection.Execute(sql3, new { Id = id });
    }

    return RedirectToAction("ReadSSD");
}
Notice that here we are also deleting the related records from SchoolDetail and Teacher tables.
Next, update the ReadST.cshtml as shown in the highlighted manner below:
@model List<School>

@{
    ViewData["Title"] = "School & Teacher";
}

<h1 class="bg-info text-white">Schools & Teacher</h1>
<a asp-action="Create" class="btn btn-secondary">Create a School</a>

<div asp-validation-summary="All" class="text-danger"></div>

<table class="table table-sm table-bordered">
    <tr>
        <th class="bg-warning">Id</th>
        <th class="bg-warning">Name</th>
        <th class="bg-warning">City</th>
        <th class="bg-warning">Update</th>
        <th class="bg-warning">Delete</th>
        <th class="bg-warning"></th>
    </tr>
    @foreach (School s in Model)
    {
        <tr class="bg-warning">
            <td>@s.Id</td>
            <td>@s.Name</td>
            <td>@s.City</td>
            <td class="bg-warning">
                <a class="btn btn-sm btn-primary" asp-action="Update" asp-route-id="@s.Id">
                    Update
                </a>
            </td>
            <td class="bg-warning">
                <form asp-controller="School" asp-action="Delete" asp-route-id="@s.Id" method="post">
                    <button type="submit" class="btn btn-sm btn-danger">
                        Delete
                    </button>
                </form>
            </td>
            <td class="bg-warning">
                <a class="btn btn-sm btn-primary" asp-controller="Teacher" asp-action="Create" asp-route-id="@s.Id">
                    Add Teacher
                </a>
            </td>
        </tr>
        @if (s.Teacher[0] != null)
        {
            <tr>
                <th class="bg-info">Name</th>
                <th class="bg-info">Address</th>
                <th class="bg-info">Qualification</th>
                <th class="bg-info">Salary</th>
                <th class="bg-info">Update</th>
                <th class="bg-info">Delete</th>
            </tr>

            @foreach (Teacher t in s.Teacher)
            {
                <tr class="bg-info">
                    <td>@t.Name.</td>
                    <td>@t.Address</td>
                    <td>@t.Qualification</td>
                    <td>@t.Salary</td>
                    <td>
                        <a class="btn btn-sm btn-primary" asp-controller="Teacher" asp-action="Update" asp-route-id="@t.Id">
                            Update
                        </a>
                    </td>
                    <td>
                        <form asp-controller="Teacher" asp-action="Delete" asp-route-id="@t.Id" method="post">
                            <button type="submit" class="btn btn-sm btn-danger">
                                Delete
                            </button>
                        </form>
                    </td>
                </tr>
            }
        }
    }
</table>
The screen will now look with the delete buttons as shown below:

Now go to TeacherController.cs and add the Delete action as shown below. This action receives the teaacher id and executes the sql delete command.
[HttpPost]
public IActionResult Delete(int id)
{
    string myCS = cs.Value.DefaultConnection;

    var sql = @"Delete From Teacher Where Id = @Id";

    using (var connection = new SqlConnection(myCS))
    {
        var result = connection.Execute(sql, new { Id = id });
    }

    return RedirectToAction("ReadST", "School");
}
All the Dapper CRUD operations are completed successfully. Now it’s your turn to test it on your pc.
Download the Source Codes:
In this tutorial we build the CRUD Operations in Dapper. We started with Create and Update operations for the 3 tables having 1-1 and 1-many relationships. Then we created a complex Read operation and finished it by adding Delete operation. Hope you like it and let me know your thoughts on the comments section.





 Welcome to YogiHosting - A Programming Tutorial Website. It is used by millions of people around the world to learn and explore about ASP.NET Core, Blazor, jQuery, JavaScript, Docker, Kubernetes and other topics.