ZXing.Net implementation in ASP.NET Web Forms

ZXing.NET is a library which supports decoding and generating of barcodes (like QR Code, PDF 417, EAN, UPC, Aztec, Data Matrix, Codabar) within images. In this tutorial I will implement it in ASP.NET Web Forms.
What we will build with ZXing.NET
- 1. Create QR Codes for any text entered by the user on the text box.
- 2. Create QR Codes Code Files for any text entered by the user. We will also save these QR Code files in a folder called qrr.
- 3. Read all the QR Code files and then decode the QR Code stored in them.
Installation of ZXing.NET
We can install ZXing.NET library from Package Manager Console. Simply run the below given command:
PM> Install-Package ZXing.NetCreate QR Codes
Create a new web form file and name it createqr.aspx and add the following code to it:
<table>
    <tbody>
        <tr>
            <td>
                <label>Enter text for creating QR Code</label>
            </td>
            <td>
                <asp:TextBox ID="qrTextBox" runat="server" />
            </td>
        </tr>
        <tr>
            <td colspan="2">
                <asp:Button ID="submitButton" Text="Submit" runat="server" OnClick="submitButton_Click" />
            </td>
       </tr>
   </tbody>
</table>

<div id="qrCodeDiv" runat="server" style="display: none">
    <h3>QR Code Successfully Generated</h3>
    <asp:Image id="qrCodeImage" runat="server" />
</div>
Explanation : Notice the textbox called qrTextBox is added to enter a text. There is also a button called submitButton on whose click the QR Code will be generated for the entered text..
This generated QR Code is displayed in the asp:image control:
<asp:Image id="qrCodeImage" runat="server" />Now go to the createqr.aspx.cs page and import the following namespaces:
using System.IO;
using ZXing.QrCode;
Also add the button click event where the QR Code will be generated. The code is given below:
protected void submitButton_Click(object sender, EventArgs e)
{
    Byte[] byteArray;
    var width = 250; // width of the Qr Code
    var height = 250; // height of the Qr Code
    var margin = 0;
    var qrCodeWriter = new ZXing.BarcodeWriterPixelData
    {
        Format = ZXing.BarcodeFormat.QR_CODE,
        Options = new QrCodeEncodingOptions
        {
            Height = height,
            Width = width,
            Margin = margin
        }
    };
    var pixelData = qrCodeWriter.Write(qrTextBox.Text);

    // creating a bitmap from the raw pixel data; if only black and white colors are used it makes no difference
    // that the pixel data ist BGRA oriented and the bitmap is initialized with RGB
    using (var bitmap = new System.Drawing.Bitmap(pixelData.Width, pixelData.Height, System.Drawing.Imaging.PixelFormat.Format32bppRgb))
    {
        using (var ms = new MemoryStream())
        {
            var bitmapData = bitmap.LockBits(new System.Drawing.Rectangle(0, 0, pixelData.Width, pixelData.Height), System.Drawing.Imaging.ImageLockMode.WriteOnly, System.Drawing.Imaging.PixelFormat.Format32bppRgb);
            try
            {
                // we assume that the row stride of the bitmap is aligned to 4 byte multiplied by the width of the image
                System.Runtime.InteropServices.Marshal.Copy(pixelData.Pixels, 0, bitmapData.Scan0, pixelData.Pixels.Length);
            }
            finally
            {
                bitmap.UnlockBits(bitmapData);
            }
            // save to stream as PNG
            bitmap.Save(ms, System.Drawing.Imaging.ImageFormat.Png);
            byteArray = ms.ToArray();
        }
    }

    qrCodeDiv.Style.Add("display", "block");
    qrCodeImage.ImageUrl = String.Format("data:image/png;base64,{0}", Convert.ToBase64String(byteArray));
}
Explanation : we used the Write() method of BarcodeWriterPixelData class to generate the raw pixel data of the string which the user entered in the text box. Notice that we are passing the text string to this method:
var pixelData = qrCodeWriter.Write(qrTextBox.Text);Next, we create a bitmap from this raw pixel data by using the below code:
var bitmap = new System.Drawing.Bitmap(pixelData.Width, pixelData.Height, System.Drawing.Imaging.PixelFormat.Format32bppRgb);We used the “MemoryStream” class of System.IO namespace to change this Bitmap to a stream of PNG. Then we finally get the byte[] array of this stream.
bitmap.Save(ms, System.Drawing.Imaging.ImageFormat.Png);
byteArray = ms.ToArray();
Once we have the Byte[] array, we are setting the ImageUrl property of the image control with the Byte[] array value as shown in the below code:
qrCodeImage.ImageUrl = String.Format("data:image/png;base64,{0}", Convert.ToBase64String(byteArray)); To test the working of this code, run your application and enter any value in the text box and click the ‘Submit’ button. You will see the QR Code gets created and is shown on the page.
See the below video which shows this working:
Create QR File
Next, we will create QR Code files based on the string which the user enters on the text box. These QR Code files will be stored inside the qrr folder of your application.
First create a new folder called qrr inside the root of the website.
Next, create a new web form called generatefile.aspx and add the following codes to it:
<table>
    <tbody>
        <tr>
            <td>
                <label>Enter text for creating QR File</label>
            </td>
            <td>
                <asp:TextBox ID="qrTextBox" runat="server" />
            </td>
        </tr>
        <tr>
            <td colspan="2">
                <asp:Button ID="submitButton" Text="Submit" runat="server" OnClick="submitButton_Click" />
            </td>
        </tr>
    </tbody>
</table>
<div id="qrCodeDiv" runat="server" style="display: none">
    <h3>QR Code file Successfully Generated</h3>
    <asp:Image id="qrCodeImage" runat="server" />
</div>
The code is totally same like the previous page. Next, create the click event of the button in the generatefile.aspx.cs page.
protected void submitButton_Click(object sender, EventArgs e)
{
    Byte[] byteArray;
    var width = 250; // width of the Qr Code
    var height = 250; // height of the Qr Code
    var margin = 0;
    var qrCodeWriter = new ZXing.BarcodeWriterPixelData
    {
        Format = ZXing.BarcodeFormat.QR_CODE,
        Options = new QrCodeEncodingOptions
        {
            Height = height,
            Width = width,
            Margin = margin
        }
    };
    var pixelData = qrCodeWriter.Write(qrTextBox.Text);

    // creating a bitmap from the raw pixel data; if only black and white colors are used it makes no difference
    // that the pixel data ist BGRA oriented and the bitmap is initialized with RGB
    using (var bitmap = new System.Drawing.Bitmap(pixelData.Width, pixelData.Height, System.Drawing.Imaging.PixelFormat.Format32bppRgb))
    {
        using (var ms = new MemoryStream())
        {
            var bitmapData = bitmap.LockBits(new System.Drawing.Rectangle(0, 0, pixelData.Width, pixelData.Height), System.Drawing.Imaging.ImageLockMode.WriteOnly, System.Drawing.Imaging.PixelFormat.Format32bppRgb);
            try
            {
                // we assume that the row stride of the bitmap is aligned to 4 byte multiplied by the width of the image
                System.Runtime.InteropServices.Marshal.Copy(pixelData.Pixels, 0, bitmapData.Scan0, pixelData.Pixels.Length);
            }
            finally
            {
                bitmap.UnlockBits(bitmapData);
            }

            // save to folder
            string fileGuid = Guid.NewGuid().ToString().Substring(0, 4);
            bitmap.Save(Server.MapPath("~/qrr") + "/file-" + fileGuid + ".png", System.Drawing.Imaging.ImageFormat.Png);

            // save to stream as PNG
            bitmap.Save(ms, System.Drawing.Imaging.ImageFormat.Png);
            byteArray = ms.ToArray();
        }
    }

    qrCodeDiv.Style.Add("display", "block");
    qrCodeImage.ImageUrl = String.Format("data:image/png;base64,{0}", Convert.ToBase64String(byteArray));
}
The submit button click event code is much similar to the earlier button code of the createqr.aspx web form. Only one change is there, which is the saving of the QR Code file inside the qrr folder. The below 2 code lines are the ones that perform this work.
// save to folder
string fileGuid = Guid.NewGuid().ToString().Substring(0, 4);
bitmap.Save(Server.MapPath("~/qrr") + "/file-" + fileGuid + ".png", System.Drawing.Imaging.ImageFormat.Png);
Enter any text in the text box and click the ‘Submit’ button. You will see the QR Code gets created and show on the page. Now check the qrr folder and you will find a .png file is created which contains the QR Code of this text.
Read all the QR Code files and Decode their QR Codes
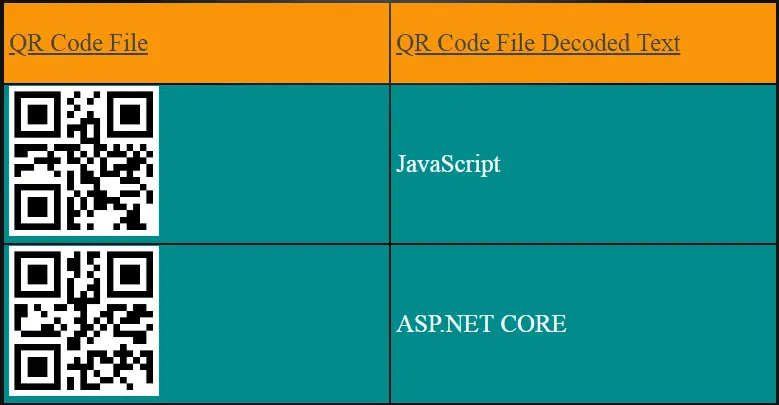
Now we will read all the QR Code files and also decode their QR Code values. So, create a new web form called viewfile.aspx whose code is given below:
<table>
    <thead>
        <tr>
            <td>QR Code File
            </td>
            <td>QR Code File Decoded Text
            </td>
        </tr>
    </thead>
    <tbody>
        <div id="qrFiles" runat="server" />
    </tbody>
</table>
Explanation : There is an HTML table which contains a div with id as qrFiles. From the code behind, we will show all the previously generated QR Codes inside this div.
Next, add the following code to the viewfile.aspx.cs page:
protected void Page_Load(object sender, EventArgs e)
{
    if (!IsPostBack)
        ViewFile();
}

public void ViewFile()
{
    StringBuilder sb = new StringBuilder();
    string[] files = Directory.GetFiles(Server.MapPath("~/qrr"));
    foreach (string file in files)
    {
        // create a barcode reader instance
        IBarcodeReader reader = new BarcodeReader();
        // load a bitmap
        var barcodeBitmap = (Bitmap)System.Drawing.Image.FromFile(Server.MapPath("~/qrr") + "/" + Path.GetFileName(file));
        // detect and decode the barcode inside the bitmap
        var result = reader.Decode(barcodeBitmap);
        // do something with the result
        sb.Append("<tr><td><img src = \"" + "/qrr/" + Path.GetFileName(file) + "\" /></td><td>" + result.ToString() + "</td></tr>");
    }
    //return sb.ToString();
    qrFiles.InnerHtml = sb.ToString();
}
Explanation : First we get all the files inside the ‘qrr’ folder by using the Directory.GetFiles() method. Then we loop through each of these files using the for each loop:
foreach (string file in files)
{
//…
}
Next, we create an instance of IBarcodeReader class and load the bitmaps from each file. See the below code lines:
IBarcodeReader reader = new BarcodeReader();
var barcodeBitmap = (Bitmap)System.Drawing.Image.FromFile(Server.MapPath("~/qrr") + "/" + Path.GetFileName(file));
The decoding of the QR Code is done using the Decode method:
var result = reader.Decode(barcodeBitmap);We append the file name and Decoded values to a string builder object like shown below:
sb.Append("<tr><td><img src = \"" + "/qrr/" + Path.GetFileName(file) + "\" /></td><td>" + result.ToString() + "</td></tr>");Finally we show the string builder object’s value inside the table like this:
qrFiles.InnerHtml = sb.ToString();Run this web form in your browser and you will see the QR Code files displayed as shown by the below image:

Dowload the codes:
The ZXing.NET is an excellent library to create QR Codes in your ASP.NET Web Forms based website. Download the codes given in this tutorial and use it to create QR Codes in your websites.


 Welcome to YogiHosting - A Programming Tutorial Website. It is used by millions of people around the world to learn and explore about ASP.NET Core, Blazor, jQuery, JavaScript, Docker, Kubernetes and other topics.