ASP.NET Core + Entity Framework Core + jQuery to Delete Records without Page Reload
In ASP.NET Core, you can perform the deletion of any row from an HTML Table located in the View, in such a way that there is No-Page reloading. You can achieve this using Entity Framework Core and jQuery. Let me show how to create this feature in your ASP.NET Core based website.
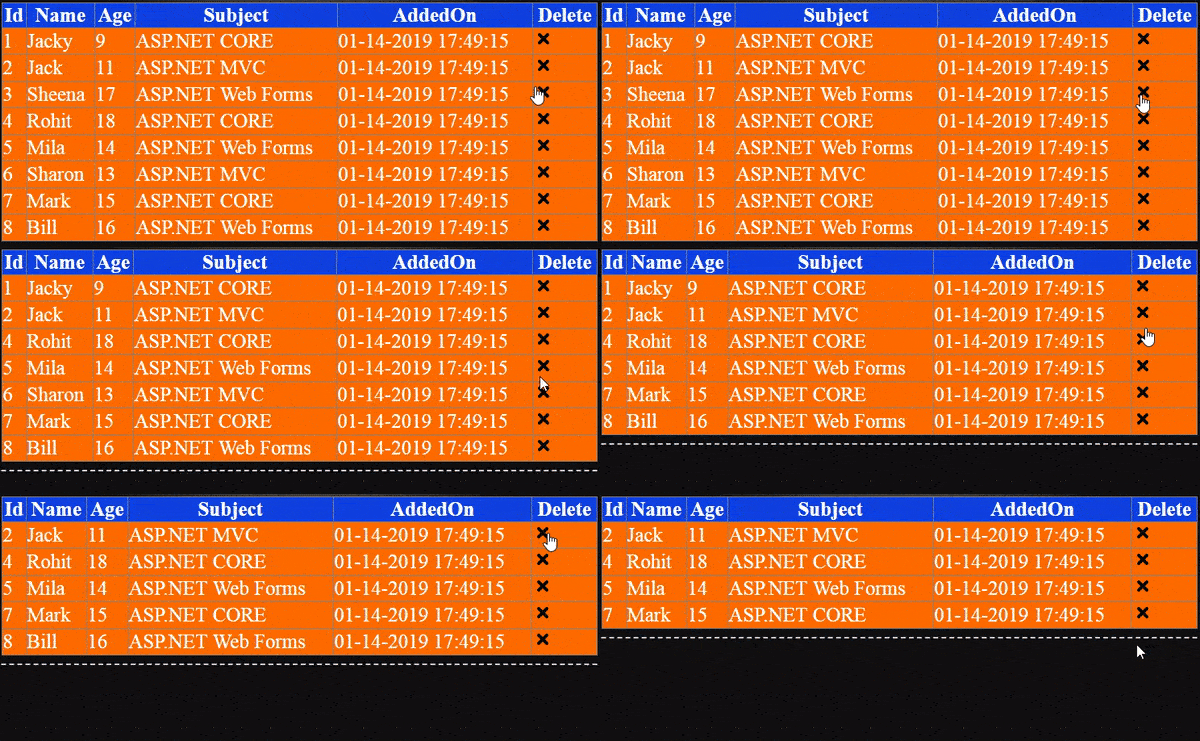
Once this tutorial is finished you will have created a special feature that will exactly work like shown by the below video:
First you need to create a new ASP.NET Core Web APP (MVC) based project in DOT NET 7.0.
Install Entity Framework Core
I start by installing Entity Framework Core to my ASP.NET Core app. To tell you more, the deletion of the Records from the database will be done by Entity Framework Core. So first you need to install to the app the following 2 NuGet Packages.
Microsoft.EntityFrameworkCore.SqlServer
Microsoft.EntityFrameworkCore.Tools
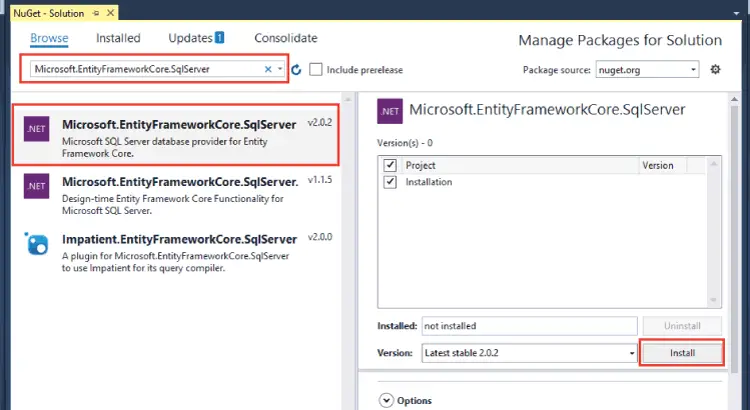
The installation process works like this. In your Visual Studio, go to Tools > NuGet Package Manager > Manage NuGet Package Manager for Solution. Then you will find the ‘NuGet Solution’ window opens up in your Visual Studio. In this window click the ‘Browse’ link and search for Microsoft.EntityFrameworkCore.SqlServer on the text box.
Soon you will get the search results displayed. So click the Microsoft.EntityFrameworkCore.SqlServer package and then click the ‘Install’ button, like shown by the below image:
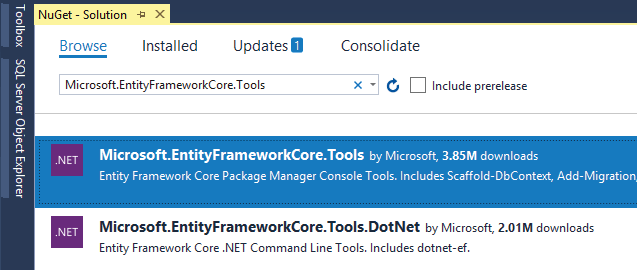
Congrats you are now ready to use the Entity Framework Core in your project.
Create a Database and Table using Migrations
The database and it’s tables are created by EF Core Migrations. So you will have to first create the DbContext class and the Entity class for the Database table.
Here I will create a database by the name of DBSchool in my SQL Server and this database will have one table called Student.
Therefore create 2 classes inside the Models folder of your project. These classes are given below:
public class Student
{
    public int Id { get; set; }
    public string Name { get; set; }
    public int Age { get; set; }
    public string Subject { get; set; }
    public DateTime AddedOn { get; set; }
}
public class SchoolContext : DbContext
{
    public SchoolContext(DbContextOptions<SchoolContext> options) : base(options)
    {
    }

    public DbSet<Student> Student { get; set; }

    protected override void OnModelCreating(ModelBuilder modelBuilder)
    {
        modelBuilder.Entity<Student>(entity =>
        {
            entity.Property(e => e.AddedOn)
                .HasColumnType("datetime")
                .HasDefaultValueSql("(getdate())");
        });
    }
}
The Student.cs class is the Entity Class that will be used to create the Database Table called “Student”. All the properties this class has will be used to create the columns for the ‘Student’ table.
Next we add the Database Connection String in the appsettings.json file.
{
  "Logging": {
    "LogLevel": {
      "Default": "Information",
      "Microsoft.AspNetCore": "Warning"
    }
  },
  "AllowedHosts": "*",
  "ConnectionStrings": {
    "DefaultConnection": "Data Source=(localdb)\\MSSQLLocalDB;Initial Catalog=DBSchool;Integrated Security=True;Connect Timeout=30;Encrypt=False;TrustServerCertificate=False;ApplicationIntent=ReadWrite;MultiSubnetFailover=False"
  }
}
The Database is specified as ‘DBSchool’ in the above code line.
We also need to register the Database Context as a service in the Program.cs class of the app. This will ensure we get the connection string to our controller (through DI) when doing database operations. The code to be added to the program class is given below.
builder.Services.AddDbContext<SchoolContext>(options =>
  options.UseSqlServer(builder.Configuration.GetConnectionString("DefaultConnection")));
Now, you are ready to run EF Core Migrations Commands. So in your Visual Studio, select Tools > NuGet Package Manager > Package Manager Console, then run the following 2 commands one after the other:
PM> add-migration Migration1
PM> Update-Database
Soon the Migrations will complete and your database and table will be created in SQL Server.
Controller – Action and View
Create a new Controller called HomeController.cs and add to it the following code:
public class HomeController : Controller
{
    private SchoolContext context;
    public HomeController(SchoolContext cc)
    {
        context = cc;
    }

    public IActionResult Index()
    {
        List<Student> studentList = new List<Student>();
        studentList = context.Student.ToList();
        return View(studentList);
    }

    [HttpPost]
    public string Delete(int id)
    {
        var student = new Student()
        {
            Id = id
        };

        context.Student.Remove(student);
        context.SaveChanges();
        return "success";
    }
}
Notice that in the Index action method where I am getting all the Student’s records from the database table like:
studentList = context.Student.ToList();The main part is the Delete Action method which will be deleting the records from the table using EF Core. This method gets the record ‘Id’ in the parameter.
I have to send this ‘id’ from the View. So now moving towards the View. Create Index.cshtml View inside the Views/Home folder with the following code:
@{
	ViewData["Title"] = "Delete Row with jQuery & Entity Framework Core";
}

@model List<Student>

<style>
	body {
		background: #111 no-repeat;
		background-image: -webkit-gradient(radial, 50% 0, 150, 50% 0, 300, from(#444), to(#111));
	}

	h1, h2, h3 {
		text-align: center;
		color: #FFF;
		margin: 5px 0;
	}

	h1 {
		font-size: 30px;
	}

	h2 a {
		font-size: 25px;
		color: #0184e3;
		text-decoration: none;
	}

	.container {
		width: 800px;
		margin: auto;
		color: #FFF;
		font-size: 25px;
	}

		.container #content {
			border: dashed 2px #CCC;
			padding: 10px;
		}

	#viewContent .studentDiv table thead {
		background-color: #0f40e0;
	}

	#viewContent .studentDiv table tbody {
		background-color: #ff6a00;
	}
</style>

<div class="container">
	<div id="content">
		<h1>Delete Row with jQuery & Entity Framework Core</h1>
		<div id="viewContent">
			@{
				<div class="studentDiv">
					<table>
						<thead>
							<tr>
								<td>Id</td>
								<td>Name</td>
								<td>Age</td>
								<td>Subject</td>
								<td>Added On</td>
								<td>Delete</td>
							</tr>
						</thead>
						<tbody>
							@foreach (Student student in Model)
							{
								<tr>
									<td>@student.Id</td>
									<td>@student.Name</td>
									<td>@student.Age</td>
									<td>@student.Subject</td>
									<td>@student.AddedOn</td>
									<td>
										<button class="delete">Delete</button>
									</td>
								</tr>
							}
						</tbody>
					</table>
				</div>
			}
		</div>
	</div>
</div>

<script src="https://ajax.googleapis.com/ajax/libs/jquery/3.1.0/jquery.min.js"></script>
<script>
	$(document).ready(function () {
		$(".delete").click(function (e) {
			var parent = $(this).parents("tr");
			var id = parent.find("td:eq(0)").text();

			$.ajax({
				type: "POST",
				url: "@Url.Action("Delete")",
				data: { id: id },
				dataType: "text",
				success: function (result, status, xhr) {
					if (result == "success")
						parent.hide("slow");
					else
						alert(result);
				},
				error: function (xhr, status, error) {
					console.log("Result: " + status + " " + error + " " + xhr.status + " " + xhr.statusText)
				}
			});
		});
	});
</script>
The View gets the Model of type List<Student> like this:
@model List<Student>It then creates the HTML table by looping through these lists of students.
I have added the delete button on this table which on clicking will delete the corresponding student’s record:
<button class="delete">Delete</button>The jQuery Code to Delete the row with No-Page Reload
The jQuery code is added at the end of the View and that will be executed on the click of the ‘delete’ button on the HTML table. On the click of the ‘delete’ button, I first get it’s parent ‘tr’ row and the value of the first ‘td’ child of this row. The first ‘td’ child value will be the ‘id’ column of the student row.
var parent = $(this).parents("tr");
var id = parent.find("td:eq(0)").text();
Then I used the jQuery .ajax() method to make an AJAX request to the ‘Delete’ Action of my HomeController.cs. I also pass the ‘id’ of the record to this function. When I receive ‘success’ message from the AJAX response then I hide the row by using the .hide() method of jQuery.
parent.hide("slow");Download the source codes.
The ASP.NET Core application can be made much better by using jQuery which is an excellent script language to do server side works without reloading the whole page. I used it here for doing deleting of records from HTML table using EF. You can download the source code and use it in your website.





 Welcome to YogiHosting - A Programming Tutorial Website. It is used by millions of people around the world to learn and explore about ASP.NET Core, Blazor, jQuery, JavaScript, Docker, Kubernetes and other topics.