ZXing.Net implementation in ASP.NET Core

ZXing.NET is a library which supports decoding and generating of barcodes (like QR Code, PDF 417, EAN, UPC, Aztec, Data Matrix, Codabar) within images. In this tutorial I will implement it in ASP.NET Core application.
What we will build with ZXing.NET
- Create QR Codes for any text entered by the user.
- Create QR Code Files for any text entered by the user. I will save these QR Code files in ‘wwwroot’ folder.
- Read all the QR Code files and Decoding the QR Code stored in them.
Installation of ZXing.NET
To use the ZXing.NET library you need to install these 2 packages in your ASP.NET Core application using Package Manager Console:
- 1. ZXing.Net
PM> Install-Package ZXing.Net- 2. ZXing.Net.Bindings.CoreCompat.System.Drawing
PM> Install-Package ZXing.Net.Bindings.CoreCompat.System.Drawing -Version 0.16.5-betaTo work with images we will also need to install System.Drawing.Common package. It’s command is:
Install-Package System.Drawing.CommonCreate QR Codes
In your controller import the following namespaces:
using System;
using System.Collections.Generic;
using System.Drawing;
using System.IO;
using Microsoft.AspNetCore.Mvc;
using ZXing;
using ZXing.QrCode;
Next add Index Action methods in your controller whose codes are given below:
public IActionResult Index()
{
    return View();
}

[HttpPost]
public IActionResult Index(string qrText)
{
    Byte[] byteArray;
    var width = 250; // width of the Qr Code
    var height = 250; // height of the Qr Code
    var margin = 0;
    var qrCodeWriter = new ZXing.BarcodeWriterPixelData
    {
        Format = ZXing.BarcodeFormat.QR_CODE,
        Options = new QrCodeEncodingOptions
        {
            Height = height,
            Width = width,
            Margin = margin
        }
    };
    var pixelData = qrCodeWriter.Write(qrText);

    // creating a bitmap from the raw pixel data; if only black and white colors are used it makes no difference
    // that the pixel data ist BGRA oriented and the bitmap is initialized with RGB
    using (var bitmap = new System.Drawing.Bitmap(pixelData.Width, pixelData.Height, System.Drawing.Imaging.PixelFormat.Format32bppRgb))
    {
        using (var ms = new MemoryStream())
        {
            var bitmapData = bitmap.LockBits(new System.Drawing.Rectangle(0, 0, pixelData.Width, pixelData.Height), System.Drawing.Imaging.ImageLockMode.WriteOnly, System.Drawing.Imaging.PixelFormat.Format32bppRgb);
            try
            {
                // we assume that the row stride of the bitmap is aligned to 4 byte multiplied by the width of the image
                System.Runtime.InteropServices.Marshal.Copy(pixelData.Pixels, 0, bitmapData.Scan0, pixelData.Pixels.Length);
            }
            finally
            {
                bitmap.UnlockBits(bitmapData);
            }
            // save to stream as PNG
            bitmap.Save(ms, System.Drawing.Imaging.ImageFormat.Png);
            byteArray = ms.ToArray();
        }
    }
    return View(byteArray);
}
Explanation: The [HttpPost] type of Index action gets the text (for which the QR Code has to be generated) in the ‘qrText’ string variable given in it’s parameter.
I first Initialize the BarcodeWriterPixelData class and then called it’s Write method to generate the ‘raw pixel data’ of the QR Code. Notice that I pass the text string to this method:
var pixelData = qrCodeWriter.Write(qrText);Next, I create a bitmap from raw pixel data of the QR Code:
var bitmap = new System.Drawing.Bitmap(pixelData.Width, pixelData.Height, System.Drawing.Imaging.PixelFormat.Format32bppRgb);I then use the MemoryStream Class to change this Bitmap to a stream of PNG. Then finally get the byte[] array of this stream.
bitmap.Save(ms, System.Drawing.Imaging.ImageFormat.Png);
byteArray = ms.ToArray();
I return this byte[] array value to the View where the bitmap code is displayed from this byte[] array value.
Create the “Index” view and add the following code to it:
@model Byte[]
@using (Html.BeginForm(null, null, FormMethod.Post))
{
    <table>
        <tbody>
            <tr>
                <td>
                    <label>Enter text for creating QR Code</label>
                </td>
                <td>
                    <input type="text" name="qrText" />
                </td>
            </tr>
            <tr>
                <td colspan="2">
                    <button>Submit</button>
                </td>
            </tr>
        </tbody>
    </table>
}
@{
    if (Model != null)
    {
        <h3>QR Code Successfully Generated</h3>
        <img src="@String.Format("data:image/png;base64,{0}", Convert.ToBase64String(Model))" />
    }
}
Explanation: The view has a form where the user enters the string in the text box. Once the QR Code is generated then the view gets it’s byte[] array value in it’s Model. This QR Code is displayed as an image by the img tag as shown below:
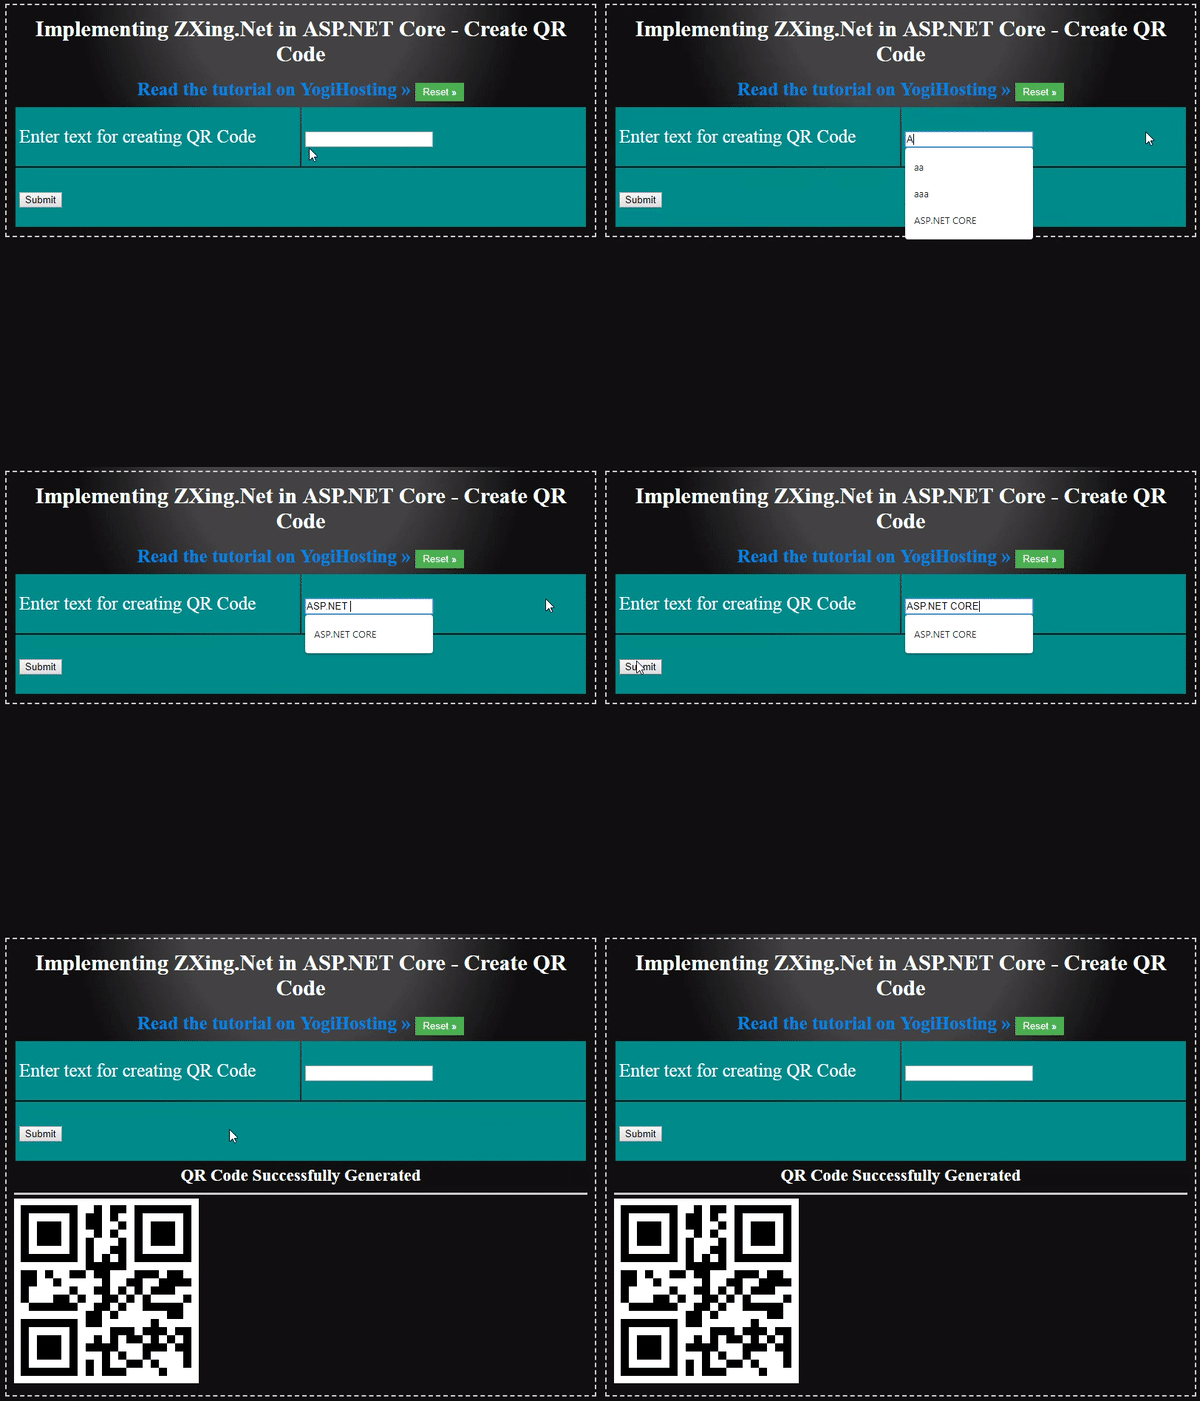
<img src="@String.Format("data:image/png;base64,{0}", Convert.ToBase64String(Model))" />Run your application and open the URL of the Index action method in the browser. Enter any value in the text box and click the Submit button. You will see the QR Code is created and shown on the browser.
See the below video which explains it’s working:

Create QR Code files
Here I will create QR Code files. These QR Code files will be stored inside the wwwroot/qrr folder of your application.
First create a new folder called “qrr” inside the ‘wwwroot’ folder of your app. Next, create GenerateFile() index methods inside the Controller, as shown below:
public IActionResult GenerateFile()
{
    return View();
}

[HttpPost]
public IActionResult GenerateFile(string qrText)
{
    Byte[] byteArray;
    var width = 250; // width of the Qr Code
    var height = 250; // height of the Qr Code
    var margin = 0;
    var qrCodeWriter = new ZXing.BarcodeWriterPixelData
    {
        Format = ZXing.BarcodeFormat.QR_CODE,
        Options = new QrCodeEncodingOptions
        {
            Height = height,
            Width = width,
            Margin = margin
        }
    };
    var pixelData = qrCodeWriter.Write(qrText);

    // creating a bitmap from the raw pixel data; if only black and white colors are used it makes no difference
    // that the pixel data ist BGRA oriented and the bitmap is initialized with RGB
    using (var bitmap = new System.Drawing.Bitmap(pixelData.Width, pixelData.Height, System.Drawing.Imaging.PixelFormat.Format32bppRgb))
    {
        using (var ms = new MemoryStream())
        {
            var bitmapData = bitmap.LockBits(new System.Drawing.Rectangle(0, 0, pixelData.Width, pixelData.Height), System.Drawing.Imaging.ImageLockMode.WriteOnly, System.Drawing.Imaging.PixelFormat.Format32bppRgb);
            try
            {
                // we assume that the row stride of the bitmap is aligned to 4 byte multiplied by the width of the image
                System.Runtime.InteropServices.Marshal.Copy(pixelData.Pixels, 0, bitmapData.Scan0, pixelData.Pixels.Length);
            }
            finally
            {
                bitmap.UnlockBits(bitmapData);
            }

            // save to folder
            string fileGuid = Guid.NewGuid().ToString().Substring(0, 4);
            bitmap.Save("wwwroot/qrr/file-" + fileGuid + ".png", System.Drawing.Imaging.ImageFormat.Png);

            // save to stream as PNG
            bitmap.Save(ms, System.Drawing.Imaging.ImageFormat.Png);
            byteArray = ms.ToArray();
        }
    }
    return View(byteArray);
}
The ‘GenerateFile’ action method is very much similar to the earlier Index action method. Only one change remains, which is the saving of the QR Code file inside the qrr folder. The below 2 code lines do this saving task.
string fileGuid = Guid.NewGuid().ToString().Substring(0, 4);
bitmap.Save("wwwroot/qrr/file-" + fileGuid + ".png", System.Drawing.Imaging.ImageFormat.Png);
Add the GenerateFile.cshtml razor view with the following code.
@model Byte[]
@using (Html.BeginForm(null, null, FormMethod.Post))
{
    <table>
        <tbody>
            <tr>
                <td>
                    <label>Enter text for creating QR Code</label>
                </td>
                <td>
                    <input type="text" name="qrText" />
                </td>
            </tr>
            <tr>
                <td colspan="2">
                    <button>Submit</button>
                </td>
            </tr>
        </tbody>
    </table>
}
@{
    if (Model != null)
    {
        <h3>QR Code Successfully Generated</h3>
        <img src="@String.Format("data:image/png;base64,{0}", Convert.ToBase64String(Model))" />
    }
}
To test it, open the URL of the GenerateFile Action method in the browser. Now enter any value in the text box and click the ‘Submit’ button. You will see the QR Code gets created and shown on the browser. Now check the ‘qrr’ folder inside the ‘wwwroot’ folder of your application. There you will find a “.png” file that contains the QR Code of your text.
Reading all the QR Code files and Decoding their QR Codes
Now I will read all the QR Code files and decode their QR Code. So, create “ViewFile” action method in your controller whose code is given below:
public IActionResult ViewFile()
{
    List<KeyValuePair<string, string>> fileData = new List<KeyValuePair<string, string>>();
    KeyValuePair<string, string> data;
    string[] files = Directory.GetFiles("wwwroot/qrr");
    foreach (string file in files)
    {
        // create a barcode reader instance
        BarcodeReader reader = new BarcodeReader();
        // load a bitmap
        var barcodeBitmap = (Bitmap)Image.FromFile("wwwroot/qrr/" + Path.GetFileName(file));
        // detect and decode the barcode inside the bitmap
        var result = reader.Decode(barcodeBitmap);
        // do something with the result
        data = new KeyValuePair<string, string>(result.ToString(), "/qrr/" + Path.GetFileName(file));
        fileData.Add(data);

    }
    return View(fileData);
}
Explanation: I get all the files inside the ‘qrr’ folder by using the Directory.GetFiles() method. Then I loop through each of these files using the foreach loop:
foreach (string file in files)
{
//…
}
Next, I create an instance of BarcodeReader class and load the bitmaps from each file. Check the below code lines:
BarcodeReader reader = new BarcodeReader();
var barcodeBitmap = (Bitmap)Image.FromFile("wwwroot/qrr/" + Path.GetFileName(file));
The decoding of the QR Code is done using the “Decode” method.
var result = reader.Decode(barcodeBitmap);I have used an object of List<KeyValuePair<string, string>> type to store all the file paths and there decoded values of QR Code. The object is returned to the view.
Finally, create a view called ViewFile.cshtml and add the following code to it:
@model List<KeyValuePair<string, string>>
<table>
    <thead>
        <tr>
            <td>
                QR Code File
            </td>
            <td>
                QR Code File Decoded Text
            </td>
        </tr>
    </thead>
    <tbody>
        @foreach (KeyValuePair<string, string> k in Model)
        {
            <tr>
                <td>
                    <img src="@k.Value" />
                </td>
                <td>
                    @k.Key
                </td>
            </tr>
        }
    </tbody>
</table>
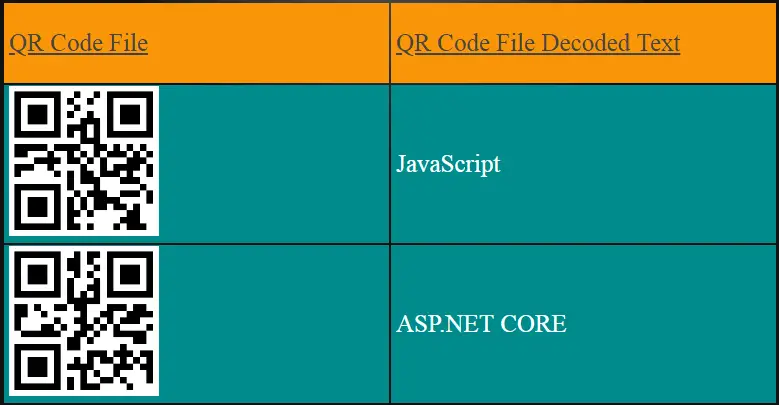
The view takes a model of List<KeyValuePair<string, string>> type and displays all the QR Code files and there decoded texts.
Create some QR Code files and then visit the URL of the ‘ViewFile’ action. You will see the QR Code files displayed as shown by the below image:

Download the source codes:
The ZXing.NET is an excellent library to create QR Codes in your ASP.NET Core app. Download the codes given in this tutorial and use it to create QR Codes in your website.


 Welcome to YogiHosting - A Programming Tutorial Website. It is used by millions of people around the world to learn and explore about ASP.NET Core, Blazor, jQuery, JavaScript, Docker, Kubernetes and other topics.