How to use Kubernetes Ingress on an ASP.NET Core app

In this ASP.NET Core Kubernetes Ingress turorial we will create an Ingress for accessing the app on the browser. Ingress is a Kubernetes object whose work is to expose the Kubernetes Service to HTTP and HTTPS routes.
ASP.NET Core Kubernetes series consists of the following articles:
- Deploy ASP.NET Core App on Kubernetes
- Managing ASP.NET Core app hosted on Kubernetes
- How to use Kubernetes Ingress on an ASP.NET Core app
- Kubernetes: Host Multi-Container ASP.NET Core app to Single Pod
- Kubernetes: Host Multi-Container ASP.NET Core app to Multiple Pods
- Kubernetes Volume emptyDir and SSL Mount to volume
- Kubernetes Persistent volumes (PV) and Persistent Volume Claim (PVC)
- Kubernetes Liveness Readiness Startup Probes
- How to use Helm for ASP.NET Core with Kubernetes
In the last tutorial I had created an ASP.NET Core app and hosted it on a Pod. I also exposed that Pod with a Service and the service was accessible with an IP address. If you want to check this tutorial then visit – What are Services in Kubernetes. Now I will create a Kubernetes Ingress for the same ASP.NET Core app.
Page Contents
What is Ingress and how it is different than a Service
When you want to expose your service to outside world i.e. with http and https protocols then you create an ingress and it exposes a service. The service is connected to the pods.
The ingress is exposed to the outside world using http and https. So this means Ingress will serve your app when the Ingress IP is called on the browser.
Check the below image where I tried to explain this working.
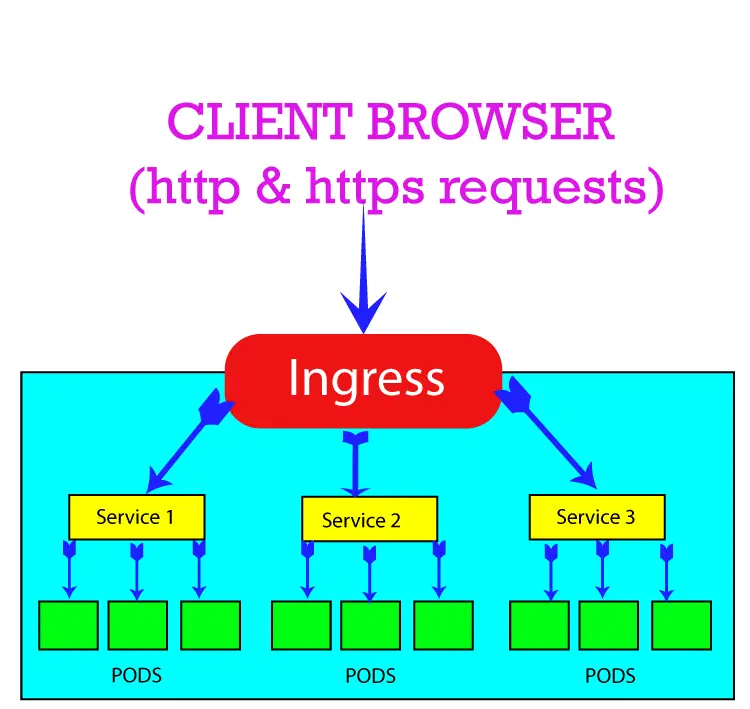
A question arises why use Ingress when the Service is exposing the Pod to HTTP and HTTPS routes? The answer is that Ingress sits in front of multiple services and act as a “smart router” or entrypoint into your cluster. So, an Ingress can control multiple services and this reduces complexities. In production you should use Ingress for exposing your app to HTTP and HTTPS routes, you should not expose your service like what I did in the previous tutorial.
In order for the Ingress to work, your kubernetes cluster must have an Ingress Controller running. The work of the Ingress Controller is to see the incoming requests and pass them on to the respective Ingress. There are lots of Ingress Controllers, see this link for various types of Ingress Controllers. I will be using ingress-nginx as their are number of reasons to do it:
- 1. It is developed by the Kubernetes core team and is most popular.
- 2. It is a complete package and works perfectly.
Just run the following command to install Ingress-Nginx Controller.
kubectl apply -f https://raw.githubusercontent.com/kubernetes/ingress-nginx/controller-v1.8.2/deploy/static/provider/cloud/deploy.yaml
Check Ingress-Nginx Controller installation guide here.
ASP.NET Core Kubernetes Ingress Example
Let us create an Ingress for my ASP.NET Core app. Note that I have already created a deployment and service for my ASP.NET Core MVC App in my previous tutorial. Kindly check that tutorial if you haven’t done so, link is here.
Now I will create an Ingress which will expose the HTTP and HTTPS routes from outside the cluster to the service. Once the Ingress is created, I will be able to access my ASP.NET Core app by opening the Ingress IP address on the browser.
So, add the below Ingress on a yaml file. I named the file as myingress.yaml.
apiVersion: networking.k8s.io/v1
kind: Ingress
metadata:
  name: first-ingress
  annotations:
    nginx.ingress.kubernetes.io/rewrite-target: /
spec:
  ingressClassName: nginx
  rules:
  - http:
      paths:
      - path: /
        pathType: Prefix
        backend:
          service:
            name: first-service
            port:
              number: 9999
The Ingress code is very simple so let us go through them.
The api version of the Ingress should be networking.k8s.io/v1 and kind should be specified as Ingress.
apiVersion: networking.k8s.io/v1
kind: IngressNext, there is a metadata field where the name of the Ingress is given as first-ingress. You can name this Ingress anything which you like.
metadata:
  name: first-ingress
  annotations:
    nginx.ingress.kubernetes.io/rewrite-target: /
Next, there is an annotations field which controls the URL rewriting. The field nginx.ingress.kubernetes.io/rewrite-target targets the URI where the traffic must be redirected. I have given it the value of forward slash (“/”). So this means incase of a URI match the URI will be rewritten to /. I will tell how the URI match is done in just a moment.
Take 3 example given below:
/apple
/jack/proper
/wave/sea/ocean
Suppose there is a URI match for all of these 3, then they will be rewritten as:
/
/
/
If I change it to /api:
nginx.ingress.kubernetes.io/rewrite-target: /apiThen these 3 URI will be rewritten as:
/api
/api
/apiThen comes the spec section which has all the information needed to configure the Ingress. I have shown it below.
spec:
  ingressClassName: nginx
  rules:
  - http:
      paths:
      - path: /
        pathType: Prefix
        backend:
          service:
            name: first-service
            port:
              number: 9999
It defines rules for matching URI. The field ingressClassName: nginx is used to reference the name of the Ingress controller that should implement the Ingress. Next, see the paths fields that defines “path” to be matched. In the annotations section above, I explained how the matching of URI is done, now you must have understood how this matching is performed.
I have given – path: / field, the “/” specifies all paths will be matched. If I would have given “apple” then all paths starting with apple will be matched, some of them are:
/apple
/apple/jack
/apple/jones/cricket?pg=4
etc..
To match more than one paths, you can add a new path section like shown highlighted in the below code:
spec:
  ingressClassName: nginx
  rules:
  - http:
      paths:
      - path: /
        pathType: Prefix
        backend:
          service:
            name: first-service
            port:
              number: 9999
      - path: /api
        pathType: Prefix
        backend:
          service:
            name: second-service
            port:
              number: 9999
Notice when the path is /api then I am targeting it with another service which is second-service. I will come to the service section in a moment.
There is a pathType field, each path is required to have a path type. The pathType can have 2 main values:
- Exact : Matches the URL path exactly and with case sensitivity.
- Prefix : Matching is done so that the URL should start with the value specified in the path field i.e. the URL should be prefixed with the value specified in the path field
Some examples of Prefix path type are:
| Path value | URL | Match result |
|---|---|---|
| / | all paths | Yes |
| /foo | /foo | Yes |
| /foo | /foo/bar | Yes |
| /foo | /bar | No |
| /foo | /foo/ | No |
| /foo | /foos | No |
| /foo/apple | /foo/apple | Yes |
| /foo/apple | /foo/bar | No |
| /foo/apple | /foo/apple/jack | Yes |
Dynamic Annotations and Path
I did not define how to make dynamic annotations before as it require you to understand the working of path field.
Now I will explain how annotations and paths can be made dynamic using regular expression. See the below Ingress yaml file and note the highlighted lines:
apiVersion: networking.k8s.io/v1
kind: Ingress
metadata:
  name: first-ingress
  annotations:
    nginx.ingress.kubernetes.io/rewrite-target: /$2
spec:
  ingressClassName: nginx
  rules:
  - http:
      paths:
      - path: /aspnetcore(/|$)(.*)
        pathType: Prefix
        backend:
          service:
            name: first-service
            port:
              number: 9999
Here $2 in nginx.ingress.kubernetes.io/rewrite-target means any characters captured by (.*) given on the path field – path: /something(/|$)(.*) will be assigned to the placeholder $2.
This means (.*) forms the 2nd segment or 2nd position in the URI. Let us understand how it happens.
The URI segments given by the “path” field are as follows.
- a. /aspnetcore forms the 0th segment.
- b. (/|$) forms the 1st segment.
- c. (.*) forms the 2nd segment.
See some examples that help you to understand the result:
- /aspnetcore rewrites to / as no segment is there on 2nd position.
- /aspnetcore/ rewrites to / as no segment is there on 2nd position. The last “/” on the “/aspnetcore/” is 1st segment.
- /aspnetcore/yogihosting rewrites to /yogihosting as “yogihosting” is 2nd segment of the URI.
The backend field specifies the K8S Service and the service port number to be targeted. This means HTTP (and HTTPS) requests to the Ingress are sent to the listed backend. So the service called first-service is targeted by the Ingress.
backend:
  service:
    name: first-service
    port:
      number: 9999
The Port number, here 9999, should be the same port given on the service yaml file.
On my last tutorial I created the Service with the YAML file which is given below. I have highlighted it’s port number which is 9999 and this is the one which the Ingress is targeting.
apiVersion: v1
kind: Service
metadata:
  name: first-service
spec:
  type: NodePort
  selector:
    component: web
  ports:
    - port: 9999
      targetPort: 8080
Ingress “host” field
The host field is an options field. If present it requires that the HTTP host header matches the host field value.
If not specified then the matching rules specified in the Ingress will be applied to all inbound HTTP traffic.
Take for example in the below YAML file of the Ingress I have applied the – host: “yogihosting.com”. So the Ingress will only match requests where the host is yogihosting.com. In simple terms it means the domain should be yogihosting.com.
apiVersion: networking.k8s.io/v1
kind: Ingress
metadata:
  name: first-ingress
  annotations:
    nginx.ingress.kubernetes.io/rewrite-target: /
spec:
  ingressClassName: nginx
  rules:
  - host: "yogihosting.com"
    http:
      paths:
      - path: /
        pathType: Prefix
        backend:
          service:
            name: first-service
            port:
              number: 9999
In the same way more and one host field can be applied. Check the highlighted below code which has another host field targeting another domain.
apiVersion: networking.k8s.io/v1
kind: Ingress
metadata:
  name: first-ingress
  annotations:
    nginx.ingress.kubernetes.io/rewrite-target: /
spec:
  ingressClassName: nginx
  rules:
  - host: "yogihosting.com"
    http:
      paths:
      - path: /
        pathType: Prefix
        backend:
          service:
            name: first-service
            port:
              number: 9999
  - host: "api-yogi.com"
    http:
      paths:
      - path: /api
        pathType: Prefix
        backend:
          service:
            name: second-service
            port:
              number: 9999
Hostname wildcards
You can apply wildcard i.e. (* character) for matching. It requires 2 things:
- 1. “host” should be equal to the suffix of the wildcard rule.
- 2. wildcard only covers a single DNS label.
| Host Value | Request for | Match result |
|---|---|---|
| *.example.com | bar.example.com | Yes |
| *.example.com | roo.bar.example.com | No, wildcard covers only single DNS label |
| *.example.com | example.com | No, wildcard covers only single DNS label. |
| *.example.com | somedomain.com | No, host is not same as the suffix of the wildcard rule |
A simple example is given below.
apiVersion: networking.k8s.io/v1
kind: Ingress
metadata:
  name: first-ingress
  annotations:
    nginx.ingress.kubernetes.io/rewrite-target: /
spec:
  ingressClassName: nginx
  rules:
  - host: "*.yogihosting.com"
    http:
      paths:
      - path: /
        pathType: Prefix
        backend:
          service:
            name: first-service
            port:
              number: 9999
Applying Ingress
So now I will apply the Ingress Yaml file on my local k8s cluster. First in my command prompt, I go to the directory containing this YAML file and run the kubectl apply.
kubectl apply -f myingress.yaml
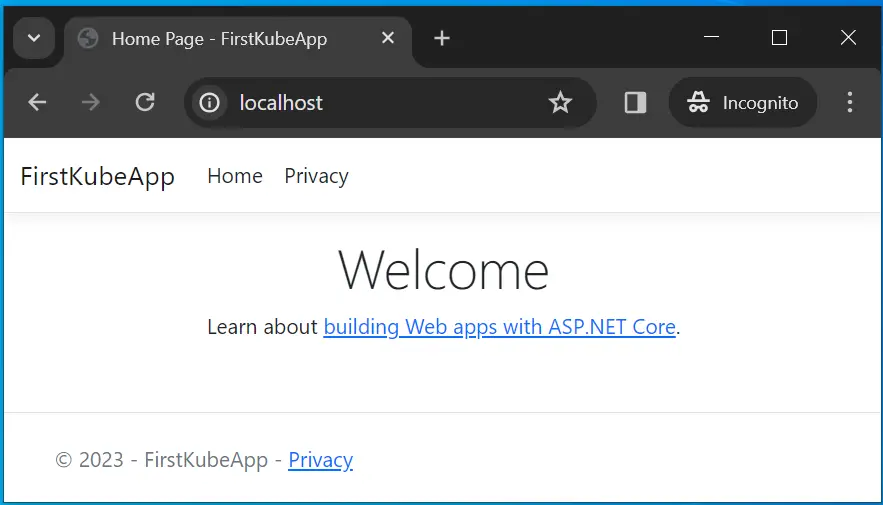
Next, run the kubectl get ingress command which will show the Ingress on my cluster. I have shown the output of this command in the below image. The ingress first-ingress is shown with an Address which in my case is localhost and port 80.

You can copy this address and paste it on your browser. This will open your app. The address in my case is http://localhost:80.
DefaultBackend
You can specify a DefaultBackend field which will be applied if none of the hosts or paths match the HTTP request in the Ingress objects. See the below Ingress yaml file of an Ingress called some-ingress which has a DefaultBackend. This default backend exposes a service called some-service in case of no match for the HTTP request.
apiVersion: networking.k8s.io/v1
kind: Ingress
metadata:
  name: some-ingress
spec:
  defaultBackend:
    service:
      name: some-service
      port:
        number: 80
Types of Ingress
There are 4 types of Ingress:
- 1. Ingress backed by a single Service
- 2. Simple fanout
- 3. Name based virtual hosting
- 4. TLS
Ingress backed by a single Service
In this type of Ingress only a single Service is exposed by the Ingress. The Ingress which we just created for our ASP.NET Core app is an example of this type.
Also, the example of the ingress given in the DefaultBackend section is also the example of this type of Ingress.
Simple fanout
In Simple fanout Ingress there is one host in the Ingress and the Ingress exposes multiple services. In the example of the Ingress shown below there is one host called yogihosting.com, the ingress exposes 2 services based on different paths. These 2 services are:
- a. news-service
- b. api-service
I have highlighted the fields of the Ingress which makes it a Simple Fanout type.
apiVersion: networking.k8s.io/v1
kind: Ingress
metadata:
  name: fanout-example
spec:
  ingressClassName: nginx
  rules:
  - host: yogihosting.com
    http:
      paths:
      - path: /news
        pathType: Prefix
        backend:
          service:
            name: news-service
            port:
              number: 4200
      - path: /api
        pathType: Prefix
        backend:
          service:
            name: api-service
            port:
              number: 8080
Name based virtual hosting
In this Ingress there can be multiple hosts but the condition is that their IP address should be same. Check the below example where the Ingress has 2 hosts – example1.com and example2.com.
Both example1.com and example2.com should have the same IP address. So in this type of Ingress there are more than one host fields.
apiVersion: networking.k8s.io/v1
kind: Ingress
metadata:
  name: name-virtual-host-example
spec:
  ingressClassName: nginx
  rules:
  - host: example1.com
    http:
      paths:
      - pathType: Prefix
        path: "/"
        backend:
          service:
            name: service1
            port:
              number: 80
  - host: example2.com
    http:
      paths:
      - pathType: Prefix
        path: "/"
        backend:
          service:
            name: service2
            port:
              number: 80
TLS
Ingress which are secured by TLS certificates comes under the TLS Ingress types. Kubernetes Secrets let you store and manage sensitive information, such as passwords, OAuth tokens, and ssh keys.
I have crt and key files for my TLS certificate, so first I create TLS Secret using kubectl by running the below command. Note that this command should be run from the directory containing the TLS files.
kubectl create secret tls myssl --cert s.crt --key s.keyK8S Secret by the name of myssl is cretead. Now I secure my Ingress by applying tls section. In this section I provide secretName field with the value myssl.
apiVersion: networking.k8s.io/v1
kind: Ingress
metadata:
  name: tls-example-ingress
  annotations:
    nginx.ingress.kubernetes.io/rewrite-target: /
    nginx.ingress.kubernetes.io/force-ssl-redirect: "true"
    nginx.ingress.kubernetes.io/ssl-redirect: "true"
spec:
  ingressClassName: nginx
  tls:
    - secretName: myssl
      hosts:
        - yogihosting.com
  rules:
  - host: yogihosting.com
    http:
      paths:
      - path: /
        pathType: Prefix
        backend:
          service:
            name: first-service
            port:
              number: 9999
We should also provide redirection from http to https in the ingress itself for this I have added the 2 code lines:
nginx.ingress.kubernetes.io/force-ssl-redirect: "true"
nginx.ingress.kubernetes.io/ssl-redirect: "true"Once we are using a TLS backed Ingress where redirections from HTTP to HTTPS are done then their is no need for configuring HTTPS on the ASP.NET Core app. We can “un-check” the option Configure for HTTPS during the creation of the app.
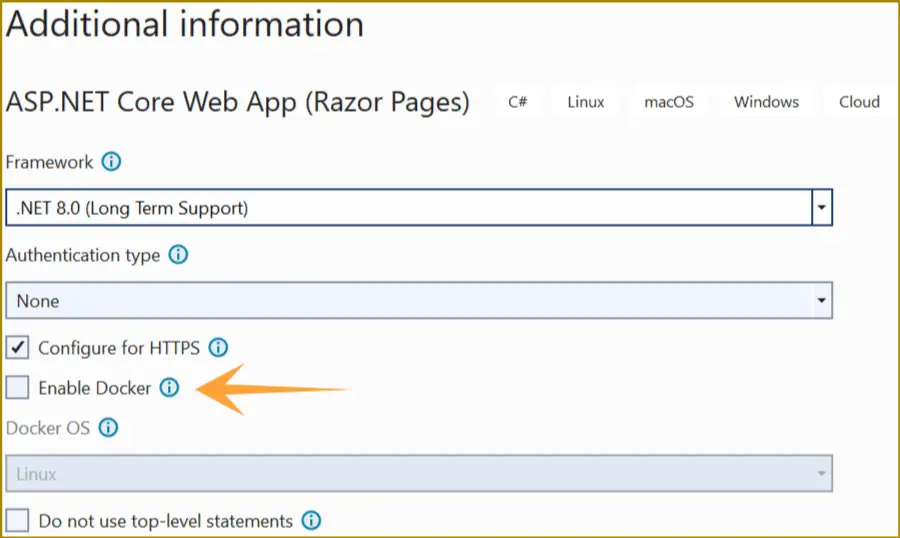
Similarly we don’t have to apply ssl during docker run command when creating container as we did on this tutorial.
Updating & Deleting Ingress
To update an Ingress change it’s YAML configuration file then apply the new changes with the kubectl apply -f command.
The name of my ingress file is myingress.yaml so the command would be:
kubectl apply -f myingress.yamlTo delete the ingress the command is:
Kubectl delete -f myingress.yaml We can also delete an ingress with it’s name.
kubectl delete ingress ingressnameDownload the source codes.
I hoped you liked this tutorial on Kubernetes Ingress. You are now ready to deploy your ASP.NET Core app on Kubernetes and expose it on HTTP with Ingress. If you like this tutorial then please share it with your friends on social community websites. Thank you.





 Welcome to YogiHosting - A Programming Tutorial Website. It is used by millions of people around the world to learn and explore about ASP.NET Core, Blazor, jQuery, JavaScript, Docker, Kubernetes and other topics.