Create first ASP.NET Core App in a Docker Container

In this ASP.NET Core Docker article we will create our first ASP.NET Core App running from a Docker Container. We will do all this from the very beginning so it will be a good learning experience for you. We will also go through the installation of Docker in Windows, MacOS and Linus, and will also learn some of the most needed Docker commands which you need to know as an ASP.NET Core developer.
Page Contents
This tutorial is a part of ASP.NET Core apps on Docker series.
- 1. Create first ASP.NET Core App in a Docker Container
- 2. Deploy a Docker based ASP.NET Core app to Azure
- 3. ASP.NET Core APP with HTTPS in Docker
- 4. Multi-Container ASP.NET Core App with Docker Compose
- 5. CRUD Operations in ASP.NET Core and SQL Server with Docker
- 6. Docker Volumes on ASP.NET Core App
- 7. Configuring Nginx as Reverse Proxy and Load Balancer for Dockerized ASP.NET Core apps
- 8. Deploy ASP.NET Core Dockerized app to Azure with GitHub Actions CI / CD
Installing Docker in Windows, Mac, Linux
For any Operating System, you can install Docker Desktop. Docker desktop includes everything you need to create and deploy apps on docker containers.
Installing in Linux can also be done from sudo commands.
Kindly visit the docker link page to know which sudo commands to run if you are in Linux.
After installation of docker desktop you will see the docker desktop icon in the taskbar. This is shown in the below image.
![]()
Windows and WSL 2
For Windows users, they will need to have WSL 2 known as Windows Subsystem for Linux. Don’t worry docker will install it for you during the installation process.
Moreove,r you can also do WSL 2 installation by yourself and choose a linux version like UBUNTU, Debian, Kali, etc. Check the installation process at here.
I am using “Windows 10 Home edition” on my laptop and Docker works smoothly without any issues. I have created all types of docker project from my laptop so just ignore if someone tells you that dockers don’t work in Windows 10 Home.
It is time to run the docker version command and check if docker is working properly or not. So open command prompt (CMD) if you are in windows, terminal if you are in Mac or Linux then run the following given below command on it and press enter:
docker versionIt will show you the docker client and server versions installed in your pc. I have shown below the screenshot of my command prompt window.

Docker was original built for Linux operation system. Linux itself is a very popular operation system so Microsoft developed WSL 2 which is a compatibility layer for running Linux binary executables natively on Windows.
In short WSL 2 helps Docker to run in Windows.
Install Hyper-V on Windows 10 Professional and Enterprise editions
Hyper-V is a Microsoft technology for creating virtual machines, and run and manage multiple operating systems on a single physical server. Note that Hyper-V is not there in Home edition so if you are a Home user then simply skip this part.
If you are using other windows versions then you can enable Hyper-V. See this link to know how to do it.
Alright, so what’s the use of Hyper-V in Docker?
Dockers provides 2 types of containers – Windows & Linux. With WSL 2 you can create Linux containers in docker while with Hyper-V you can create Windows containers in docker. So, this means in Windows Professional and Enterprise (provided you have Hyper-V enabled), you can create both Linux and Windows containers in docker.
If you are using Home edition like myself then you can only create Linux containers in docker.
Selecting a container type in docker desktop is quite easy, right click the docker desktop icon in the task bar and select the option that says – Switch to Linux containers or Switch to Windows containers. Again, if you are using Window 10 Home (like myself) then you don’t have to do anything as Linux containers will automatically be selected while Switch to Windows containers will be disabled/greyed.
I strongly suggest you to use Linux containers in docker as these containers can also run-on Windows OS. Windows containers, on the other hand, will not run in Linux OS. All my codes in this tutorial and the others are made on Linux containers of docker. So don’t be afraid to try it.

Important Docker commands for an ASP.NET Core developer
Let us now quickly go through some of the important docker commands that we will be using for the sake of this tutorial.
Docker commands for managing Containers
Run the docker ps on the command prompt and it will show all the running containers in your docker environment, along with their details like their container id (which is a random 15 characters long), Image which is contained by the containers, the Command which tells what the docker container is executing in the image, status, creating time and so on. I have shown the output of the docker ps command in the below image, you can see 3 containers are running in my docker environment.

Since you will be running this command the first time so you will not be seeing any container names.
Containers can be either in running state or in Exited state. So, in order to see all the containers (running + exited) you need to add --all to the docker ps command.
docker ps --all You can also see all the containers in your docker desktop. Open the docker desktop and click the left side section Containers / Apps to see all the containers. Running containers will be shown in green color while the exited once will be shown in grey color.

Docker containers are created with the following command:
docker create --name containername imagenameHere “containername” is the name you want to give to the container, “imagename” is the name of the image present in your local docker environment that you want to run from the container. Since you are not having an image to be run inside the container therefore running this command right now will give you an error saying no image is present with a given name.
I will be creating a docker image for our ASP.NET Core app in just a moment. There you will see how this command works.
Once a container is created then you need to start it (i.e. change it’s state to running), which can be done by the following command:
docker start containernameYou can stop a running container by using the stop command:
docker stop containernameThe docker run command is a single command that creates a new container and runs it. The following run command creates a new container by the name “mycontainer” and having an image “myimage” and also runs it.
docker run --name mycontainer myimageThe -p option can be added to “run” command to bind the port of the container with the host port. For example, the following command will run a container with an image called “myimage” so that the container port 8080 is bind to the port 5000 of the host:
docker run --name mycontainer -p 5000:8080 myimageLets understand what I mean by it. Suppose if the image called “myimage” contains an ASP.NET Core App then you will be able to access it by calling the url – http://localhost:5000 on the browser. Here 8080 is the app port and 5000 is the host port. We are opening 5000 port on the browser and straightway 8080 port of the app is called and our app opens in the browser.
A container can be deleted by running docker rm command. This will delete a container and free its storage on the hard disk. The following given command will delete a container by the name of testc.
docker rm testcAlso note that all the stopped contains can be deleted by a single command which is:
docker container pruneAnother way to run, stop and delete docker containers is from the docker desktop. See the below image.

You can also see the logs of the containers for debugging purpose. The following command shows the logs of a container with an id “ca0cdb8201ff”.
docker logs ca0cdb8201ffDocker commands for managing Images
Docker images are built with the help of Dockerfile which is a text-based file containing instructions to assemble an image. I will discuss more on Dockerfile when we will create ASP.NET Core app, so kindly wait for it.
Docker has many commands to manage images, let us discuss some important once.
The following command will list all the docker images.
docker image lsThe below given screenshot shows the images in my docker environment.

If you run this command in your command prompt now then you will probably see no image as there aren’t any images in your docker environment. I will create image for an ASP.NET Core app in just a moment.
A docker image is built from the Dockerfile by using the build command. See the below build command.
docker build -t myimage -f Dockerfile .This will create an image called myimage from the Dockerfile. Notice the “.” sign at the very end which specifies to use the current folder to find a Dockerfile. So to run this command make sure you go to the folder of the Dockerfile by using “cd” command in command prompt.
The flag “-t” is used to name and and optionally tag it in the ‘name:tag’ format. We can also write the same build command as:
docker build -t myimage:v1 -f Dockerfile .Here v1 is the version of the image. You can tag the image with anything like.
docker build -t myimage:x -f Dockerfile .
docker build -t myimage:y -f Dockerfile .
docker build -t myimage:latest -f Dockerfile .
The “-f” is used to specify the Dockerfile. By default, docker will look for Dockerfile that has the name as “Dockerfile”. So, you can write the above build command simply without the -f as:
docker build -t myimage:v1 .Notice the “.” at the end, it tells docker server to look for Dockerfile file on the current location.
If your Dockerfile has some other name then your command will look like:
docker build -t myimage:x -f mydoc .
Here mydoc is the name of my Dockerfile.
The pull command pulls an image or a repository from a registry. The default registry is docker hub. There is a hello world image given in docker hub, check it’s link. Now let us pull this image to our local system.
Run the following pull command to pull hello world image from docker hub.
docker pull hello-worldThe image will be pulled in a few seconds time and you will see it’s digest and status, check screenshot below.

Next, run the docker image ls command which will show you this image name on the list.
You can also push an image to the docker hub by using the push command. The below command push “myimage” to the docker hub.
docker push myimage
Note – you will need to have an account on docker hub website for this. It is totally free so you must do it.
The docker image rm command removes an image from your local environment. The following command will remove “hello-world” image from our system.
docker image rm hello-worldYou can remove all unused images from your system by the docker image prune command.
docker image pruneEnough of these commands, let’s now implement them on an ASP.NET Core Docker based app.
ASP.NET Core Docker Example
First open Visual Studio and create a new ASP.NET Core Web App (Model-View-Controller).
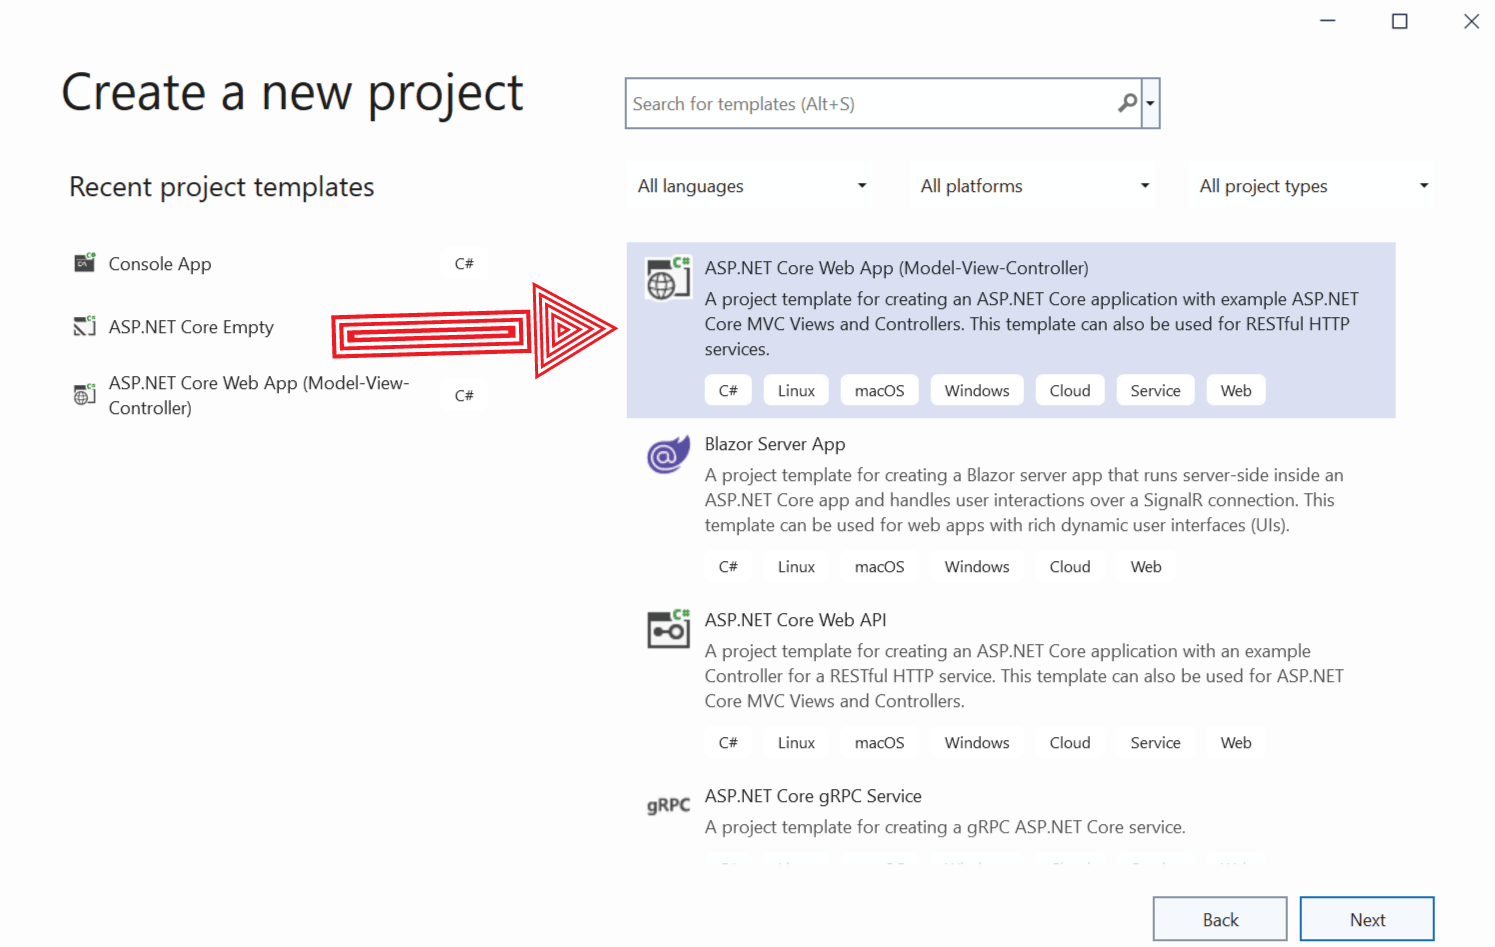
Give your app the name FirstDockerApp, and make sure to check the option that says – Place solution and project in the same directory. This is important since this helps docker to access all the app’s files and folders correctly.

Click the Next button and then on the next screen select the latest version of DOT NET which is .NET 10.0.

There is also Enable container support option which adds Docker support to the app. Keep it unchecked since I would demonstrate this option later on.
Click the Create button to create the app. We will now add Dockerfile to the app.
ASP.NET Core Docker Dockerfile
A Dockerfile is a text based file but having no extension. It contains instructions to assemble a Docker image. In Visual Studio you can create Dockerfile effortlessly by right clicking the app name in the solution explorer then select Add ➤ Container Support option.

Next, you will see a new Container Scaffolding Options dialog that requires you to select the target OS from Windows or Linux, container build type, distro and so on. Make sure you select Linux and Dockerfile. For distro you can select any one of your choice like Ubuntu, Debian, Kali. Keep Container Build Context as it is.

You can select any OS but note that Linux OS is excellent. Click the OK button and your Dockerfile will be created on the root of the app.

When Visual Studio creates Dockerfile it does a couple of things in the background:
- Checks if Docker desktop is installed and running.
- Pulls the images of ASP.NET Core and Dot NET SDK from the Microsoft Container Registry (MCR). These images are needed for our app to run in the container.
- Builds our app image, this image name will be “firstdockerapp” since this is the name of the app which we have chosen.
- Creates a container called “FirstDockerApp” for the image.
You can see all the logs of these operations in the output window of VS. This window can be opened from View ➤ Output menu of VS. See the below screenshot of my output window.

Just read it and you will find the docker build and docker run commands. This means VS had done 2 important things:
1. Built the image for our app, it is named as “firstdockerapp”. You can see this image in the docker desktop. I have shown this in the below image:

2. Created and ran a container for this image. This container name is “FirstDockerApp”. You can verify this container to be running in docker desktop. See below image:

ASP.NET Core Dockerfile structure
The Dockerfile which is created has the following code:
# See https://aka.ms/customizecontainer to learn how to customize your debug container and how Visual Studio uses this Dockerfile to build your images for faster debugging.

# This stage is used when running from VS in fast mode (Default for Debug configuration)
FROM mcr.microsoft.com/dotnet/aspnet:10.0 AS base
USER $APP_UID
WORKDIR /app
EXPOSE 8080
EXPOSE 8081

# This stage is used to build the service project
FROM mcr.microsoft.com/dotnet/sdk:10.0 AS build
ARG BUILD_CONFIGURATION=Release
WORKDIR /src
COPY ["FirstDockerApp.csproj", "."]
RUN dotnet restore "./FirstDockerApp.csproj"
COPY . .
WORKDIR "/src/."
RUN dotnet build "./FirstDockerApp.csproj" -c $BUILD_CONFIGURATION -o /app/build

# This stage is used to publish the service project to be copied to the final stage
FROM build AS publish
ARG BUILD_CONFIGURATION=Release
RUN dotnet publish "./FirstDockerApp.csproj" -c $BUILD_CONFIGURATION -o /app/publish /p:UseAppHost=false

# This stage is used in production or when running from VS in regular mode (Default when not using the Debug configuration)
FROM base AS final
WORKDIR /app
COPY --from=publish /app/publish .
ENTRYPOINT ["dotnet", "FirstDockerApp.dll"]
A Dockerfile tells how to build an image for our ASP.NET Core app. It contains instructions in stages, here there are 4 stages. Each instruction creates a layer on the docker image. A Docker image is built up in layers which makes it lightweight and fast in execution. First a base image is chosen that contains the elements that are needed, and then the app is copied on top of it. There can be any number of stages and it is totally up to you to decide how many stages we are going to create. Microsoft has used 4 stages which are given on the Dockerfile.
The first 5 lines of the Dockerfile creates a base stage.
# This stage is used when running from VS in fast mode (Default for Debug configuration)
FROM mcr.microsoft.com/dotnet/aspnet:10.0 AS base
USER $APP_UID
WORKDIR /app
EXPOSE 8080
EXPOSE 8081
First the base runtime image of ASPNET Version 10.0 is copied from Microsoft Container Registry (mcr). Runtime version is very small compared to SDK version since it is only for running app. So this will make the image lightweight. It is shown below.
FROM mcr.microsoft.com/dotnet/aspnet:10.0 AS baseThe “AS base” is used to name this stage “base”. This name can be used in subsequent FROM instructions to refer it.
Next, we have.
USER $APP_UIDThe USER $APP_UID instruction in a Dockerfile is a security best practice used to switch the container’s running user from root to a non-root user. Note that root is a user in Linux having maximum privilege.
Next, see how WORKDIR instruction is used to set the current working directory inside the image. Inside this working direction, the docker commands will be executed. This directory is set as app.
WORKDIR /appThe EXPOSE instruction tells that the container listens on the specified network ports at runtime. This means the container will be accessible from the specified ports.
Here ports 8080 and 8081 are exposed.
EXPOSE 8080
EXPOSE 8081
The protocol can also be specified like TCP or UDP, the default is TCP and does not needs to be specified. If you want to specify UDP protocol then do it this way:
EXPOSE 8080/udp
The second stage contains the following codes:
# This stage is used to build the service project
FROM mcr.microsoft.com/dotnet/sdk:10.0 AS build
ARG BUILD_CONFIGURATION=Release
WORKDIR /src
COPY ["FirstDockerApp.csproj", "."]
RUN dotnet restore "./FirstDockerApp.csproj"
COPY . .
WORKDIR "/src/."
RUN dotnet build "./FirstDockerApp.csproj" -c $BUILD_CONFIGURATION -o /app/build
Now in the 2nd stage a reference to the .NET SDK image version 10 is made – FROM mcr.microsoft.com/dotnet/sdk:10.0 AS build and named it as “build” – AS build, and also set the build configuration to Release. SDK image is large since it contains compilers, libraries and tools used to build the .NET apps. Here we will restore and build the app so we need the SDK version.
Next, working directory inside the image is set to src.
WORKDIR /srcAfter this FirstDockerApp.csproj is copied from the local directory where the app is, to inside of the src directory of the image. The COPY instruction is used to do this task. It contains 2 parameters – first is the source location and other is the destination on the image.
COPY ["FirstDockerApp.csproj", "."]The FirstDockerApp.csproj location on the image will be src/FirstDockerApp.csproj.
In the next line the dotnet restore command is run to restore dependencies of the app. Note that this command runs inside the image and all the dependencies specified in the csproj file are restored in the image. The NuGet package manager is used to restore these dependencies inside the image in the working directory (src).
RUN dotnet restore "./FirstDockerApp.csproj"See – ./FirstDockerApp.csproj, it has a “.” on the first place. It tells to see the current working directory which is “src”.
Next, with the COPY . . instruction (which has 2 dots).
The first dot says to copy from the source which is on local drive. The second dot says to copy to the current directory of the image.
Remember, the working directory is set to be “src”, so with this command, all the files will be copied to the “src” directory of the container.
After that the work directory is set to src.
WORKDIR "/src/."And then performed the dotnet build operation which will build the .NET app’s image.
RUN dotnet build "./FirstDockerApp.csproj" -c $BUILD_CONFIGURATION -o /app/build
The -c $BUILD_CONFIGURATION -o /app/build instruction tells 2 things:
- 1. Set the build configuration to Release as $BUILD_CONFIGURATION environment variable value is set to Release previously. This is done with the -c flag.
- 2. The built binaries of the app should be placed to app/build folder in the image. This is done with the -o flag.
In this stage the app is published and it’s dependencies to a folder in the image for deployment to a container. This folder is specified as app/publish inside the image. See the “-o” flag on the publish command. Note the publish command will run from inside the working directory on the image which is previously set as “src”.
Here the “build” stage (which is the second stage) is referred and given name “publish”, and then performed the app’s publishing. This simplifies the creation of the image by a great deal.
# This stage is used to publish the service project to be copied to the final stage
FROM build AS publish
ARG BUILD_CONFIGURATION=Release
RUN dotnet publish "./FirstDockerApp.csproj" -c $BUILD_CONFIGURATION -o /app/publish /p:UseAppHost=false
Setting the .NET UseAppHost property to false /p:UseAppHost=false disables the creation of a platform-specific executable of the app during the build or publish process, producing only a portable, platform-independent .dll file
The fourth stage code is given below:
# This stage is used in production or when running from VS in regular mode (Default when not using the Debug configuration)
FROM base AS final
WORKDIR /app
COPY --from=publish /app/publish .
ENTRYPOINT ["dotnet", "FirstDockerApp.dll"]
In this stage the final image is build from the previous stages.
A reference to the “base” stage (which is 1st stage) by using FROM base instruction.
FROM base AS finalThen setting the working directory inside the image to “app”.
WORKDIR /appNext is the COPY instruction.
COPY --from=publish /app/publish .The COPY accepts a flag --from= that can be used to refer to a previous build stage (here the publish stage), and then copy instruction, /app/publish, copies folder from this stage to the current working directory of the container. The current working directory which is set in the previous line is “app”.
The --from flag is very helpful since we already published the app (in another stage), and in this stage (which will build the image) should contain the compiled files from the previous stage.
Finally, the ENTRYPOINT command is given to specify which executable should be run when a container is run from the docker image. Here we execute the FirstDockerApp.dll file.
ENTRYPOINT ["dotnet", "FirstDockerApp.dll"] Well, that’s all for the ASP.NET Core Dockerfile, we are now ready to build the .NET app’s image from the dockerfile.
.dockerignore
You will also see that a file called .dockerignore gets automatically created along with the Dockerfile. The .dockerignore file allows you to specify a pattern for files and folders that should be ignored by the Docker when building docker images.
You can see this file by clicking the arrow sign in the front of the Dockerfile.
Open the dockerignore file to find the following patterns.
**/.classpath
**/.dockerignore
**/.env
**/.git
**/.gitignore
**/.project
**/.settings
**/.toolstarget
**/.vs
**/.vscode
**/*.*proj.user
**/*.dbmdl
**/*.jfm
**/azds.yaml
**/bin
**/charts
**/docker-compose*
**/Dockerfile*
**/node_modules
**/npm-debug.log
**/obj
**/secrets.dev.yaml
**/values.dev.yaml
LICENSE
README.md
!**/.gitignore
!.git/HEAD
!.git/config
!.git/packed-refs
!.git/refs/heads/**
There are a number of patterns given per line.
The “**” means to match anything. So the **/.classpath will mean to ignore files that are of .classpath extension and residing anywhere in the app.
It will match the following paths for this file:
a.classpath
b.classpath
ab.classpath
a/some/xy.classpath
a/name.classpath
wwwroot/a/b/c/d/e.classpath
etc…
This ! pattern negates an ignore pattern, meaning any file or directory that matches this pattern will be included in the Docker build context. So !**/.gitignore will be included.
Running ASP.NET Core Dockerized app from Visual Studio
How do I Dockerize a .NET Core project? To Dockerize an ASP.NET Core App we need to add a Dockerfile to it through Visual Studio. Then Visual Studio will automatically creates a Docker Image and a Docker Container to run this image. We will also get a new Docker Run option on Visual Studio menu so that we can now run our app from inside a docker container instead of IIS Express.
Check the below image.

Now run your app and Visual Studio will run it inside a Docker Container. As soon as the app opens in the browser the VS opens a Container Window that shows the docker container where the app is running, docker images, logs of container and so on. These informations are very useful to debug if something went wrong in the container. See the below image where I have shown the screenshot of this container window.

My app opens at the URL – https://localhost:49165/. In your case port may be different. What visual studio does is that it connects with the Container’s exposed port and runs the app from there.
Publish command (-p) to bind Container’s port to the Host
The -p command can be added to “docker run” command to bind the port of the container with the host port.
Let us build a new image for our app using the Dockerfile. In your command prompt go to the directory of the dockerfile and run the below command.
docker build -t fda -f Dockerfile .This will create a new image called fda. I have shown this in the below given image:

Next run the following command to run a container and bind the container’s port 8080 to the 5001 port on the host.
docker run --name mycontainer -p 5001:8080 fda
Now go and open the url – http://localhost:5001/ in your browser and your app will open perfectly. I have shown this in the below image.

Docker Logs
To Fetch the logs of a container use any of the 2 docker logs command which are given below:
docker logs container-id
docker logs container-name
Let us see the container logs which is running our fda image. So first run the docker ps command which will show all the running containers.
docker psCopy the container id of the docker container running the fda image (which in my case is d302558bf826).

Then run the docker logs command for this container id.
docker logs d302558bf826The command will show you the logs for the container. See the below image which shown the logs of the container running “fda” image.

These logs are very helpful to check whether the container is working correctly or not. They help you to debug any problem that might be affecting the containers.
Bash Session in a Docker Container- “docker exec -it bash”
The docker container in our case has Linux Operating System. Suppose we want to run linux commands inside an existing container like ls command which will show you all the files and directories inside the container. In this case you use the docker exec command to start a bash session inside the container.
My container id is “d302558bf826” (run docker ps to get the container id). To start the bash session the command will be:
docker exec -it -u root d302558bf826 bashThen you will see a text – “root@d302558bf826:/app#”. So, run ls command which will show all the files and directories inside the docker container.
You can also move one directory up by cd .. and move inside a directory called app by cd app command.
Check the below image where I have shown this bash session.

Other command commands are:
clear – which clears the screen.
exit – exits out from the bash session.
In this Docker tutorial you learned how to create and run an ASP.NET Core app in Docker. I covered Dockerfile and created Docker Images for the app from it. Later I hosted the app from the Docker container and ran it form there without using Visual Studio. I hope you like this tutorial, kindly share it on facebook, twitter and linkedin.
We have launched Docker for .NET Developers – Complete Knowledge in Udemy, check it now – 
SHARE THIS ARTICLE
Related Tutorials:


ABOUT THE AUTHOR
I hope you enjoyed reading this tutorial. If it helped you then consider buying a cup of coffee for me. This will help me in writing more such good tutorials for the readers. Thank you.

HELLO EVERYONE
 Welcome to YogiHosting - A Programming Tutorial Website. It is used by millions of people around the world to learn and explore about ASP.NET Core, Blazor, jQuery, JavaScript, Docker, Kubernetes and other topics.
SUBSCRIBE TO NEWSLETTER
Enter your email address to subscribe to this blog and receive notifications of new posts by email.
Join 90K other subscribers